Sunday, 9 August 2015

Day 6 Creativity - a trip to Southwold


Today was the day to go to the seaside - the aim being to visit Norfolk and Suffolk Guild of Weavers, Spinners and Dyers Annual Exhibition. We couldn't have had a more beautiful day, sunny and very hot. It was lovely to see so many people enjoying themselves on the beach.
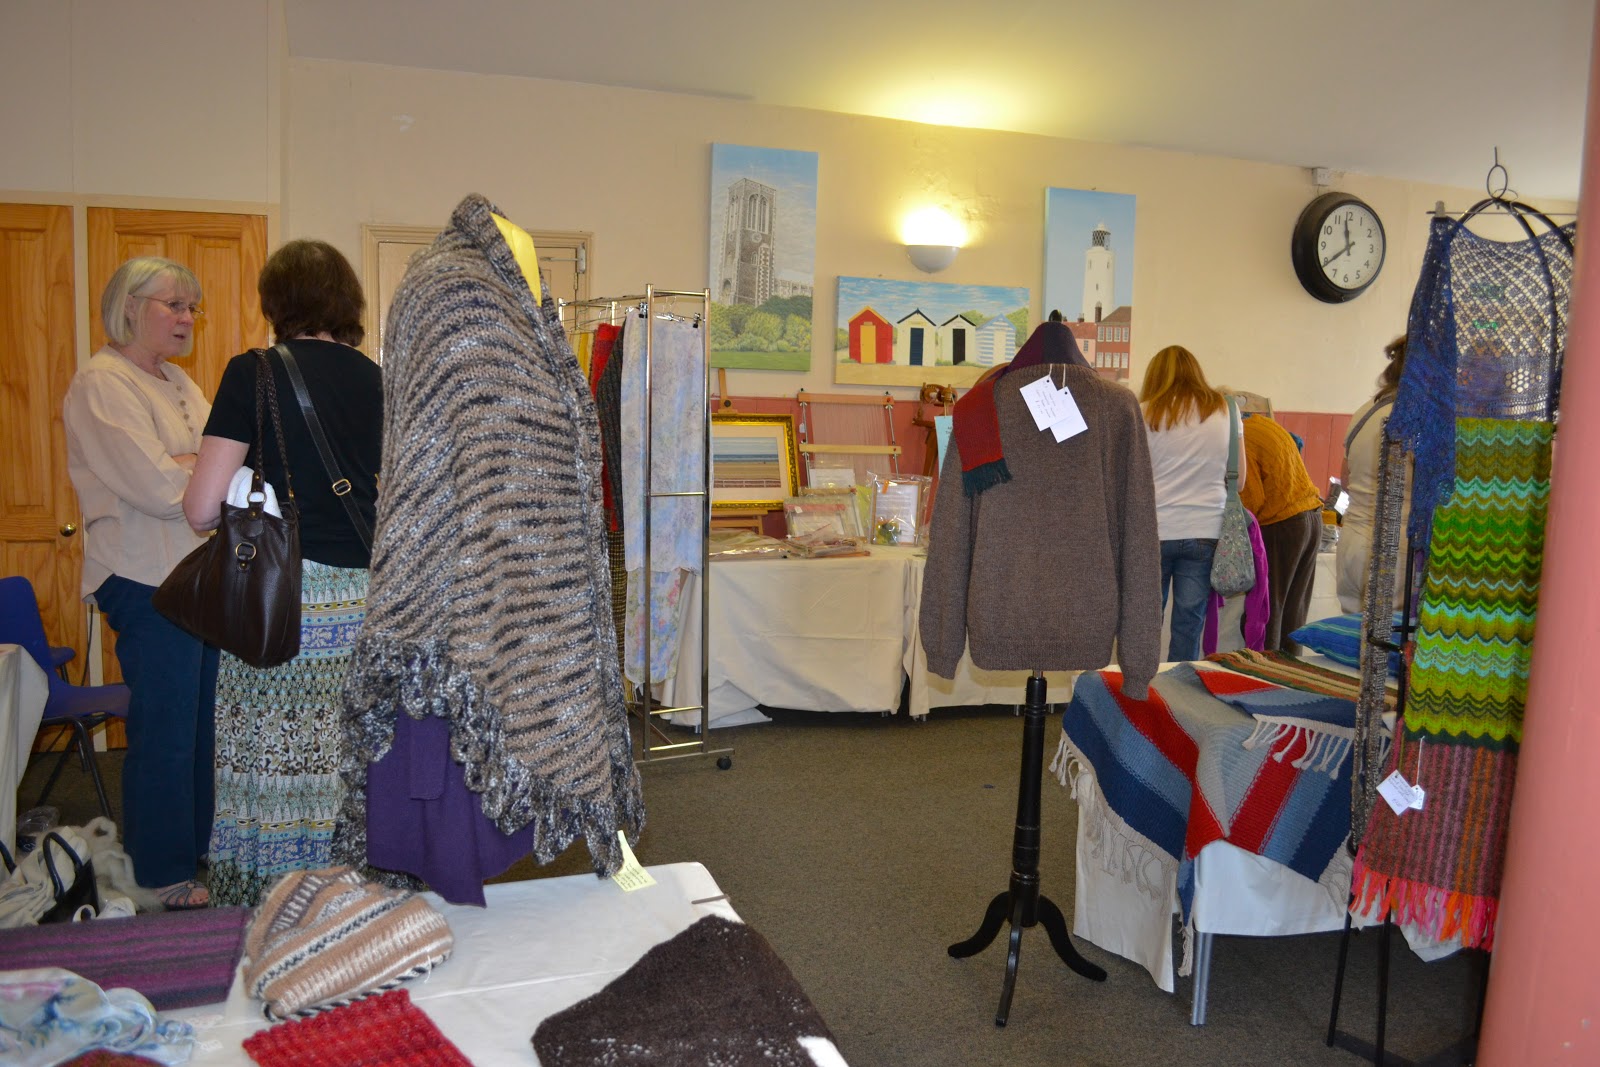
The exhibition was good - as always - and I wouldn't want to single out a single item. It's so good to see how creative it is possible to be with fibre and yarn. It was nice also to see interactive peg loom weaving and members spinning and particularly weaving on a 4 shaft floor loom. Besides the exhibits there was also equipment to buy too. I was particularly taken by the tapestry looms, 'made in any size you want' by a member's husband. It was great to talk to members who were stewarding the exhibition. It's a date (first week in August) to definitely put in the diary for next year and I hope to get to some of the meetings during the year too.

A general view of the exhibition


However, my  creativity day item for the day was found in a vintage shop! I can't every resist looking at old sewing patterns and today's find was a real gem.


It's very simple - I particularly like the sides! I have plenty of material in my stash that would be a good candidate for this so the brain is working out which to use.
I plan to use a fine wool material and wear with sleeves underneath, I was attracted to how the sleeve openings 'happen', I just like the simplicity of the design. As some of you know the pattern is big for me so more creativity will be needed in getting it to fit but should be OK using my body duplicate! But this project is one for the back burner for now - an early autumn project I think.

Thursday, 6 August 2015

Day 5 Creativity - what's not to love about Natural Dyeing


I decided that yesterday's post would be the last on Natural Dyeing for a while. However, today has seen such wonderful colours appear that I am not sticking to that.

I decided that I wanted to keep as much as I could of the meadowsweet dyeing so went for the fair isle yoked jumper option. I plan to do the traditional star and tree Shetland version if the stitches work out..... so I need main plus 5 colours. Last night I worked out a bit of a plan for the five colours, and this morning started on my quest. I may be tight for wool for the main part so decided to mordant 50 g more and dye that with madder as it will be a colour that will lift the meadowsweet colour and give me another 30 g for the main part of the jumper.

So this is what I have got by using additives:
Lighter green - iron
Darker green - more iron
Coral - madder on its own
Golden brown - madder over dyeing the meadowsweet
Bright gold - tin


(Apologies the skeins have not been re skeined so the washing ties are still in them, hope this is not too distracting)

This is what I just love, having decided on a colour range, using my local meadowsweet dyed yarn ( except in one case) I have a collection of gorgeous strong colours all by Natural Dyeing.

I will so enjoy making and wearing this jumper knowing that it is British Wool and dyed from meadowsweet a few hundred yards from my house. Of course, in addition the meadowsweet are due to be cut back as soon as the farmer is not harvesting the corn and has time to clear his ditches.

Quite a good example of sustainable textiles I think. All the waste dyestuff has gone on the garden to water the plants and the heated meadowsweet residue will be composted. The additives do contain metal salts but by careful calculation very little is left in the dyepot.

Now do I go and gather more meadowsweet and dye the rest of the other cone of cream yarn so I can weave the scarf I intended to do initially?

Wednesday, 5 August 2015

Day 4 Creativity - Dyeing with Meadowsweet- part two


This morning I decided to dry all 500 g worth of dyed skeins. This is to give me more time to decide on the project for them. Usually I leave the skeins wet when using additives.

So having changed my mind completely from the woven scarf in meadowsweet and meadowsweet and iron I am still thinking of a knitting project.

The skeins look like this :
The lighter one has tin additive
The dark green one has iron additive - rather a lot
The darker meadowsweet has copper additive.
The bigger skein ( background ) is meadowsweet on its own.
In real life the meadowsweet skein has a definite greeny tone to it.


Part of the reason for drying them was to compare the skeins. I dyed 2 lots of 200g and the the remaining 127 g with some handspun yarn with it - this was interesting and I'll explain further on.

I dyed one lot of 200g in an aluminium pan and one in an enamel pan but with EXACTLY 400 g of meadowsweet. The enamel pan took ages to get to boiling point and then I forgot it at lunch time so the yarn was in for quite a bit longer BUT the colours of both sets are identical. This amazes me. One might think the meadowsweet had reached its capacity for reacting with the dye. However, I think not as the separate 127 g is definitely a deeper dye. I weighed the total amount of yarn in the pot and doubled this for dyestuff so I think it must be due to the hand spun yarn not taking up so much of the dye for its mass compared to commercial yarn. I find this perfectly normal for all sorts of reasons. I also included a small sample of non scoured, non mordanted yarn to show how essential it is to scour yarn well and mordant thoroughly. This is the skein on the right. The odd skeins, ie the non commercial cone, are much browner in colour – again difficult to get right here but I have done my best. (I do hate it when the ipad think for me!!)
 

The ‘odd skeins’ – the one on the right is the non scoured, non mordanted one ! (Apologies for the lack of clarity in the picture but it’s the colour that matters in this context)

So back to my choice…… At the moment I am pondering on knitting a yoked sweater in meadowsweet colour with a fair isle yoke - using 4/5 yet to be dyed yarns using the exhaust dye and additives. I have tried the yarn 'on my front' to see if the meadowsweet colour will be good for me as a sweater - answer is 'yes'.

Or, whether to change more of the meadowsweet yarn into other colours using additives and knit a fair isle jumper.

I intend to knit either jumper on the knitting machine - once I have designed a pattern! But I think I have 2/3 days to make my choice as I want to you the dye exhaust at its best.

What a lovely choice to have to make!!!!
(Apologies, no idea why the text size has a mind of its own today!)


Tuesday, 4 August 2015

Day 3 Creativity: Dyeing with Meadowsweet - part one


I love Natural Dyeing and I love my textile work to have a story to tell. Now that we live 'in the middle of nowhere' (otherwise 'the country'- Norfolk in fact), I have my own source of many dye plants within walking distance. One of my favourite natural dyes is Meadowsweet and the ditches down our lane are full of it just now.

You can see it is a glorious place to live – but more importantly you can just spot the meadowsweet.


A better view of the meadowsweet
 
If all goes to plan I intend to weave a scarf in 2 colours. On its own Meadowsweet will give a greeny mustardy yellow. I intend to dye half the wool again using iron as additive to give a more greeny hue. Natural dyes 'go' together and I like to dye a family of colours from the original dye bath.

All this needs lots of planning. I ordered a 500g cone of natural coloured British Wool - approx 4 ply weight if you are a knitter! Then this needed to be made into skeins, ready for the dyeing.

Once skeined, the wool needed scouring and mordanting to allow it to accept the dye more evenly.

Lots of skeins – I decided to do 50g skeins

When this preparation is done it's time to get the dyestuff so I can use if fresh. I've decided to dye at 200% ( compared to weight of dry wool) so that's quite a lot of meadowsweet. However, compared to the amount in the ditches it is insignificant,  only the tops are needed not the roots and very soon the farmer will clean out the ditches and the wonderful meadowsweet will be gone.

So the penultimate stage is to extract the dye from the meadowsweet. This involved chopping the meadowsweet & boiling it up - a super activity for a sunny day (Sunday) interspersed with deadheading some plants! For good measure I left the dyestuff in the water until Tuesday. It was meant to be Monday but I ran out of time yesterday.


Meadowsweet soaking in water


So now for the dyeing in the strained dye. The dye and the yarn was brought to the boil slowly and then left simmering for about 45 minutes. The dye liquor will be  kept and could be used again as an exhaust dye to get a lighter meadowsweet colour. However I will split up the exhaust dye and use it as a base for some additives.

 So I’ve had a long day today. The camping gas stove ( about 30 years old) decided to play up – flames from the knobs so had to give up with that. So, I have just been using the electric ‘dyeing’ double hob outside. So it’s taken twice as long. However, all the yarn is dyed with  meadowsweet ands its resting in rinse water. I have done 2 additional sorts of samples as well :

1.      Using different yarns – mainly hand spun, including one with no scouring or mordanting

2.      Samples of overdyeing the meadowsweet dyed yarn with solutions of tin, iron and copper.

These samples are drying – results tomorrow. All looking even better than hoped for.

What was going to be a two colour woven scarf, might just be a fair isle jumper…..

Monday, 3 August 2015

Creativity Day 2 : Portable pocket


Diss Guild of Weavers, Spinners and Dyers are making a 'dressing gown' for the 60th anniversary challenge of the Association of Weavers, Spinners and Dyers. The challenge is to produce 60 dressing gowns, to celebrate 60 years of the Association. Having looked at examples we decided our aim would be to also showcase weaving, spinning and dyeing at its best. We also wished to involve as many of the Guild as we could. Our contribution is to be a Saori styled 'dressing gown’.

 The weaving of the cloth took place on Saori Looms at Designers 21 in Diss where one of our members, Kim (www.twistedtailor.co.uk) has her brilliant Saori Workshop. 3 lengths of material were woven which included a good proportion of hand spun and hand dyed yarn, all donated by members. On Friday 5 of us met to construct it into the 'dressing gown' (or rather a super coat) following the pattern Kim designed for us.

Another member is weaving a belt on an inkle loom and I have spent about a day using the tiny amount of material left to make a pocket that will go on the belt and not detract from the fantastic fabric of the jacket. In fact having made a sample portable pocket I have decided that I can find a use for several of these! The sewing group designed the draft for the pocket at the end of our construction marathon.
Portable pocket as a draft
 
Actual pocket using the oddment of weaving - the orange section is the front of the tube to carry the belt. The hand goes in to the pocket at the base of the orange section. The seam up the centre is because we wished to use both selvedges - so this just made the job a little more challenging!

 
I am sure I will write more about this later as we have more plans for the design and the jacket. It is a stunning item and we are delighted with our contribution.

N.B.The 'dressing gowns' are to be donated to Knit for Peace, a charity which will distribute them to people in the UK in fuel poverty
. I believe the handing over of the  ‘dressing gowns’ will take place at the Knitting and Stitching Show at Alexandra Palace in October.


Sunday, 2 August 2015

A month of creativity - day 1 - vintage cushion cover


I hope to have a month of textile creativity - sheer bliss - and to keep a journal of that on my blog.

The month has started well. Last March (2014) I wrote about repurposing some vintage linen - into making a case for my iPod. This encouraged me to make what was a linen cushion cover into a bag. I like to carry a spare bag with me all the time when I am out. I have enjoyed using the one that I have made – this has also sparked many interesting conversations with people too. Also, I am unlikely to meet another whilst out shopping!


After going through my set of linen embroidered cushion covers from clearing my aunt's house I decided one of these was just right for right for a shopping bag.
Unfortunately all the green thread had reacted badly to the light and needed replacing.


This duly completed, I lined the bag with part of a surplus white linen table cloth from my stash. This had been my mother's.

Now in July 2015 much more of the embroidery needed replacing. So I have been doing this gradually through the month and August the 1st was washing day for the bag.
This is the result - very pleased with it and it has memories of both my mother and her sister.


Thursday, 30 July 2015

The short jacket


For ages I have had a problem on days when it is a little cool in the summer. I have two great short linen jackets but none of my cardigans can be worn with them, as the cardigans  'show' by about 3 cm under the jacket! So I can decide to wear a cardigan or wear a jacket!  About 2 weeks ago I decided to do something about it and knit a cardigan that would fit under the jackets. The joy of doing this with the help of the knitting machine is that I can decide what I want and then achieve it in a fairly short time.
The jacket sleeves are 3/4 and I decided to knit a long sleeve cardigan - much more use but to make the sleeves interesting by adding a lace edging.
This is the lace edging I designed for another item (might make a blog post later!) so sampled this :


It looks good and I already have a longer cardigan in the same yarn ( 2 strands of Metropolitan fine crepe). I love this cardigan but decided also to reduce the width of the scarf/collar so it would sit under the jacket better.

So this is the story.
It didn't take long to do the actual knitting - I didn't time it but did it over a few days on my vintage Brother 830. It looks pretty grim when it is taken off the knitting machine.


So next for the blocking and I estimate that I took well over half the time to block that I do to knit. I have a pattern of each piece so block onto the pattern piece using my custom made blocking board.
Before the blocking


After the blocking


The seams were stitched with a tiny zigzag on my Janome sewing machine except for the beginning and end  of the seams that I always do by hand.

So the cardigan is constructed but not yet finished. I am a strong believer in ' details are what count' so I have edged the bottom of the sleeves and the bottom of the cardigan in crab stitch. This is VERY time consuming, longer than the knitting and spread over 3 days. Good light is essential but I just love the finished edge.

Crab stitch round the edging. This is much more professional.

The lace at the sleeve edging


The completed jacket.  Another great item for the wardrobe.


My only wish is that I had done this month's if not years ago!