Saturday 27 February 2016

Dress and Jacket Suit


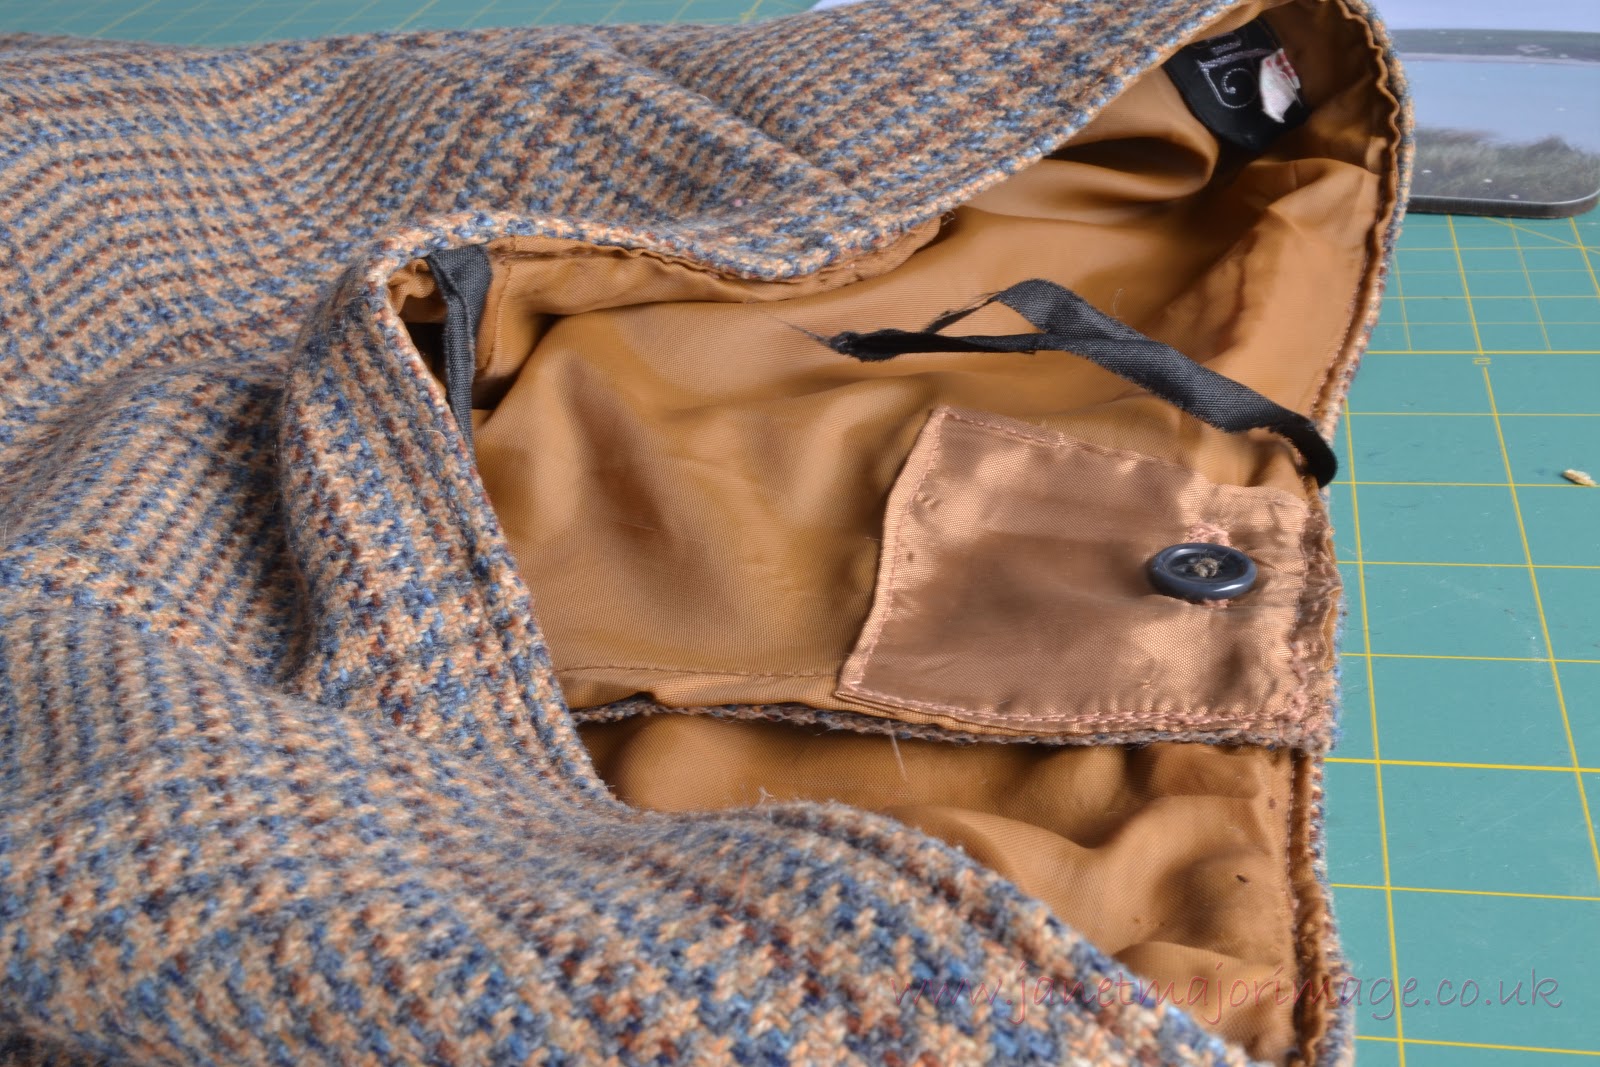
Some years ago I made this jacket.
 
It is made from 2 skirt lengths from Linton Tweed fabrics in Carlisle. The lining is from a length of printed samples in silk from Smart's Mill in Bollington, Cheshire. I bought a large piece really for the plain silk between the swatches ( to dye with), but the colours are so great I have used several of the different colour ways.

I  like this jacket but really only had a Harris Tweed skirt that it matched nicely- I now have another skirt it will match (blog post here of 1 Feb 16) but I like to have more flexibility than that.

So I had one and a bit turquoise skirt lengths and some small prices of brown so I thought I would make a colour blocked dress. I was going to give it caps at the sleeves as there was not enough material for sleeves.

So last year I made a dress block and completed the majority of the dress. What to do at the armholes was still puzzling me so it lingered and lingered and winter came. So it went in the wardrobe.

I have just resurrected it and decided I would just use the lining of the bodice and make it sleeveless. I knew I would not be happy with cap or even short sleeves, so found an oatmeal close fitting top that looks nice under it.

But nothing is ever simple. I had a two colour bodice and the lining would show at the armholes possibly and at the next edge so I needed turquoise for the neck edge and chocolate brown at the armholes. Then I hit upon the idea of using different pieces of lining, much as I had done on the jacket to make the inside a delight to wear and to match the jacket. This seemed a good plan, but I didn't want the patterned silk to show at the neck at all, so I decided to make a neck facing instead. I just about had enough material for this.

The order of construction needed careful planning so the lining looked as good as the outside. It all worked out.
 
Belt loops were attached, hem completed and the dress was finally done.
 
and the back..
When I tried it on it felt a bit 'bare' at the neck. So a look ed through my scarf box and came up with an old favourite. This is made from fine silk with knitting yarns stitched on to it - on both sides of the silk. The yarns all tell a story, some are hand spun, some naturally dyed, some bought on Skye, some of garments no longer with me. The colour and feel was good but a long scarf was not suitable. Fortunately I had some silk left so enjoyed making another similar one which I stitched into a circular cowl.

.

So this is the completed dress and jacket. I feel it was worth all the effort.


Now I need a nice warm bright spring day to wear it.


Wednesday 17 February 2016

The Horsey Hat


The Horsey Hat
The story of this hat starts way back - before 2001 when we moved from Norfolk to Cheshire. So let's say it was 15 years ago. In Norfolk, we were living next door to a farm and the owner offered me Suffolk fleece - if not they would be destroyed. I had just started spinning and took one!  This stayed in the paper sack I was given it in until 2014 when the Association of Weavers, Spinners and Dyers had their National Exhibition in Norwich Cathedral. I offered to spin some local fleece - I had Jacob fleece which I had spun already from a friend in Diss but they already had some of that. I was asked if I had any Suffolk yarn that I could contribute to the wall of wool. The answer was that I had some 15 year old fleece and I would see what I could do. This was coupled with the fact that we were having a big house sort out and had the house on the market in Cheshire as we intended to reallocate back to Norfolk.
The story of washing the fleece like this is described here on 8 Feb 2014 (2 postings) as I used my version of the fermented suint method.
The whole fleece looked like this!

I was delighted that the sad looking lump from the bag produced the most beautiful clean fleece, which was quite unexpected by me. I decided to spin the fleece thick for me ( 9-10 wpi). As my preferred spinning gauge is very fine lace this seemed very thick, but I wanted enough yarn to make a show - I had a time limit on producing it. Mary ( Chair of Diss Guild, who was organising this part of the exhibition said I could dye they yarn - if the dyes were native to Norfolk. So I left a skein undyed and dyed a skein with woad, another with nettle and a third with nettle and iron. We had plenty of nettles growing at the back of our garden, bordering on the farm where the sheep had lived, back in the days when we lived in Roydon. I was pleased with the results and the skeins were duly part of the exhibition.

My skeins are in this part of the large Wall of Wool, to the rightof the vivid yellow one - the colours are not very accurate in this unfortunately.


A friend sent me a lovely photo of Horsey beach for my birthday about this time and I mentally noted the colours were very similar.


Fast forward to September 2015 when we had settled back in Norfolk ; I was looking at doing something with the yarn. I decided I would knit a hat, which would be very much in keeping with Horsey beach as my recollection is that it is always windy there. My plan was to knit a fair isle hat as I just love fair isle patterns. But after much sampling and knitting of trial patterns I couldn't get a design that looked neat enough to me. Fair Isle works brilliantly finer Shetland wool of about 4 ply equivalent! I decided this yarn was just too thick for that and another approach was needed.
Then I remembered my Swaledale and North Ronaldsay hat ( yarn bought in Orkney).
This was a modification of a pattern by Elizabeth Lovick ( from Orkney) - the pattern is textured using purl where one might put another colour in Fair Isle knitting.

I used a draw thread so that the hat would double up as a cowl and be dual purpose.


But for the Horsey hat I decided to take another step and use patterns that might be found on North Norfolk fishermen's Ganseys. So more research on their patterns ensued and this proved difficult as quite rightly some of the fishing families are protective of their patterns. In the end I decided to use Gansey patterns that matched my beach theme and are found on some Ganseys.


So the bottom pattern represents pebbles worked in nettle and iron dyed yarn, the diagonal lines remind me of lines along the windswept Horsey beach , worked in nettle dyed yarn and the blue ( woad dyed) waves speak for themselves, the natural coloured yarn topping representing the clouds. I added the reverse stocking stitch ( also in natural) to separate the colours and thought it would represent the foam on the waves.

Another view using it as a cowl


I am really pleased with the result and thought the story worth telling.

Monday 8 February 2016

Vintage Buttons


I sorted these buttons out to take to a 'show and tell' at the local Heritage Centre, unfortunately I couldn't make it on the day. I had done some additional research for the event and thought it interesting so am sharing it here.

I love vintage buttons and have quite a collection. I do use them and have been known to make a garment to use a particular button! However, I saw these on a stall at Diss Market in the earlier 90s when I was writing a chemistry textbook for GCSE pupils. Not that I needed an excuse but they would definitely put the section on early plastics in to context.


I knew the buttons were made from protein in milk. Initially they were used as a substitute for horn buttons. This card is probably a shop sample as the four digit numbers a re not dates but product codes.
It is possible to make plastic from milk and I have done this with pupils, but it was a French Chemist Auguste Trillat, in 1893, who moved the process forwards by stabilising the plastic by immersing it in formaldehyde - a well known preservative of the time. This improved plastic was odourless and insoluble. It was also was much firmer and could be cut, drilled, embossed and also dyed.
In the UK this plastic was called Erinoid and it seems that buttons were manufactured in a disused woollen mill near Stroud.
Many Art Deco buttons are made from Erinoid - these from my collection seem to be Erinoid.


 I just love the detail of them.


All was going well with the Erinoid production, but clearly a lot of milk was needed. I can't find any figures for this country but in Germany where Galalith seemed to have the name for buttons 30 million litres a year were used in 1913!
With the outbreak of war milk was clearly needed for food and this type of button industry could not continue.
This indicates that my Art Deco plastic buttons are probably pre First World War!
However, It seems that Brazil was still making buttons from milk into the 1960s.
I have other Art Deco buttons that are made of glass, are they just better quality or did glass supersede Erinoid plastic buttons. More research needed.


Monday 1 February 2016

Re-fit of a wool skirt


In one of my favourite Vintage shops in Suffolk earlier in the year I came across a sad looking brown check skirt. So parting with £5 I rescued it and sent it to the cleaners. It was size 16 but I hoped I could make it fit me.
After the dry cleaners had done their stuff it looked very good, but on putting it on the mannequin it fell off as it was SO big. The other rather unfortunate thing was it had a side zip, so that had to come out!
Although in excellent condition the skirt was clearly several years old, it had real petersham at the waist and the back of the zip had material to protect underclothes or body getting stuck in the zip. It was of course fully lined too.
So over the course of 3 days I have spent several hours on this and am more than delighted with the result.

So this is the story of the restyling.
It turned out that 3 of the four waist darts had been removed!
So I took out the lining, removed the petersham and the extra material inserted where this was cut when the darts were removed, removed the zip, noticing the buttonhole keeping the zip closed was worn such that the buttonhole was detached from the wool material - this needed creative thinking!

This was my order of construction:
1. Reinstate the three darts.
2. Tack together the back and front at the side seams and try on.
3. Stitch up the seam below the zip.
4. Re- insert the zip invisibly - my favourite method involved the seam below already being stitched as it gives a perfect transition between zip and seam with no bulge!
5. Stitch the other side seam. Care needed to be taken to match the plaid exactly! ( I was impressed at the accuracy that Yves St Laurent achieved - blog post of 28 Sept 15 (can search under 'design') so I took extra care with pinning and tacking the side seams.

At this stage the skirt looked great when I tried it on but I noticed that by shortening a bit it would suit my legs better! ( It's bad news to have a skirt ending on a wide part of your leg!)

6. The next thing was to attack the waist. I realised that if I darned the buttonhole closed on the wool zip facing and turned it upside down I could make a new buttonhole that would not be frayed. So I attached the skirt to the petersham, then attached the lining and zip facing, this time stitching through from the right side of the skirt. It gave a very neat finish due to the stiffness of the petersham.

7. Unfortunately the lining was very worn where buttonhole had been so I decided to patch the lining with some similar coloured lining backed with iron on fine interfacing.


8. The skirt had been very well made when new and I wanted to keep the integrity of a professional finish so the only way to manage the buttonhole was to do it in two stages! The first buttonhole was in the skirt and petersham - this needed care as obviously the hole was already cut in the petersham. I used the automatic function on my Janome and so got a buttonhole I was happy with - after several trials on similar weight wool material. Then there was the buttonhole to make in the lining and this needed to match up exactly with the buttonhole made in the skirt zip facing!

9. Buttonhole cut and button attached. Wow, this has given a nice finish to the top of the zip.


10. Now to sort the length. This was pinned at a length of some of my other favourite wool skirts - it also meant the lining needed shortening. I used My Elna Overlocker to neaten the actual skirt material and then stitched the skirt using an invisible hem stitch on the Janome.

11. It appears that at sometime in the skirt's history both side seams were left open at the bottom as the lining had been shaped around them. This was not the best stitching in the skirt so I decided a bit of colour here to smarten them up - a great use for some turquoise vintage bias binding inherited from my aunt. There is a blue thread in the plaid of the skirt.
 
12. An inch of machine stitching to hold the lining to the skirt by the buttonhole and job done.

A 'new to me ' wool skirt which fits perfectly and I love! Unfortunately I forgot to take a before photo.


I love this complete outfit, the yoke really ‘lifts’ the skirt and both are super warm.


Now to alter the black and white checked one that I found in Knaresborough, but this has a back seam zipper should  be less work!