Monday 29 November 2021

Grafting 2 Sided Lace

This  week it seems like Christmas has come early, finally I know it is possible to graft lace so the pattern is not interrupted because I have done it myself. The reason why I have been able to do this is because Joni Coniglio has written an amazingly detailed article ‘How to Graft Two-Sided Lace Knitting  top to bottom’ in the Winter Issue of Interweave’s Knits magazine. The magazine also contains details for grafting joins in other lace patterns too. (1) 


To me, knitting fine lace is a bit of an addiction but to my eyes it is not perfect when the first thing I notice is the line of the graft, often across a border. Some time ago I came across the early work on this by Joni Coniglio and used her 3 DVDs from Interweave plus written articles  to help me do better lace grafting. My first attempt at this was in the fine lace scarf Hinneywaar, pattern from Unst Heritage Centre,  but I could not do this perfectly as I had not planned for the graft. My graft was better than I had managed before and a vast improvement on a garter stitch or stocking stitch graft. I wrote about this here (2). When I knitted my Burrafirth  scarf I was able to alter the knitting slightly to set myself up for grafting that would be a further improvement. I am aware it is not absolutely perfect. It was tricky as I had 3 different grafts to do across the width of the scarf, one in each border and the garter stitch middle. I have to say even I have to search for the border grafts. Details of these posts are here (3)


But what the article, just published, has done has taught me how to graft double sided lace so that it is perfect! I am glad I have done the other grafting as I understand the system used and for the second current grafting described below I was able to do it just from the border chart used for the knitting, rather than writing out a very long and involved set of codes. The detail in the article is superb, there are very clear stitch diagrams showing the path of the grafting yarn as well as photos of the stages. There is no set of words to chant during grafting  as you in fact create the stitches needed in sequence across the border that make up the lace. It is also a wonderful way to understand what goes on in lace knitting. I know I understand knitting so much better now. 


Some practical things I learnt about the lace grafting this way. 

It does take some time to learn. 

Plan where the graft will be  before you start knitting. Just like in sewing an exquisite item, planning the details of the finish are as important as anything else. 

Practice the grafting with bigger needles and bright wool until you get it right. 

Take photos and make notes of any tricky bits so you can refer to them when you are doing the ‘real’ grafting. 

For the actual grafting I work in daylight under a magnifying lens and make sure that only a real emergency would interrupt me. 

I sit at a large table so I can have everything I need within reach- my samples, diagrams of the stitches if I need reassurance, pencil, rubber, my magnifier lens on a stand. 

Cross off each stitch as you graft it. 

Don’t try it when you are in a rush or have other things on your mind. 


The sample  graft recommended in the article

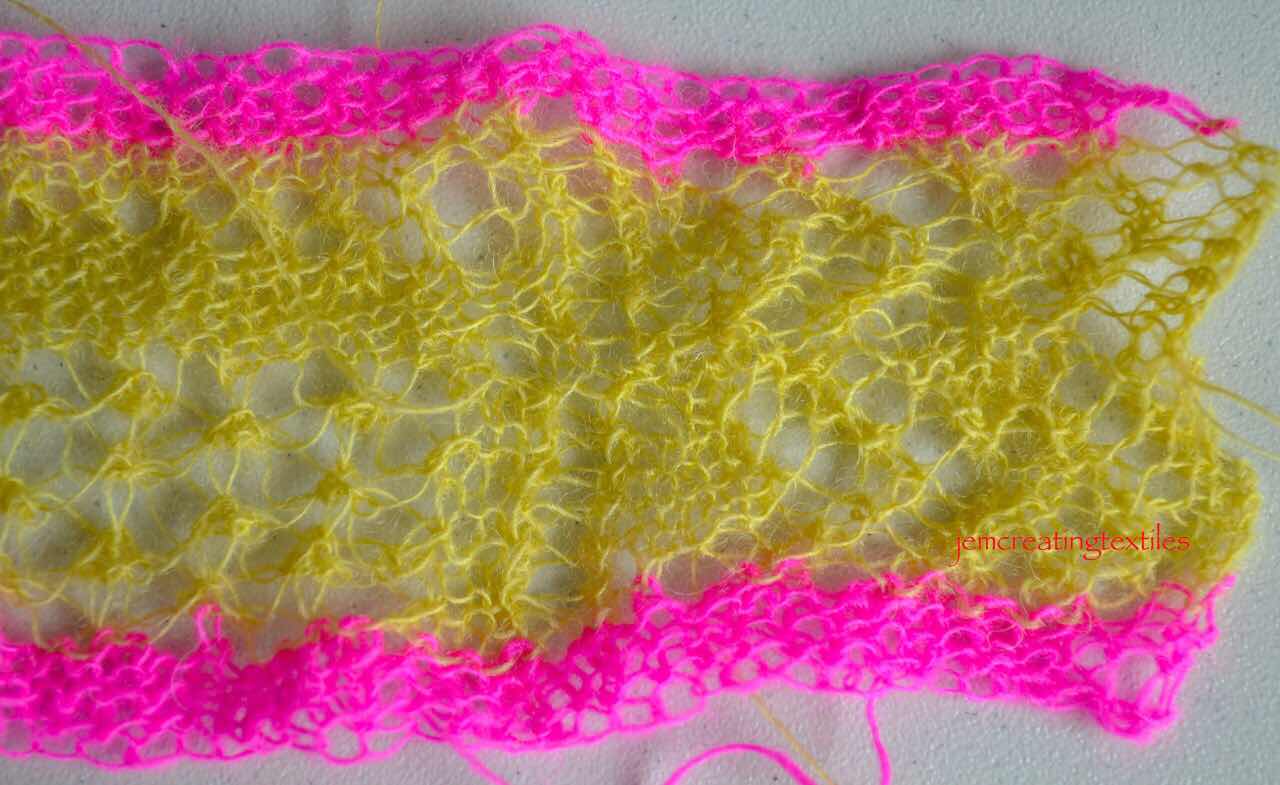
These are the two pieces to be grafted together. Notice the ‘waste yarn’ and preparation rows. ( I actually decided not to use these as I could not easily see the stitch formed  being this colour and structure. 


Note: in the top section the row white markers show the line of what the graft should look like when completed, the 3 grey loops on the bottom indicate twisted stitches prepared for the graft. 


I then swapped to using a very different yarn with a salmon colour and more rounded structure.

I also knitted what the grafting rows should  look like, ie this is the pattern showing where I will be grafting in a different colour - this was very useful as I could check each stitch group as I completed it

The two rows to be grafted


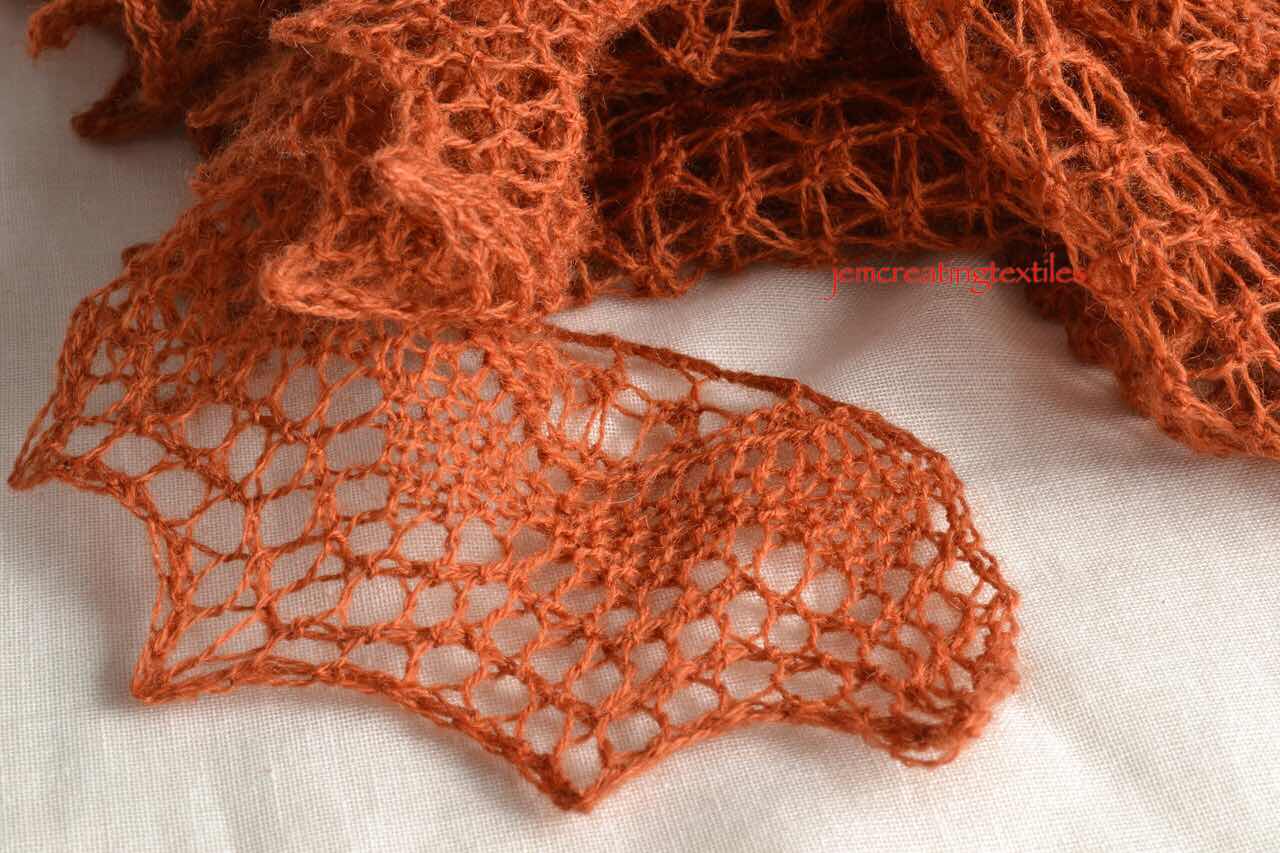
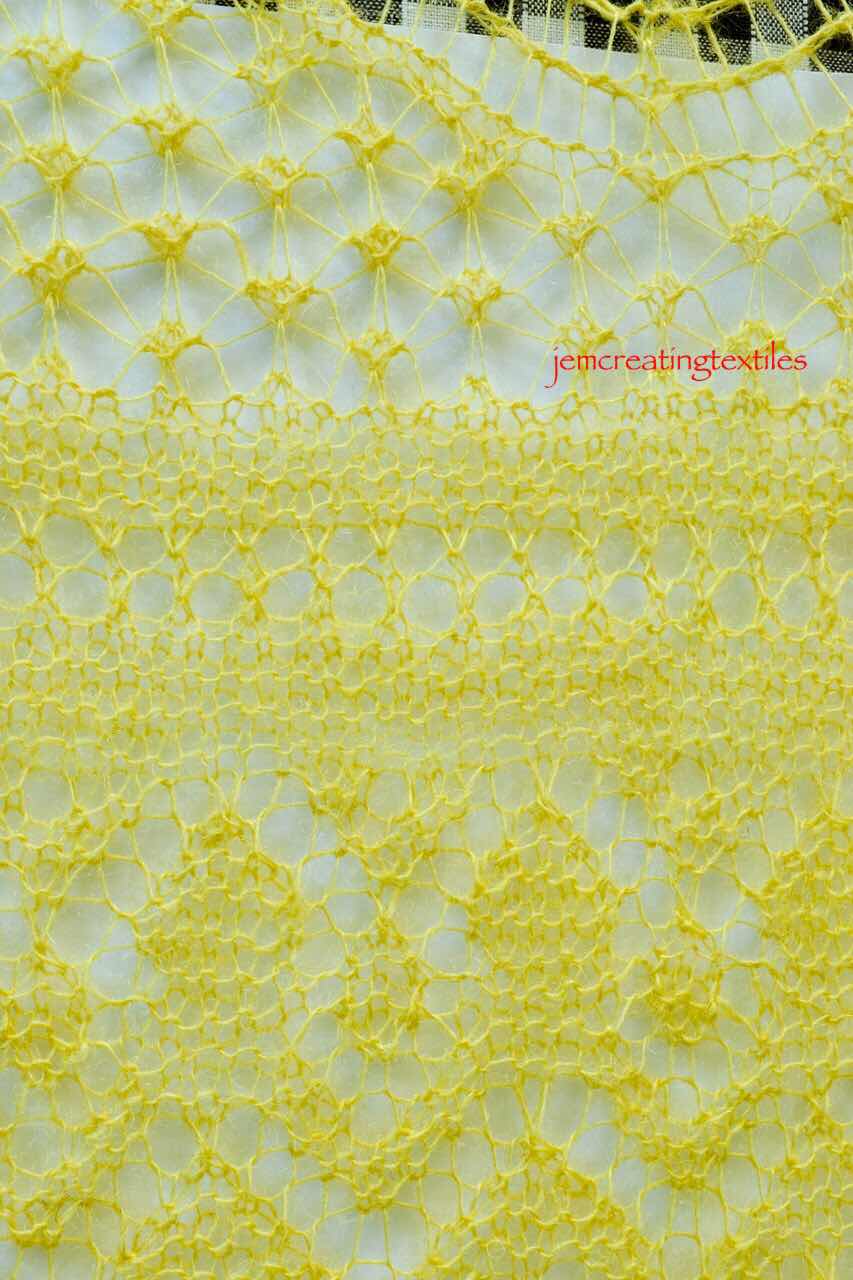
This is the grafted piece, this includes twisted stitches as well as decreases, yarn overs and  there is pattern in the rows on both sides.

Graft with preparation rows still in place


Graft  complete


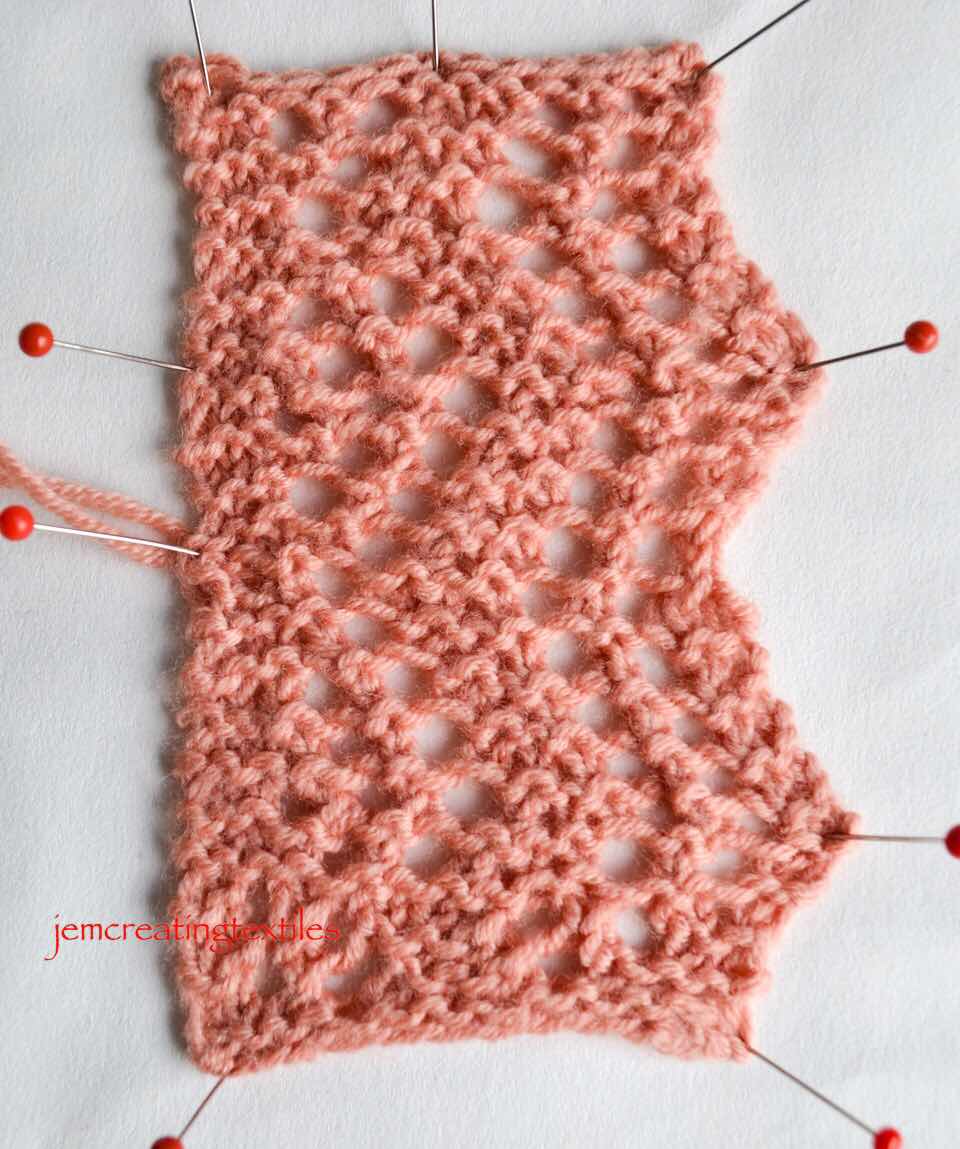
The graft I did ‘on my own’ (4)

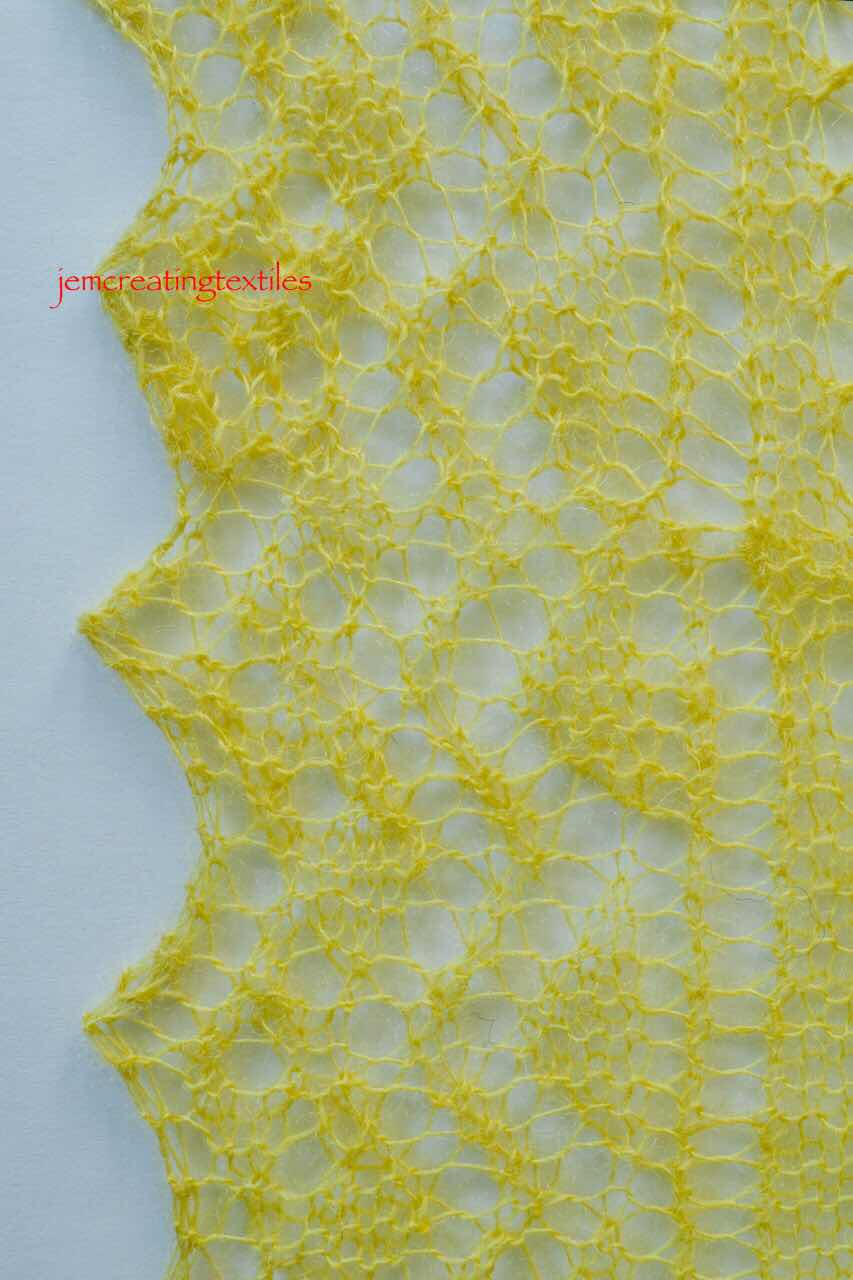
This is the graft using what I have learnt from studying Joni’s method. I am very pleased with this, especially as I felt I had learnt the method well enough to ‘do it myself’ without any guidance or instructions  given. It is a mental challenge and one that solves the problem I have with grafting. I now love grafting because the result is so brilliant. 


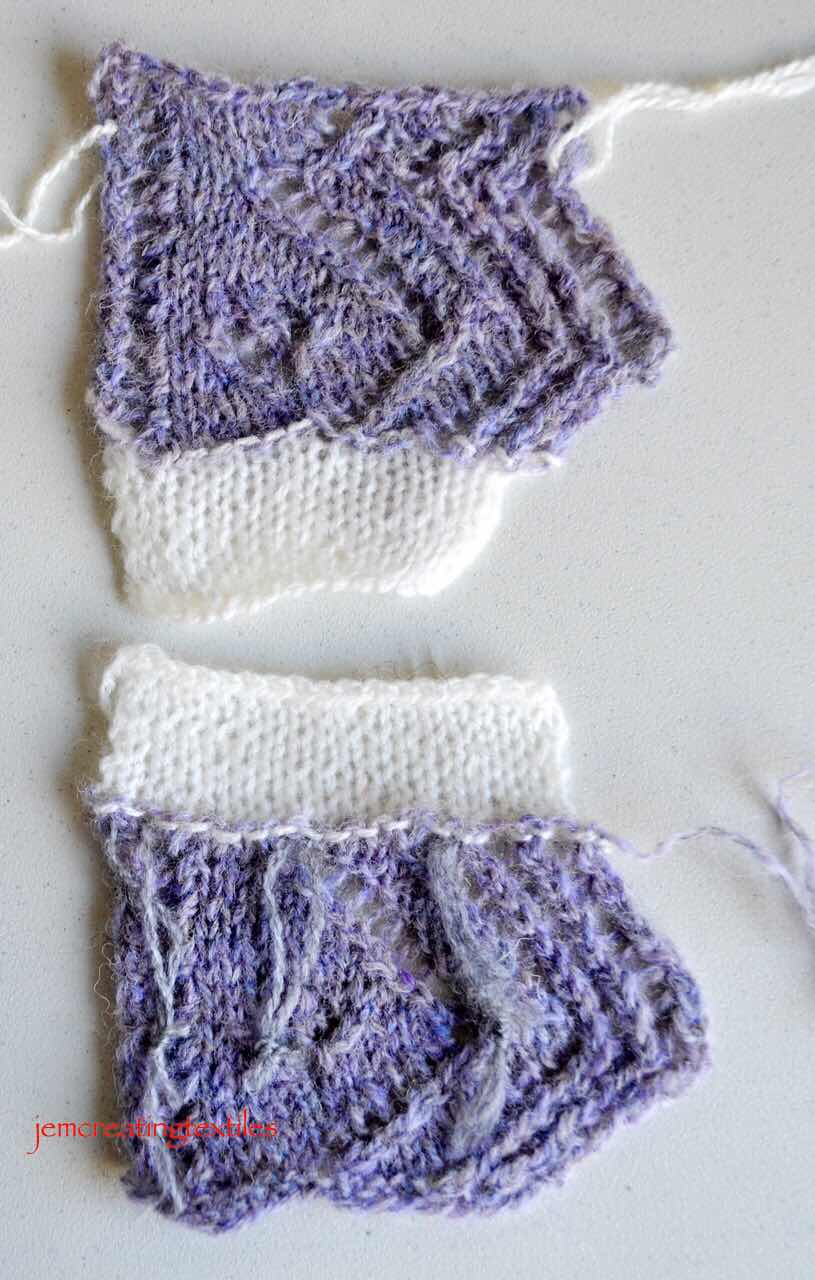
Trial pieces grafted together 

Note the threads on the left show the line of the graft, this was lace patterned on one row 


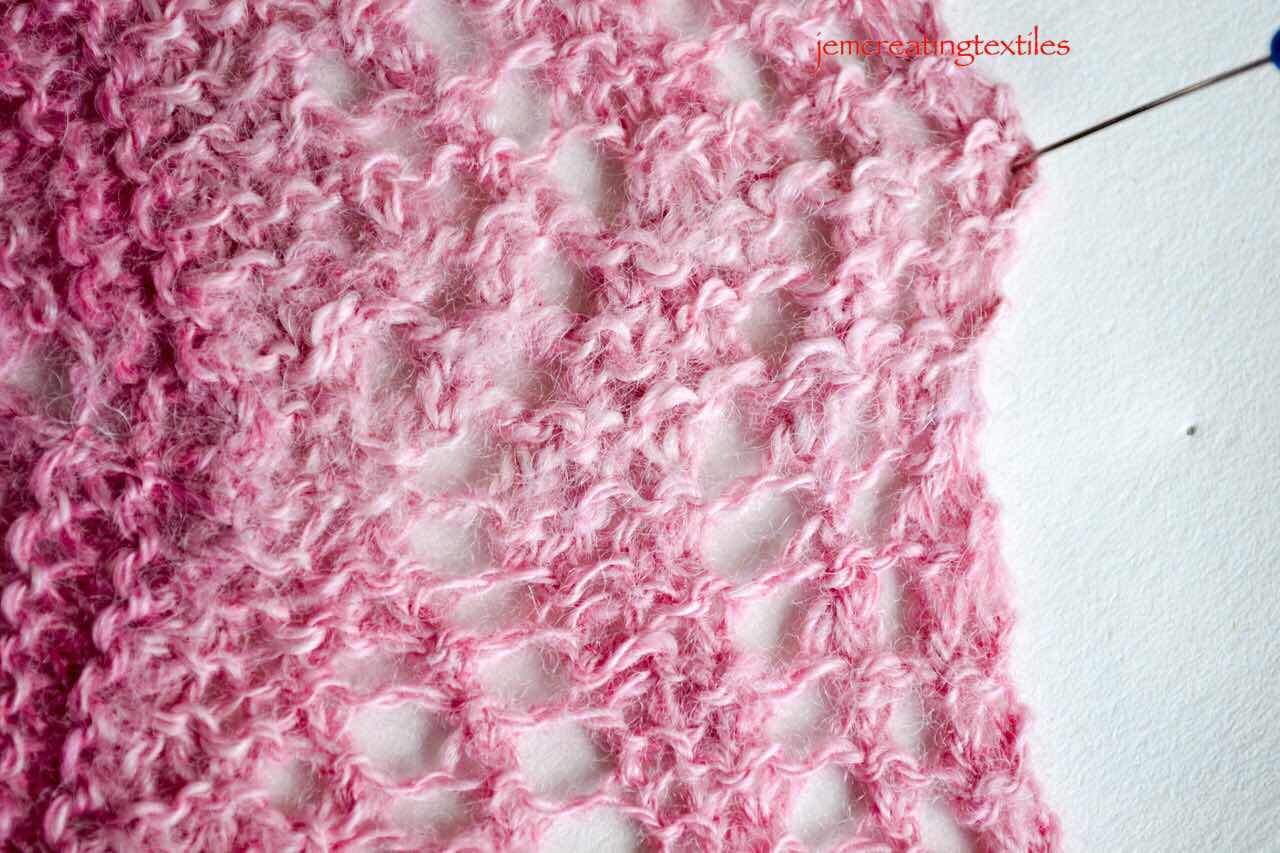
The graft showing up in a different colour

Note I found this so useful the first time that I did this sample again


The completed graft 

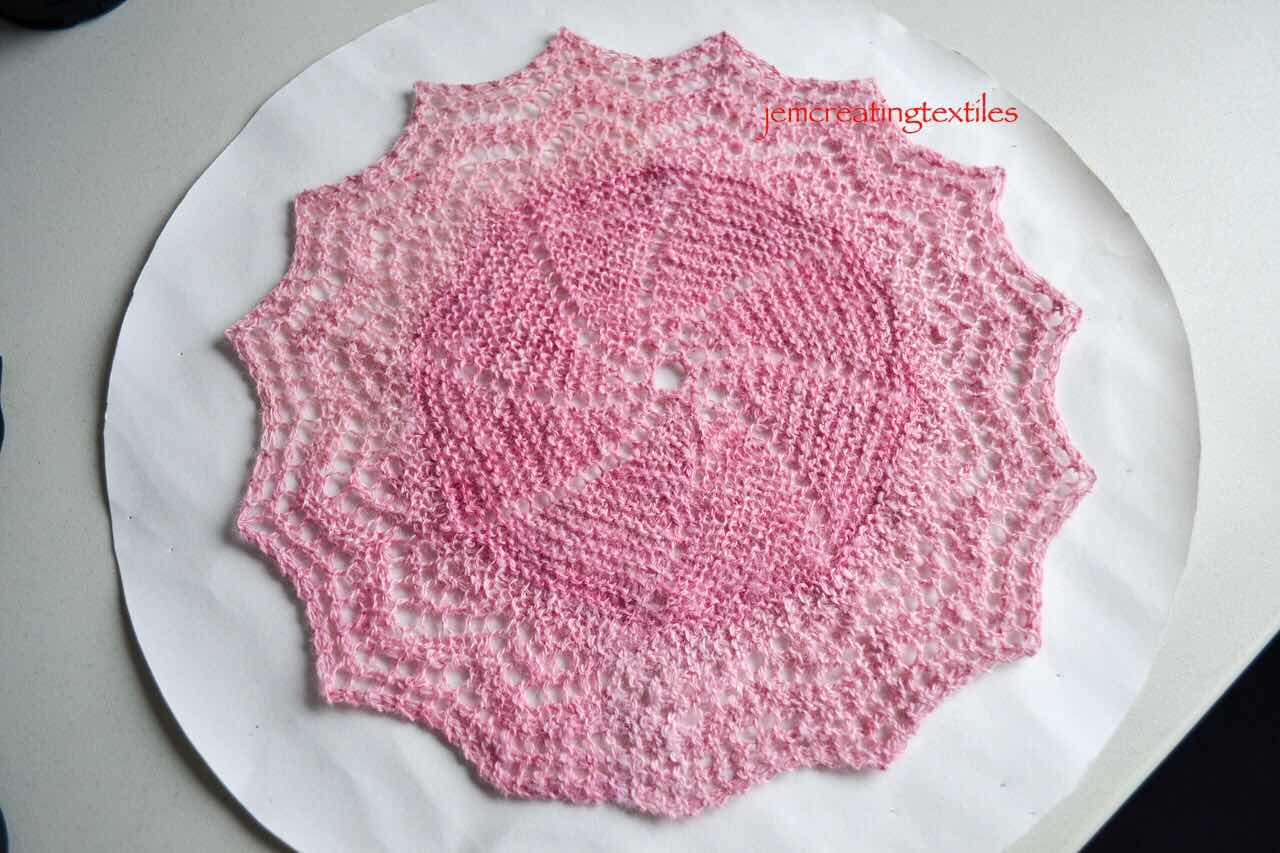
Worked in fine lace in an actual pattern that did also involve knitting on the border to the centre.

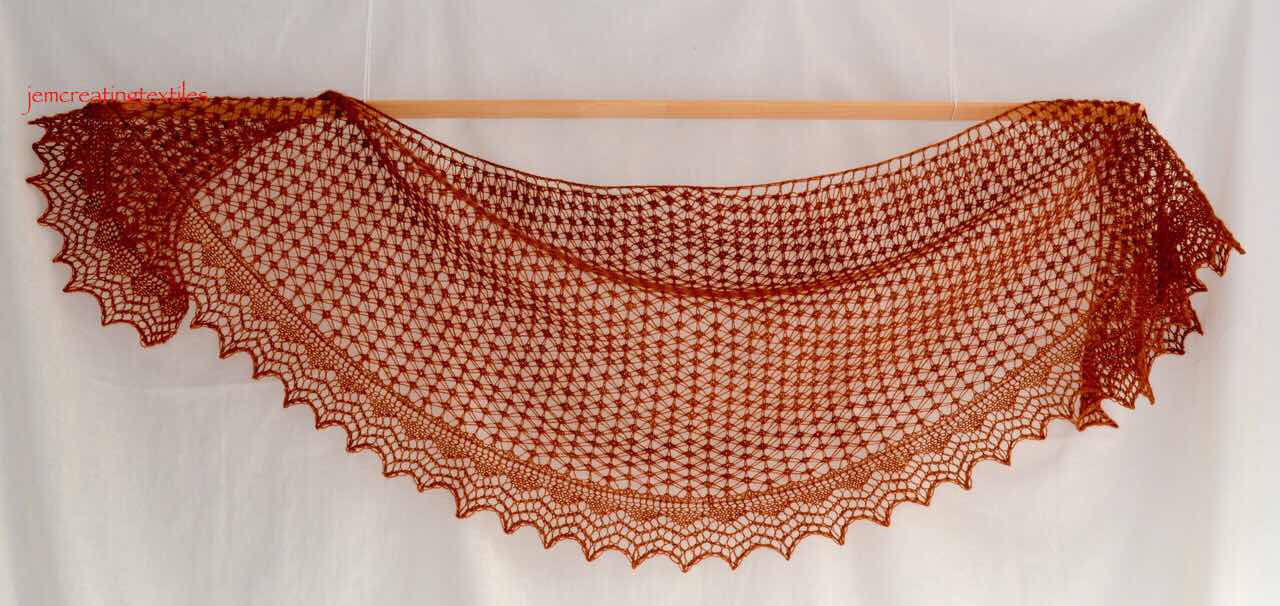
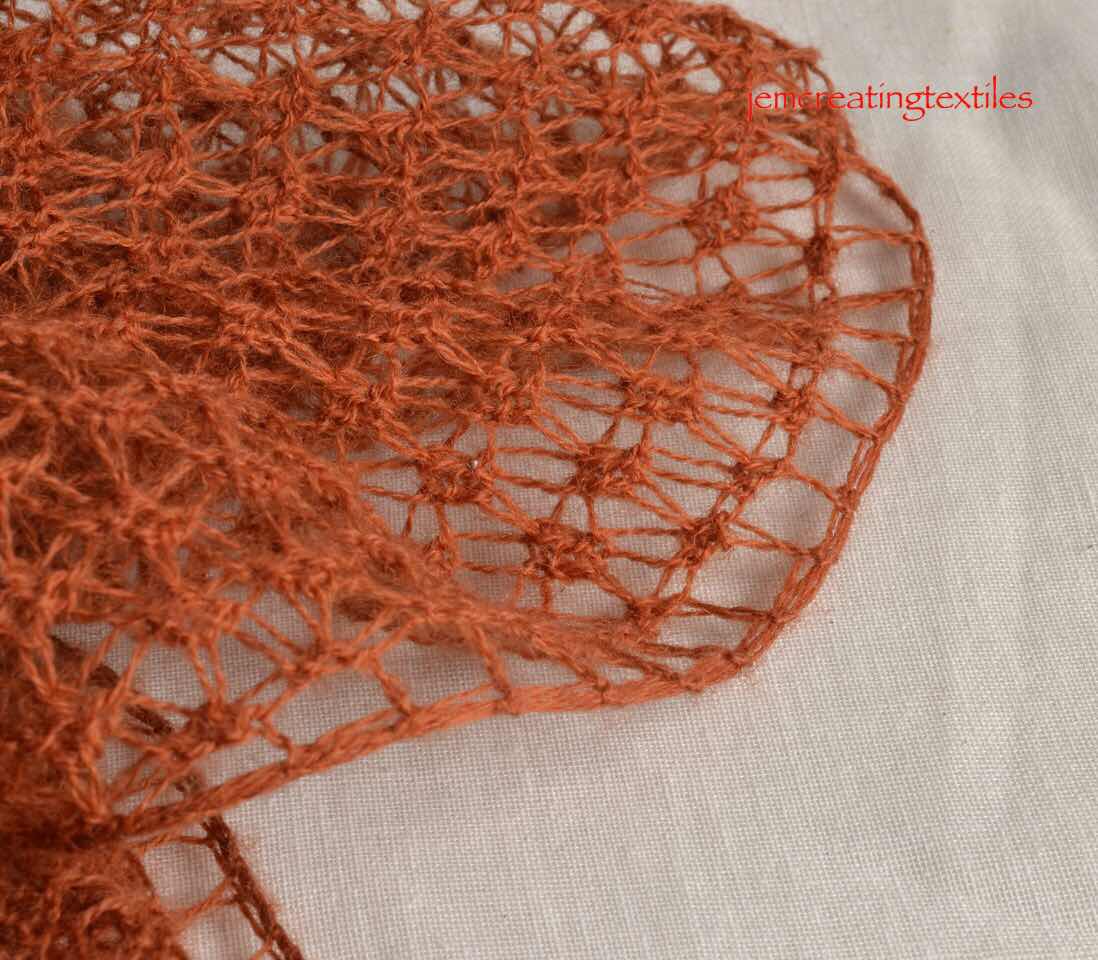
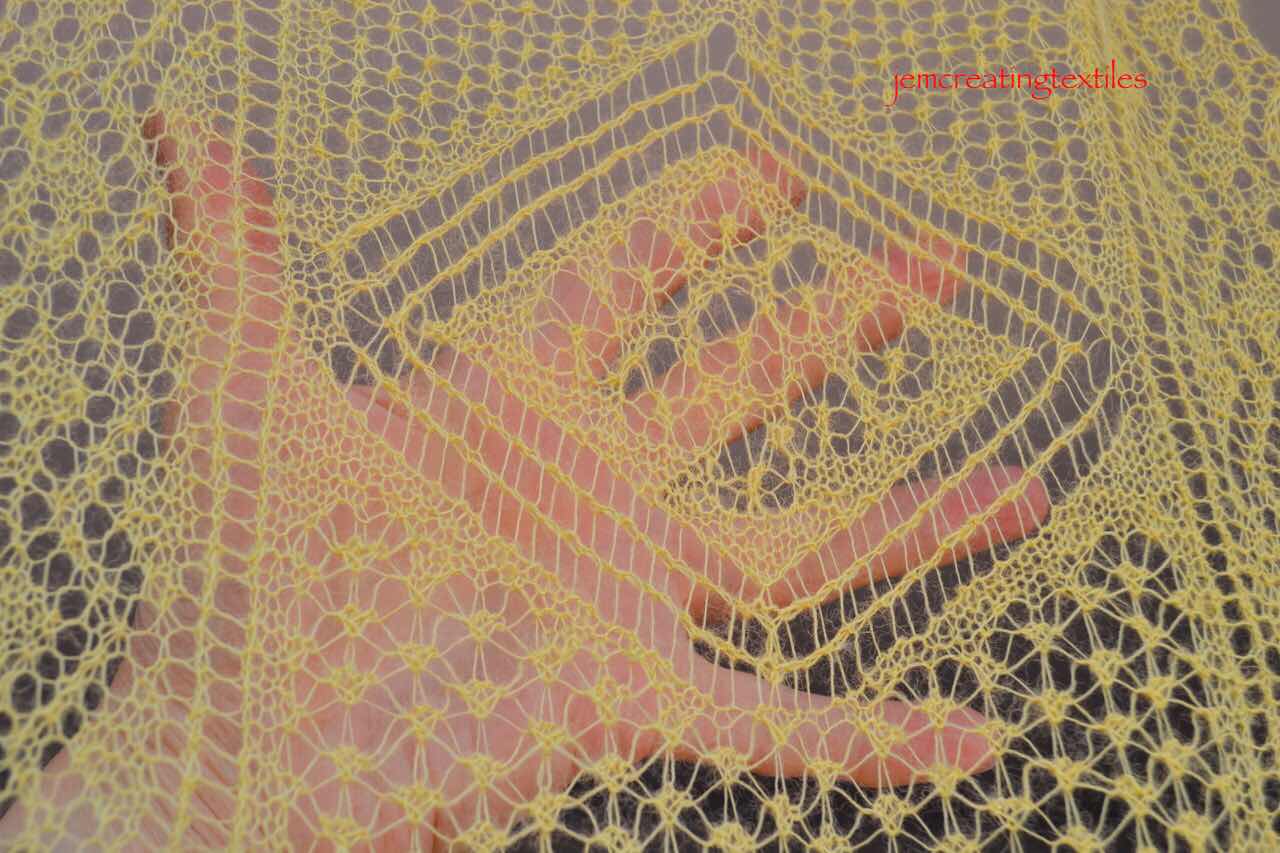
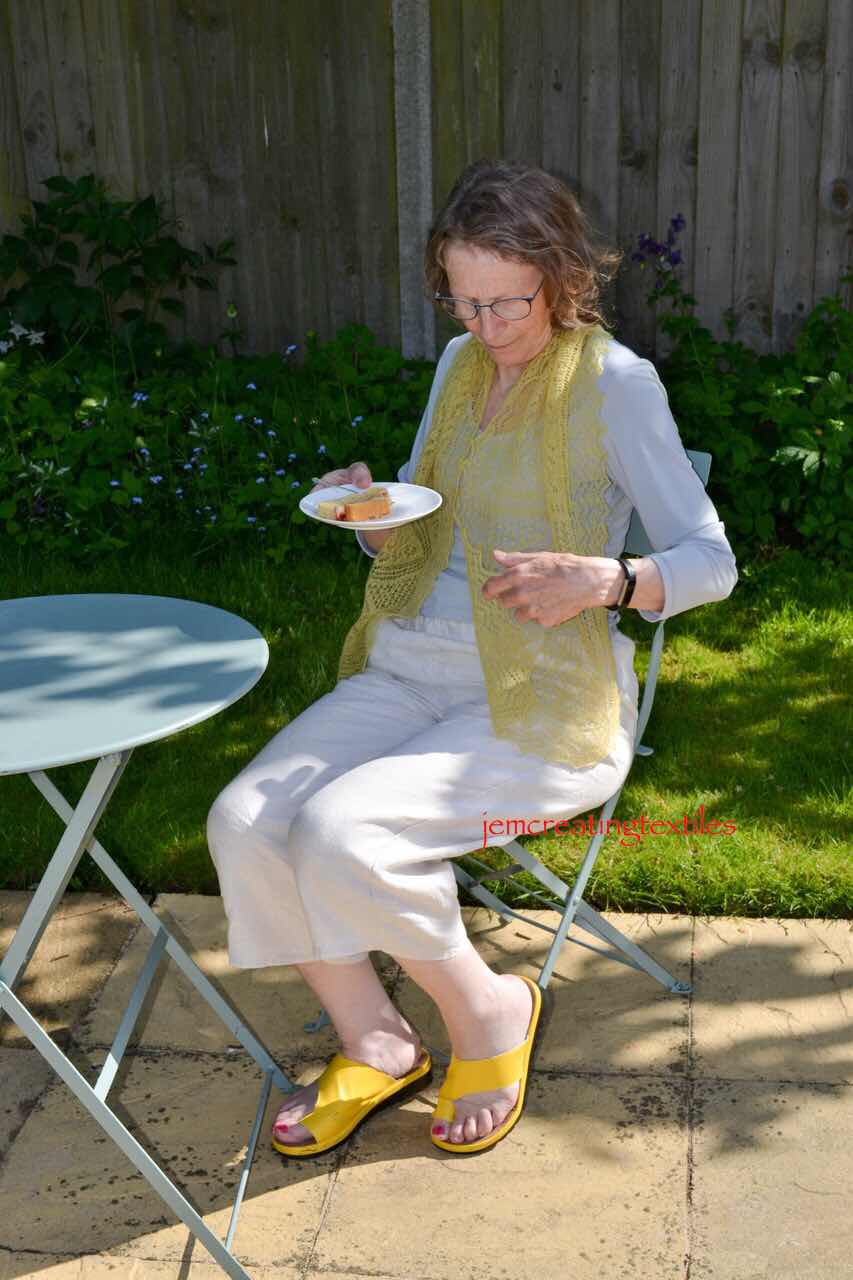
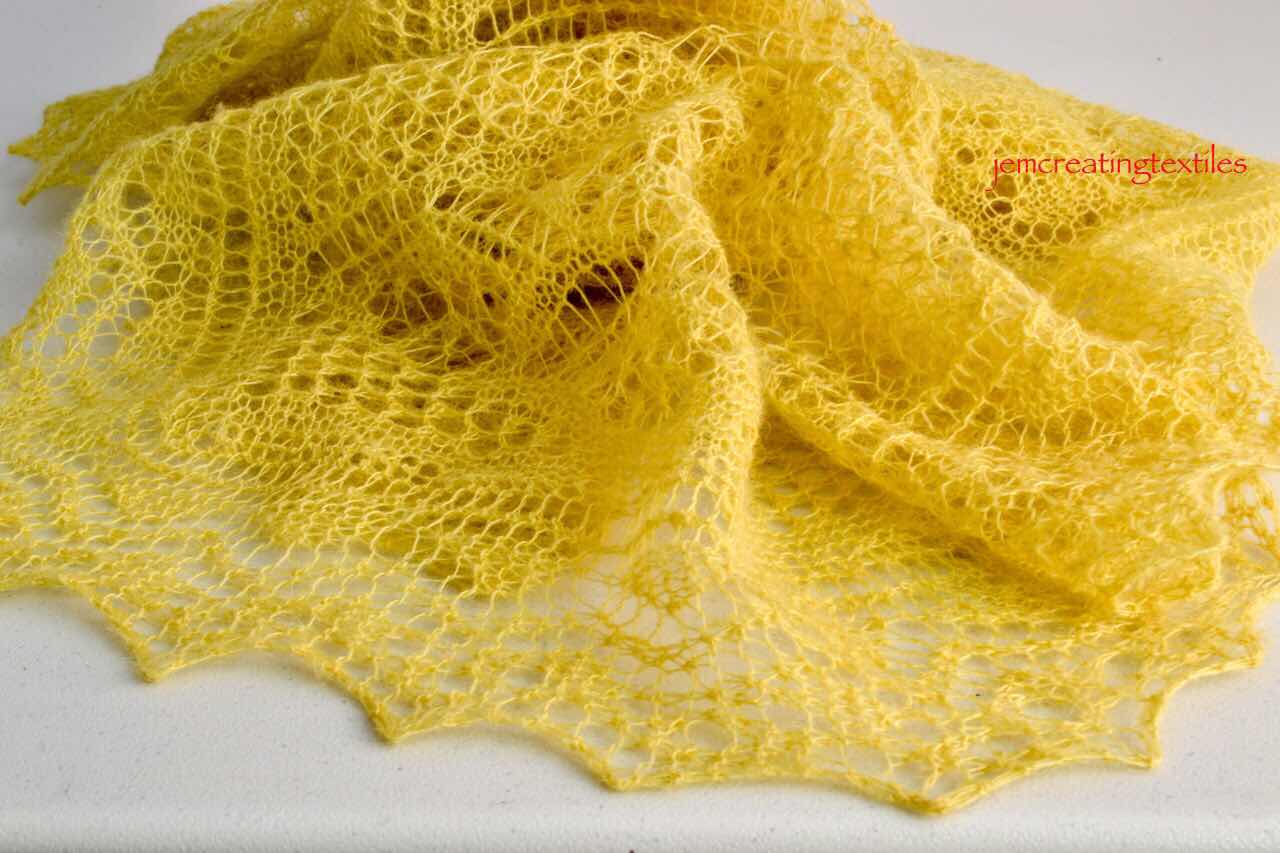
Note : The actual piece with the graft in the border, actually knitted in hand spun naturally dyed alpaca. (5)


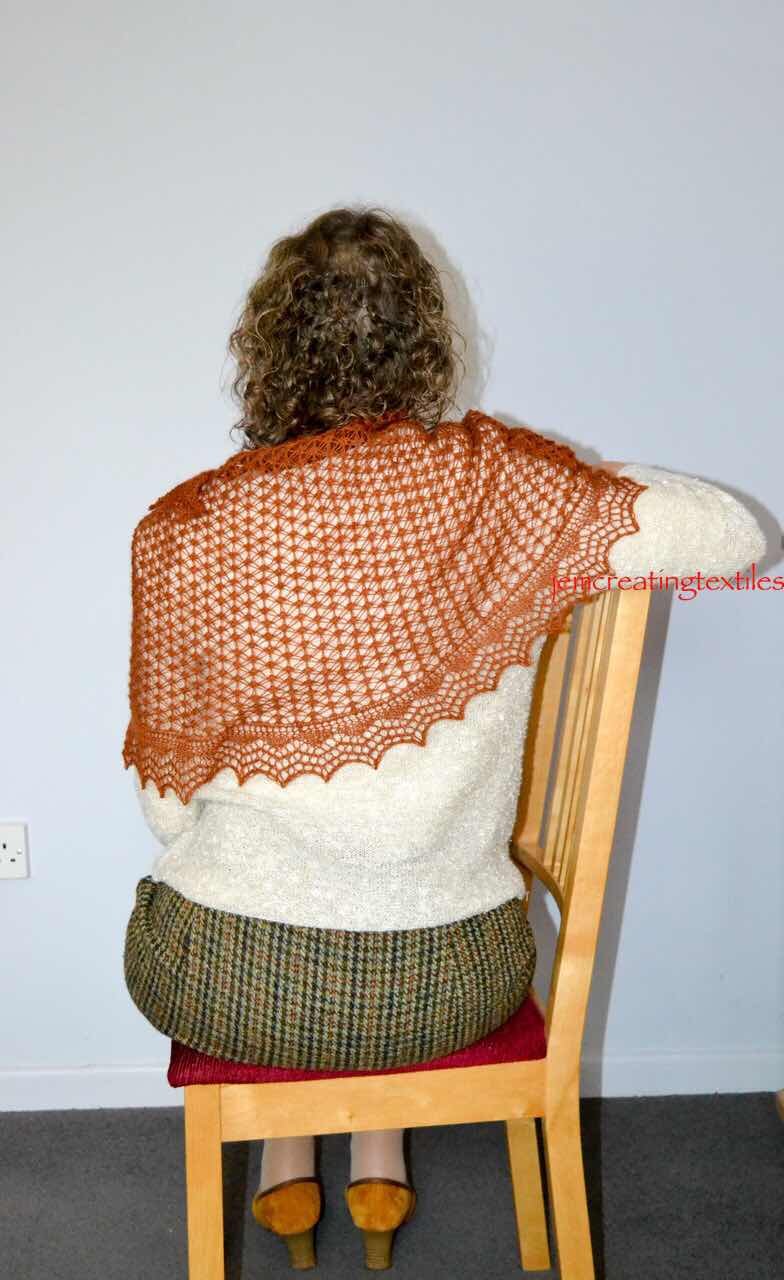
The graft in the completed piece. This is taken from a pattern by Elizabeth Williamson that I used to try this particular grafting.   (6) 


I hope you are encouraged  to try this and to raise your fine lace knitting to new heights. 


Joni has published a blog post where she has included very clear instructions and photos to show how to do a simpler graft than the one in the article i have mentioned here. It is very helpful and well worth a read and having a go. You will find it here: 


https://www.interweave.com/article/knitting/grafting-a-lace-edging-is-as-easy-as-1-2-3-4/


Notes

  1. I have no financial benefit in writing this, I  do not know of anyone else who has ‘cracked ‘ how to do this so well. This copy of Knits is available as a digital download from Interweave for $8.99 or £6.74 (as I write this) 
  2. The photos and detail of this are on posts from 26July 20 and 3 Aug20
  3. Details of grafting in the Burrafirth scarf, also a design  by Hazel Laurenson for Unst Heritage Centre are in posts of 30 Sept 20 and 6 June 21
  4. I say ‘on my own’ but obviously this is not the case. I mean I have worked out the place to do the graft, the foundation rows and the sequencing myself
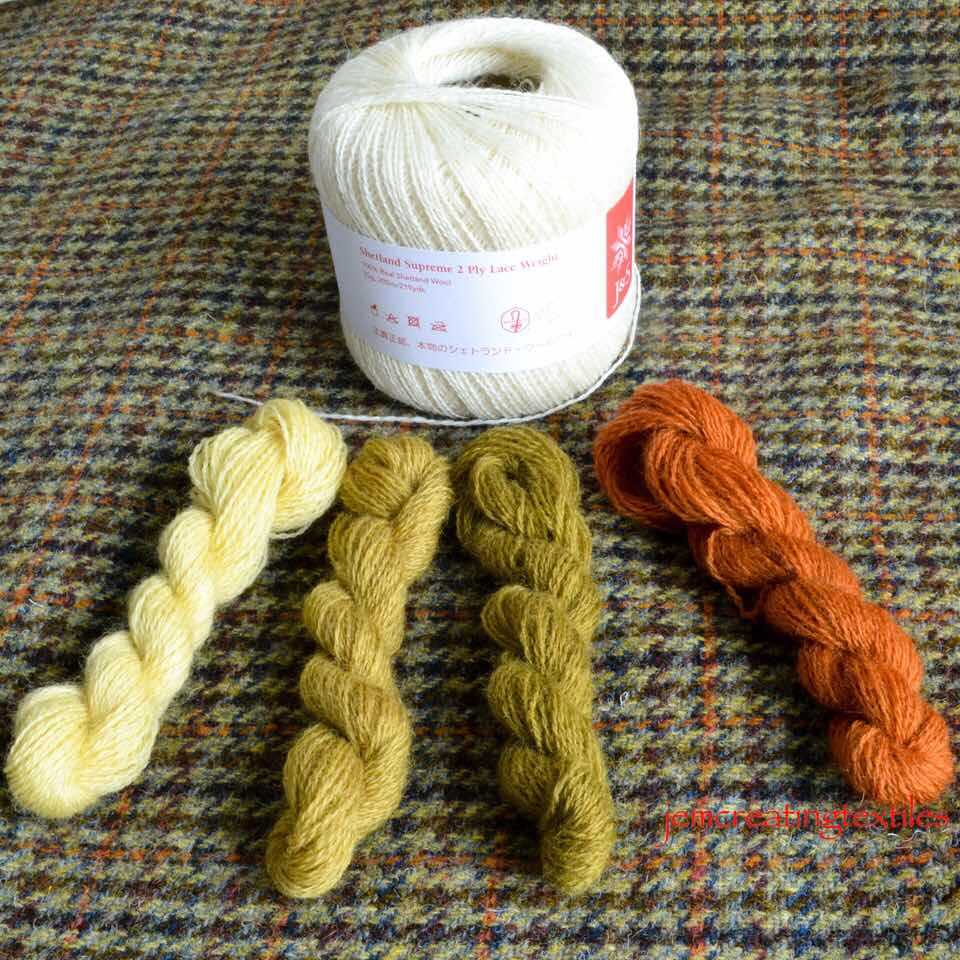
  5. I do a lot of natural dyeing, this was the first time I dyed alpaca. Dyeing alpaca is very different to dyeing wool! 
  6. This pattern is from Shetland ‘born and bred’ Elizabeth Williamson who can be found on Instagram as Elizabethwilliamsonknitting and who has some amazing patterns for sale in Ravelry (as same name as iG). As I mention earlier I have knitted her Fladda shawl which I have  described here, having attended a series of workshops with Elizabeth locally over the summer.  (Details and photos of my Fladda can be seen on 14 Sept 21) 

Sunday 26 September 2021

A visit to West Stow


This is another post about a place local to me in East Anglia. This one does have definite textile interest. On it’s web site (1) West Stow is referred to as one of England’s great archeological sites, I thought that was quite a boast  but after visiting I think it is well justified. 

The reconstructed village 


But first a bit  of background. West Stow is in Suffolk, about 30 miles from us and one of those places that you think you will go to ‘some time’ and this week was that time. It is just north of Bury St Edmund’s and in an area called Breckland or ‘The Brecks’ (2). My first zoom experience in lockdown was joining a lecture about Anglo Saxons in East Anglia and the lecture contained quite a bit about West Stow. Whilst the 125 acre country park it sits in was open during lockdown the museum section and ‘village’ was not. We decided we would wait to go until the children had gone back to school. Michael had taken the grandchildren before lockdown but I think I last went nearly 40 years ago and it has been much improved since then. 

We were lucky the weather was glorious for September. My main interest in going was to see the warp weighted looms there in a ‘weaving hut’ in the village. I had spent a day learning to weave with a warp weighted loom with Elizabeth Johnston in Shetland. (3)

West Stow Anglo Saxon Village is a recreation on the site of the original village. The settlers are thought to have arrived via the River Lark and to have built the village up a slight hill from the river. Evidence of other settlements occur in the area. By chance this one had been covered by a medieval sandstorm and equally luckily had been found after many years and thus  been more fully excavated. The main excavation was  between 1965 and 1972, although there was some excavation from  about 1878.  The site was occupied by Anglo Saxons  from about 450- 650 AD. There is evidence of 2 types of buildings, a larger type - eg a hall and smaller ones, with 69 of these being mentioned. The Anglo Saxon Village Trust was set up in 1972 and since then 8 buildings have been constructed and today there are 7 and some smaller ones.

A painting giving an impression of the village


 Each of the main buildings show increased complexity in build and their overall construction is noted at the entrance to each. Having lived in a thatched house of later date (15C) for many years, the construction of these Anglo Saxon huts was of much interest to us. 

View of the workshop. I meant to go back and take a picture of the smaller huts. I forgot…so that is another reason for returning. 


Reconstructed door lock 


One of the huts is called the weaving hut and contained the looms. I was pleased that I knew how these worked, and had woven on one myself, sadly these looms had clearly not been used for some time.


I can understand that they were tied so they could not be tampered with but it is a shame. One loom appears to be set up to be the equivalent of a four shaft loom and this is the weaving on it.

Apologies for my head appearing on this, flash was needed in the dark of the hut! 


However, I became interested in much more than what  was on offer in the weaving hut. The displays in the Anglo Saxon Gallery and Visitor Centre were well presented and more extensive than I expected. 


Thought was also given to the place of the Anglo Saxons in West Stow in relation to earlier peoples, particularly the Romans and also to the  later Vikings. East Anglia is such a great place to find out about the story of earlier inhabitants. 

It was actually the clothing and personal accessories that attracted me while I was there. A large number of personal combs (as opposed to combs to be used on fibre) were found- 106 and 120 have both been quoted! 


By studying these it has been possible to work out how they were constructed and this photo shows the different stages.

How the combs were constructed:


…and visually


For too many years Anglo Saxons have been regarded as ‘ lessers’, certainly in terms of their skills and organisation compared to Romans! It seems to me they were much more sophisticated than they have been portrayed as. The jewellery and skill shown in articles made from wood and metal, pottery, basketry and leather and textile work, to say nothing of gaming pieces, musical and art pieces show they were not just living a subsistence existence. Even from this small settlement in Suffolk, excavations have shown trade with other parts of England as well as the Baltic, Mediterranean and Rhineland !

Besides the usual shop items for the children to take home from a school trip, it was good to see a range of more detailed books. 

As usual we started the day with coffee and cake from the cafe, but had taken a picnic with us so cannot comment on what lunch was like. 


After lunch we took a stroll through the country park to see the River Lark. One could imagine the settlers arriving in their boats. Although I did wonder just how much they brought with them. I can’t imagine them unloading sheep, cattle, goats, pigs, horses etc  that had travelled with across the North Sea and then along this river once reaching Britain. 


The Anglo Saxons who settled in this village very much seem to have used local resources and I wonder if they took over animals left by the declining Roman population. 


All in all a great day out. 


Notes

  1. More information can be found on the website. www.weststow.org including a short video giving an overview of the village.   The site is open  throughout the year but do check details of opening and admission. A Book ‘Understanding West Stow’ is available to purchase at a very reasonable price (£4.50 in Sept 2021, and gives a very good introduction to the site. The first photo is taken from that. 
  2. ‘The Brecks’ is National Character Area number 85, as defined by Natural England and is an area of mainly sandy soil centred around Thetford, Norfolk  and stretching into Suffolk and Cambridgeshire. It is particularly interesting inn terms of nature and archeology. 
  3. This was with Elizabeth Johnston in 2018 It was a superb day  and I have written about his previously, see post of 11Nov18.  Elizabeth has co authored a wonderful book about these with Hildur Hakonardottir and Marta Klove Juuhl. The Book concentrating on the the use of these looms in Iceland, Shetland and Norway.It is called The Warp Weighted Loom and the book itself is a thing of beauty.

Sunday 19 September 2021

Cley- a gem of the North Norfolk coast

I have several half written posts about places in East Anglia that we have visited this summer. Out latest was a trip to Cley on the North Norfolk Coast. I am determined to finish writing this post and then will try and work at finishing the others. 

The village has Anglo Saxon roots, Cley being a derivation of clay! Cley is pronounced to rhyme with ‘shy’ but at times the village has been called Clay! 

If you are a bird watcher then the word  Cley will mean something to you ….a bit like when I hear the name Shetland which is tied up with spinning, lace and fair isle  in my head! 

Cley is described as one of the best bird watching sites in the UK and the home of birding in Britain. It sits looking north with only sea between it and land over the globe on the other side! It attracts a lot of migrants, especially in autumn and spring, acting as a staging ground. We actually visited as we hadn’t been for far too long due to Covid 19 restrictions. We weren’t intending to see any bird in particular but as you approach the beach this is a common sight.


Like many places along our coastline it is but a shadow of its former self due in the case of Cley to silting up ! Cley is now ‘Cley next the sea’ but the village has been a decent walk from the beach since the 17th Century. The much photographed and ‘ loved by artists’ windmillI was actually built in the early 19th Century. Over the years it has been more or less fully restored and now operates as a rather special B and B and self catering venue. (The Church in the photo is in a neighbouring village!) 


I spent a notable birthday there a few years back- great views from the windows over the surrounding area. The sides of the window were mirrored! 


 Cley  used to be one of the busiest ports in the country, where cloth, grain, and fish were exported or imported.Along with other Norfolk ports there was much trade, in particular connected with weaving, with the Low Countries and probably more goods moved this way than by land to other parts of the country. Goods were taken to Hull and London by sea rather than by land. 

The village used to be based around the Grade 1 listed Medieval church, set even further inland. As with many Norfolk Churches it seems large, parts date back to 1320-1340. The village itself is a nightmare for both pedestrians and traffic. If driving when you want to pull on the side to get out of the way of the local bus there will be a building jutting out into the road! Much patience and driving skill is needed. When built the narrow roads and lanes were not designed  for the volume or size of modern traffic. However the village is worth pursuing, there is a free car park at the village hall, delightful lanes and alleyways and some very nice shops - a great deli, a second hand bookshop, art gallery, pottery, smoke house and at least one really good coffee shop with views over the marshes. If you do venture to the village, take a look at the buildings, everything from flint cottages to very modern via Dutch Gables (reminding one of the trading links) and grand Georgian. 

 View from the West of the village near Artemis coffee shop and the Deli. 


Cley itself sits in the area of the Norfolk Coast Area of Outstanding National Beauty. The bird reserve is to the East of the village and is surrounded by  marshes important for their populations of rare and breeding birds. It is the oldest county Wildlife Trust reserve in the country being set up in 1926. It is a special place and one of the iconic birds is the avocet, to me such an elegant bird. 


The previous thatched reserve building now hosts exhibitions during the year and in 2007 a new eco friendly visitor centre opened. It has a good cafe, nice shop with cards by local artists and a good book section besides the usual gifts. There is an interpretation area, and talks and workshops are held in a separate ‘education’ building. One can sit having coffee and cake and look over the reserve.

(In the following photo the deeper blue line across the centre is the sea, the avocet photo was taken from one of the hides in the centre of the photo.) 


There are many hides allowing good viewing of the frequent flocks of birds and access to the beach is possible if one is prepared to walk.

Typical reeds


View  of the Beach looking west from the East Bank walkway-it was this busy whe we were there in the week! 


A great place to blow away the cobwebs and appreciate the natural beauty of our surroundings. 


Tuesday 14 September 2021

Fladda / Alchemilla is finished and I love it


During June / July I was fortunate to attend a series of lace knitting workshops with Elizabeth Williamson, close by in Suffolk. During this time we saw a range of Elizabeth’s shawls, by range I mean in shape, colour, fibre, stitch pattern and challenge. You name it Elizabeth had an example. I fell in love with Elizabeth’s Fladda instantly, I loved the crescent shape and the openness of the design and determined to knit it. 


You will see that I also call it Alchemilla and that will be the name I use for it. Fladda is the name of the pattern, given by Elizabeth, it is a Shetland word. I decided that I would knit the pattern in my own naturally dyed yarn. I have had a couple of Alchemilla plants in pots on my patio and they have flowered profusely this year and given me real joy. 


Alchemilla plant


I also decided that this shawl would be great alongside my Hand Made Harris Tweed Skirt. The Alchemilla dyes  the yarn in a yellow hue and I decide I would do a sample dye using both madder and iron, after dyeing it yellow. 


I lived with these skeins on the skirt for some days before deciding to go with the madder modified one. I am delighted with my choice and I am only sorry that there was not enough dye to do the green version as well.

The yarn I used was Jamieson and Smith 2 ply Supreme. It dyed beautifully and was a joy to knit. It is a thicker yarn than the 1ply supreme and 1 ply cobweb that I normally use but my eyes have been opened to the superb lace shawl that can be made with slightly thicker yarn and bigger needles and I will certainly be doing such a design again. (After sampling I choose to use 3.5mm needles.) 


A corner of the crescent


The long edge


Some facts: 

Finished mass : 49g

Knitting Time : 38 hours - added to this should be the checking stage, finishing ends etc and dressing, which is probably another 4 hours. 

shawl being dressed 


I knitted the shawl using 30 cm dpns, as I use a knitting belt. I have 40 cm needles but never needed to swap even when the number of stitches got large.  

Finished width - 133cm and depth - 44cm centre back


Me, wearing the shawl 


It has been a very wet day and the light was poor! 


You can find Elizabeth’s patterns on Ravelry, under Elizabeth Williamson. Elizabeth was born and brought up in Shetland surrounded by Shetland Knitters. 

Sunday 8 August 2021

Sheringham and Cromer


Over the summer I will try and describe some of our local places, starting with these 2 places. 

Cromer pier 


Both these towns are situated on the north east of Norfolk. We visited both at the beginning of June when we were booked into Sheringham Museum for a morning. This was towards the beginning of opening up the lockdown restrictions. It enabled me to visit the Gansey exhibition  and enjoy part of the Michael Harvey  Knitting Collection( see blog of 2June21 for pictures and more details). 

Both towns held bad memories for me as a child for different reasons. Every year, when I guess I was at Junior school, I was subject to the annual Methodist Sunday School Outing. I would rather have stayed at home and sewed or knitted but that was not to be. I had to go and get through the day. We went on a coach and were  looked after by the person who ran the Sunday School and I assume a helper! We had to sit on the beach and ‘play’ and then eat a prepared sandwich lunch! Eventually it was time to go home! Cromer held similar horrors for me as some elder girls, daughters of my parents ‘friends’ were bouncing me over the waves in the sea which I hated and dropped me! Eventually with the help of others on the beach I was ‘found’! I can remember it to this day spluttering out salt water and being very frightened. 

It was only when we moved back to Norfolk recently that I came to really appreciate both places. The reasons I love them are not ‘new’ reasons and I suspect would have endeared me to both places as a child….if only I had known about them. 

Perhaps I can tempt you to like these wonderful towns too. Both places are now along what has been coined ‘The Deep History Coast’ and recently more has been made of this important aspect of our our history. This 36 km  section  of the Norfolk coast extending from Weyborne to Cart Gap juts out into the a North Sea. Until about 6000BC (although there seems to now be some ‘discussion about that date) Britain was joined to Europe and if you ever  listen to the shipping forecast you will have heard conditions given for Dogger Bank. In the past ‘Dogger Bank’ had inhabitants and was on the path travelled by many from  Europe to Great Britain. Given the position of Sheringham and Cromer the coast is constantly being eroded and although a big storm destroys more of the cliffs, it is often after a big storm that fresh evidence for our past is uncovered. Writing  about this is beyond the scope of this short post, but two significant finds were the fossilised steppe mammoth discovered at West Runton in 1990   and the Happisburgh fossilised hominid footprints dating back over 800,000 years ago to the early Pleistocene discovered in 2013. 

Erosion such as this: 


It is always fascinating to walk along the coast here and keep an eye on the beach hoping to make a find! For anyone who does visit there are now interpretation boards along the coast, some great art work and an app to help you on your way. I hope all this is now taught in local schools! How cool is that, being so close to real history. (1) link to Deep History coast. 

Another reason to visit Sheringham is the steam railway.

This is not my photo and I would like to credit the photographer but unfortunately do not have a name. 


 ‘The Poppy Line’ (2) travels west  along the coast to Holt, another delightful place to visit. Be warned however, it is a long walk from Holt station to the town, particularly on a hot day. If you are interested, do look up train times and type of train. If is is particularly hot the steam train may have to be swapped for a diesel. Sparks from the steam engine can cause a fire on the heathland the track goes though. Many years back we had a trip for a Father’s Day treat. 2 courses of lunch going from Sheringham to Holt and 2 course including cream with the puddling picked up a station on route. Another great trip is a Santa special. As adults we were given Sherry and mince pies by Santa’s kind elves….but then this was many years pre Covid! It is a delightful journey. You can still travel to these two places by train. I am sure some years ago you could get on a train in Liverpool and get off the same train in Sheringham. When I checked this it seems that you can travel direct from Manchester to Norwich and would need to change there for Cromer or Sheringham. You would need to devote a day for the journey  but it must be more appealing than the M1 or the M6! 


Both Sheringham and Cromer are famous for their fishing Heritage and Sheringham (3) in particular has some wonderful art work along the front along from the Museum, in terms of murals depicting this. If you are lucky enough to visit the Museum it is well worth allowing time to potter round outside to look at these.

Making the most of a concrete see wall


This is an Anglian Water Building and if you look up the history of the museum called The Mo, you will find some interesting facts about the link between the museum and Anglian  Water. Also it is good to read that Sheringham is a Blue Flag beach. I rather liked the use of art here! 


..and adjacent to the Museum


In Cromer Museum (4) you can see some bits of the famous West Runton  Mammoth. What a pity it is deemed too big to recreate. In my mind it is another Norfolk  jewel that could be boasted about! I have spent hours trying to find my photos of the bones! I think a winter project will be to sort the many digital photos I have. So this is a link to some photos of the bones. If you press visit, you can see an article written pre 2015. Alas Norwich Castle Museum  is now involved in a massive project to recreate the Norman Keep and sadly I fear seeing a reconstruction of the West Runton Mammoth has been pushed far into the future! (5)


However, it was the advent of the railway that brought Sheringham and Cromer their beginnings as Tourist Resorts in Victorian times. Trains full of people would come from the Midlands and for the first time many workers could appreciate the bracing air. Much building happened in both towns and there is some stunning architecture  in both Sheringham and Cromer. 

Taken from the top of the  cliff where I took the first photo:


I was pleased to see these adverts along the route of the zigzag climb from the beach in the resting  spots at the corners of the climb. (Michael searching his bag for his inhaler!) 


The pier dates from 1901 and has been renovated recently to restore it to something like it’s former glory. There is still an end of the Pier show if this is to your liking. It is also a brilliant place to go to photograph sunsets! 


Notes.

  1. The app for the Deep History Coast https://www.visitnorthnorfolk.com/Deep-History-Coast/deep_history_coast_app.aspx
  2. The Poppy Line https://www.nnrailway.co.uk/
  3. Sheringham Museum https://www.sheringhammuseum.co.uk/
  4. Cromer Museum https://www.museums.norfolk.gov.uk/cromer-museum
  5.  The West Runton Elephanthttps://images.app.goo.gl/3njSagVCiUS6Xjey8
It seems you need to be logged in to Google if you wish to comment. If that still does not work, look on the top right of the blog and you can get to my website which has a comment section that works! Sorry about the extra fuss! 

Sunday 6 June 2021

Burrafirth scarf complete


This is one of the patterns devised by Hazel Laurenson for Unst Heritage Trust. This pattern is steeped in ‘Unst’ for me. We love the island and are sad that because of covid -19 we have missed 2 years of visiting. Hopefully we will be able to visit soon. Hazel has devised the motifs in the pattern from ‘The west Side Shop 1880’s collection’. The pattern is available from Unst Heritage Centre and the booklet with more of these motifs in, called ‘Recreating vintage Shetland Lace’ is also available from the  Heritage Centre.(1)

The construction of the scarf  is typical Unst to me: 

Waste yarn cast on, 

knit the bottom lace edge, 

turn the right hand corner, 

pick up lace edge stitches, pick  up stitches form the waste yarn and 

turn the bottom left hand corner,

Then the first border is knit between the two vertical lace edges, so each row you actually knit 3 different lace pattern. Good for the concentration! 

After the first lace border you leave this knitting.

Start again and repeat what you have already done but this time continue for the middle of the scarf.

All that is left is to graft the two together 

Wash and dress the shawl. 


I choose to knit this one in Jamieson  and Smith Supreme 1 ply. However, I naturally dyed this yarn with Golden Rod from my garden in South Norfolk. I did not know how the quite ‘ungentle’ conditions for the natural dyeing would affect the yarn. Would it come apart? Would it felt? Well I am pleased to report that neither of these happened for me. (I do quite a lot of natural dyeing but 

even though  I had dyed the cobweb yarn form Jamieson and Smith I had not dyed this finer Shetland supreme 1 ply. After natural dyeing The NM 1/16 yarn gave me 60wpi  measured using a gauge form FLP. (2) 

I previously posted  the dyed yarn with the Harris Tweed shawl, the picture above shows the scarf with the skirt.


Those that follow my fine lace knitting will know I am a bit obsessed with grafting. So I trialled the grafting for this stole even before I decided to knit the pattern. (I discussed this in detail in a blog post here on 20 Sept 20) 


I started  knitting this scarf in Sept 20 but after I had knitted the first section I didn’t knit anymore until Feb 21. When I finished knitting the stole I decided to do trial grafts of the edging and centre again. So I knit a duplicate sample  of the full width of the scarf.  This included the  last lace edging  repeat each side and the central area which is garter stitch.

Sample with grafting of the lace edging and  garter stitch. 


Again I would like to thank Joni Coniglio for her instructions for lace grafting (3)

I found this scarf  was less nerve wracking as I had previously grafted the Hinneywaar shawl last summer and done more trials since. 

Somewhere in one of these widths of garter stitch is my graft.

Garter stitch graft


The graft of the lace edging is in here. Not quite perfect, and  I think I could improve next time with a tweak to the tension. I have enlarged it as I know I like to look at other people’s  grafts and learn from them so I am guessing this is the same for readers here.


Unusually for me I noted down how long I knitted for in each session and for the whole scarf  my total knitting time was 60 hours. Then there was the grafting, Checking, washing and dressing which would be another 7.5 hours so the total for the construction would be 67.5 hours. (This does not include the time for dyeing the yarn, sampling initially etc).


Undressed length 100cm and width 27.5cm 

Dressed length 141cm and width 31cm

Total mass 31g.


It ‘s been tricky photographing this, one doesn’t like to complain about bright sun from morning to night, but it is not good for photographs of a scarf like this. 

This gives an impression of the transparency of the scarf, but the background is very distracting. 

Hanging in the window


Looking inwards  allows the patterns to show up more. The scarf might not be very big but it packs in a good number of patterns! 


And the hand photo


...and on me, in the garden for afternoon tea, when there was a gust of breeze! 


..and my favourite photo. 


Notes

  1. Unst Heritage Centre website http://www.unstheritage.com/web/
  2. FLP (Fleece Loved Products) can be bought from Jellybeans Yarns on Etsy, Beaker Button on fb or contact fleecelovedproducts@gmail.com
  3. Joni Coniglio’s 3 lace grafting lessons are available from Interweave, search under ‘lace knitting grafting’. There are 3 videos and an ebook in the series.