Friday 24 June 2022

Shetland Lace Knitting : ‘joins’ in a mini hap


I have mainly chosen to knit rectangular scarves/ stoles/ shawls. There are several reasons for this but  the three main ones are: more wearable for me; I first saw the very fine lace Unst examples and wanted to recreate these; their construction with invisible joins appealed to me a lot! I also found that as I became more skilled in the construction and techniques I could personalise these by using my own chosen combination of motifs. 


During one wool week I took a mini hap class (outside to inside)  with Donna Smith so I could become more familiar with the construction of a square hap….. I quickly learned that there were many ways of constructing a hap and doing the joins! It took me a long time to get round to finishing this hap. 


I am a firm believer in trying out a technique first, often using larger needles and yarn and then when I am happy with the different techniques I can scale down the yarn and needle size to suit my preferences for something very lacy. Eventually I finished the hap but was not proud of what I had achieved. 


I continued to knit fine lace and more recently use my own naturally dyed yarn for this. Then I became very fortunate, Elizabeth Williamson, daughter of Betsy Williamson from Shetland, moved to Woodbridge and started teaching lace knitting! This has really broadened my horizons as I have knitted in different yarns, learned to knit different shaped shawls, learnt many more Shetland techniques, many that I did not know I did not know and generally had a great time! 


The most recent project we have been doing is a mini  square Shetland lace hap, again outside to inside. Illness got in the way and I needed to wait for the next stage (we are fortunate in meeting with Elizabeth in person, although her workshops can be taken online wherever you are in the world.) It is a very clever and lovely design. I have posted about it here on 15 June  22. 


I decided to return to the hap I had knitted many years ago whilst waiting to finish ‘Elizabeth’s’ hap. I wanted to try different ways of joining the mitres where the wedges meet  and also joining on the sides of the centre to the two wedges (trapezoids). I ignored the outer lace at this stage and just knitted in garter stitch. Some of the wedges I did the decrease on the outer stitches and some one stitch in. I wondered if I could even tell the difference. One wedge would be knitted first,  before the centre and the one opposite would be grafted on. (I love grafting since I have improved my technique due to following methods given for grafting, including two sided lace grafting, by Joni Coniglio documented in some recent  posts here in this blog). 

The other important consideration to me was the holes around the centre of the shawl, I aimed for the holes to be identical and the same number on each side. 
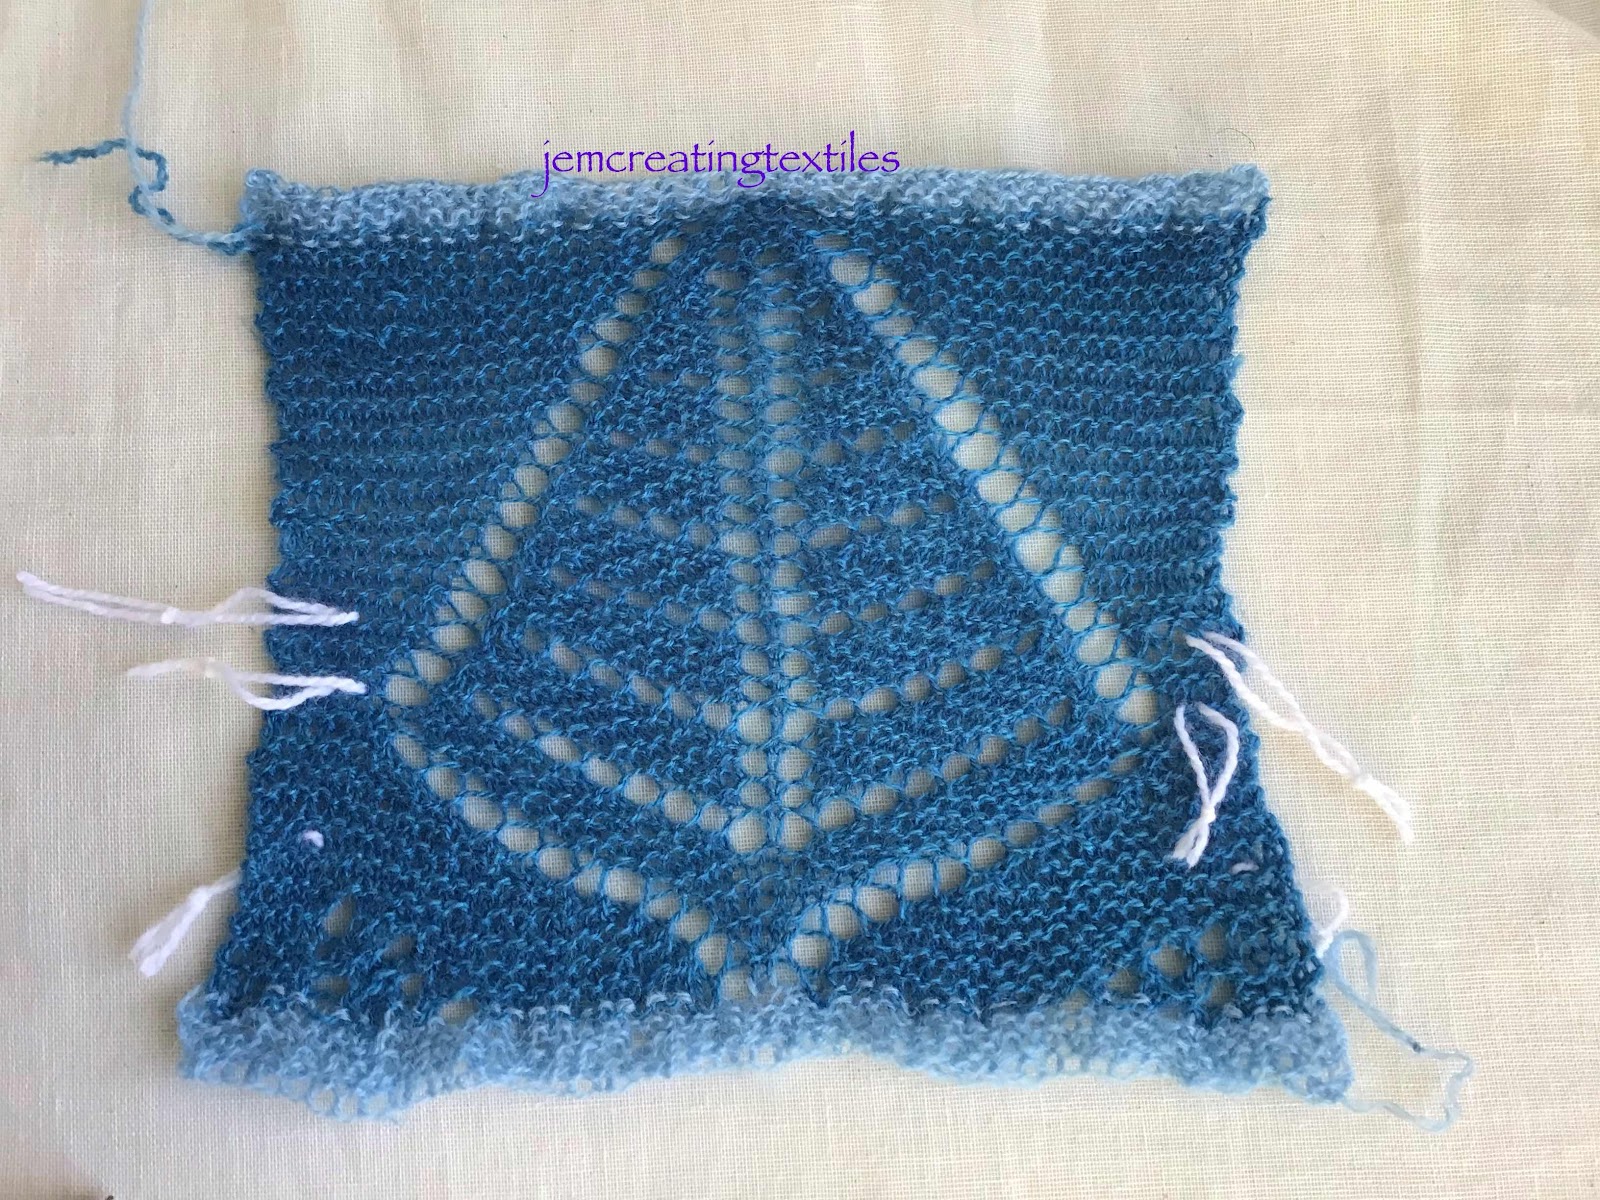
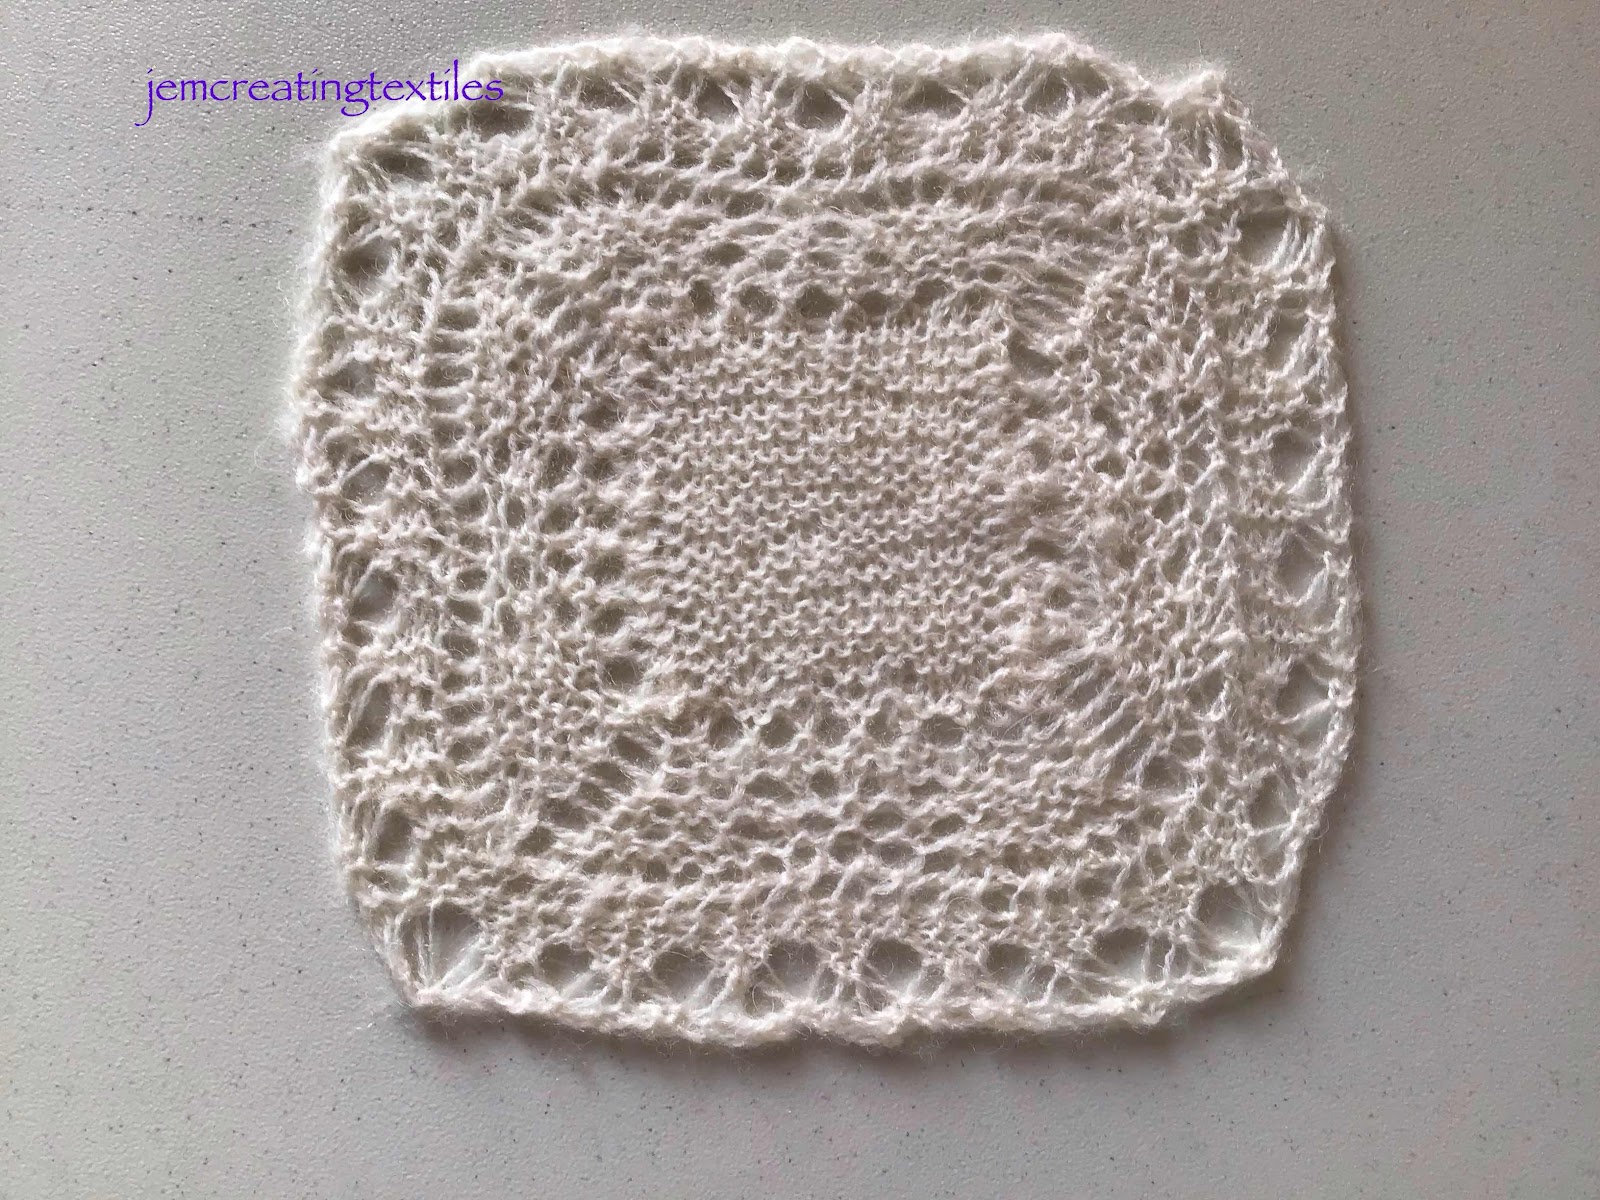

Sample one

Hap  with holes on each side and the garter stitch graft on the side opposite where I started.

In this instance I am happy with either a herringbone stitch or whip stitch join for sides 2 and 3 to the centre 
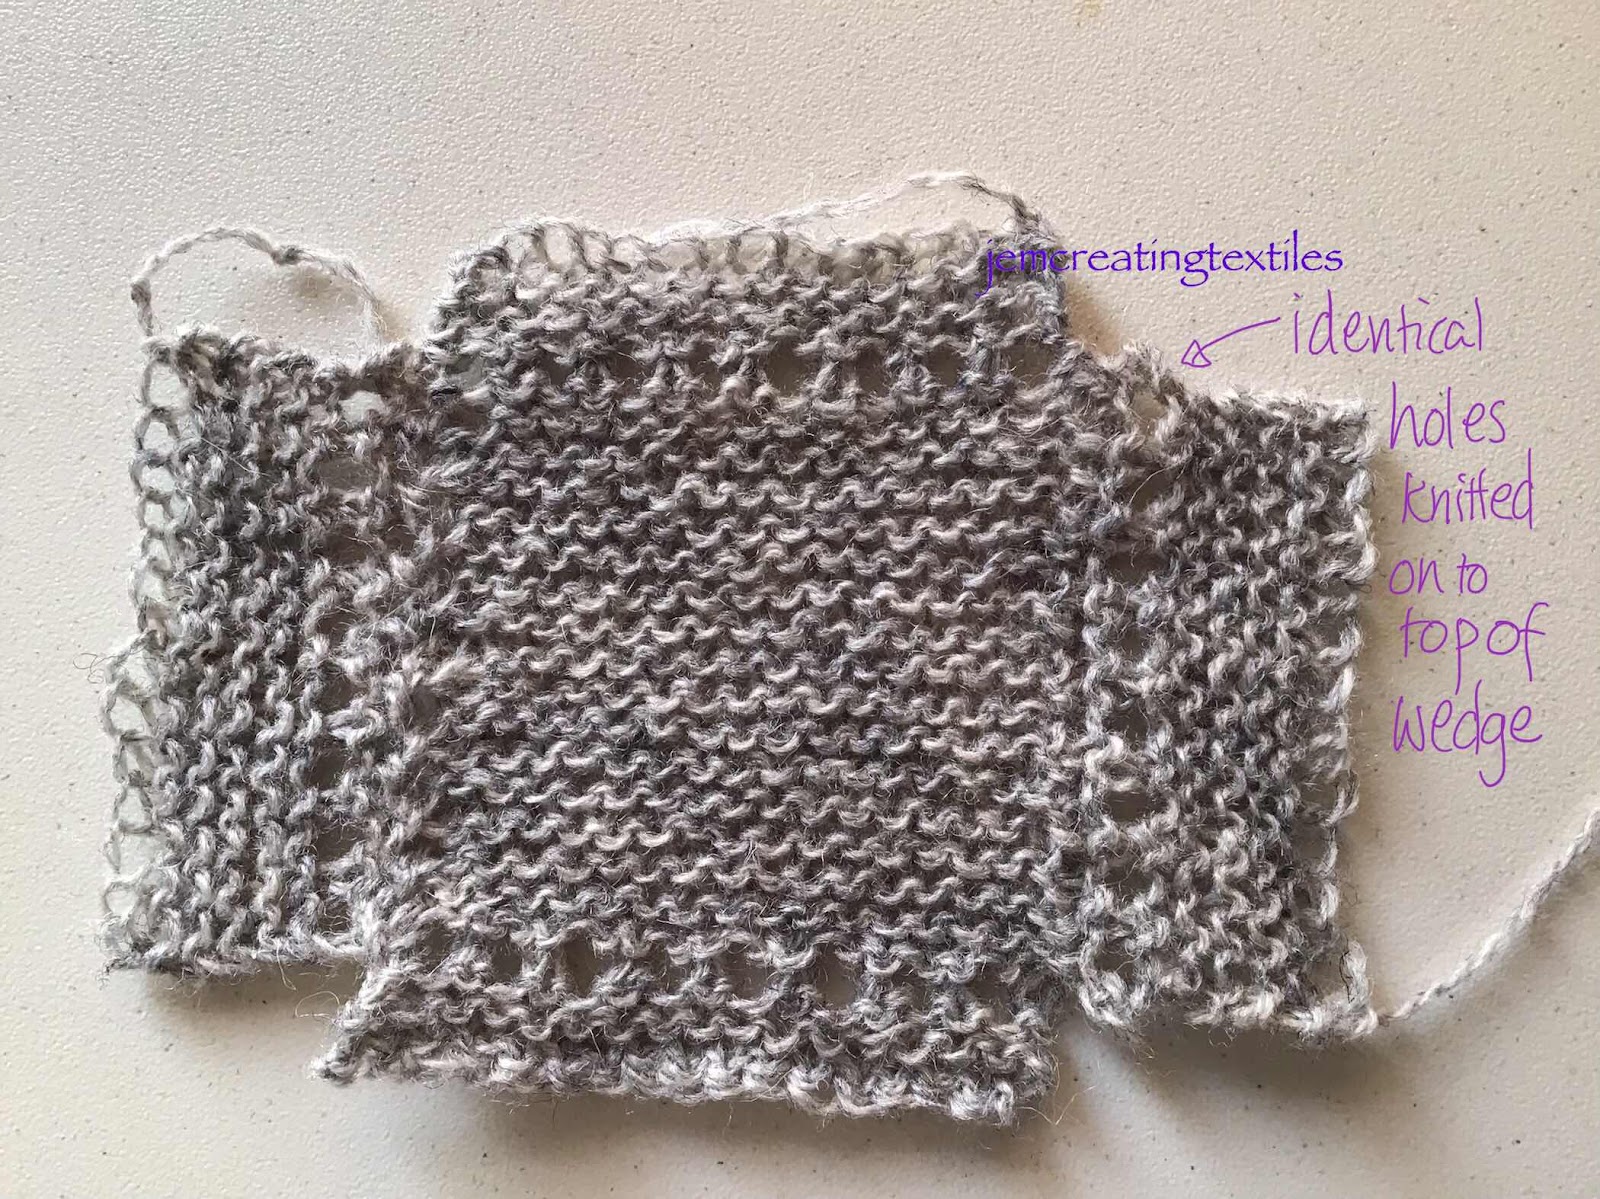


Sample two 

Knitting another sample to see how slipping the first stitch and then doing a whip stitch join can look. I like the neatness of the holes formed and one to add to my repertoire but not for joining the edges of the centre square when I have already knitted the holes around all 4 sides of the square. 
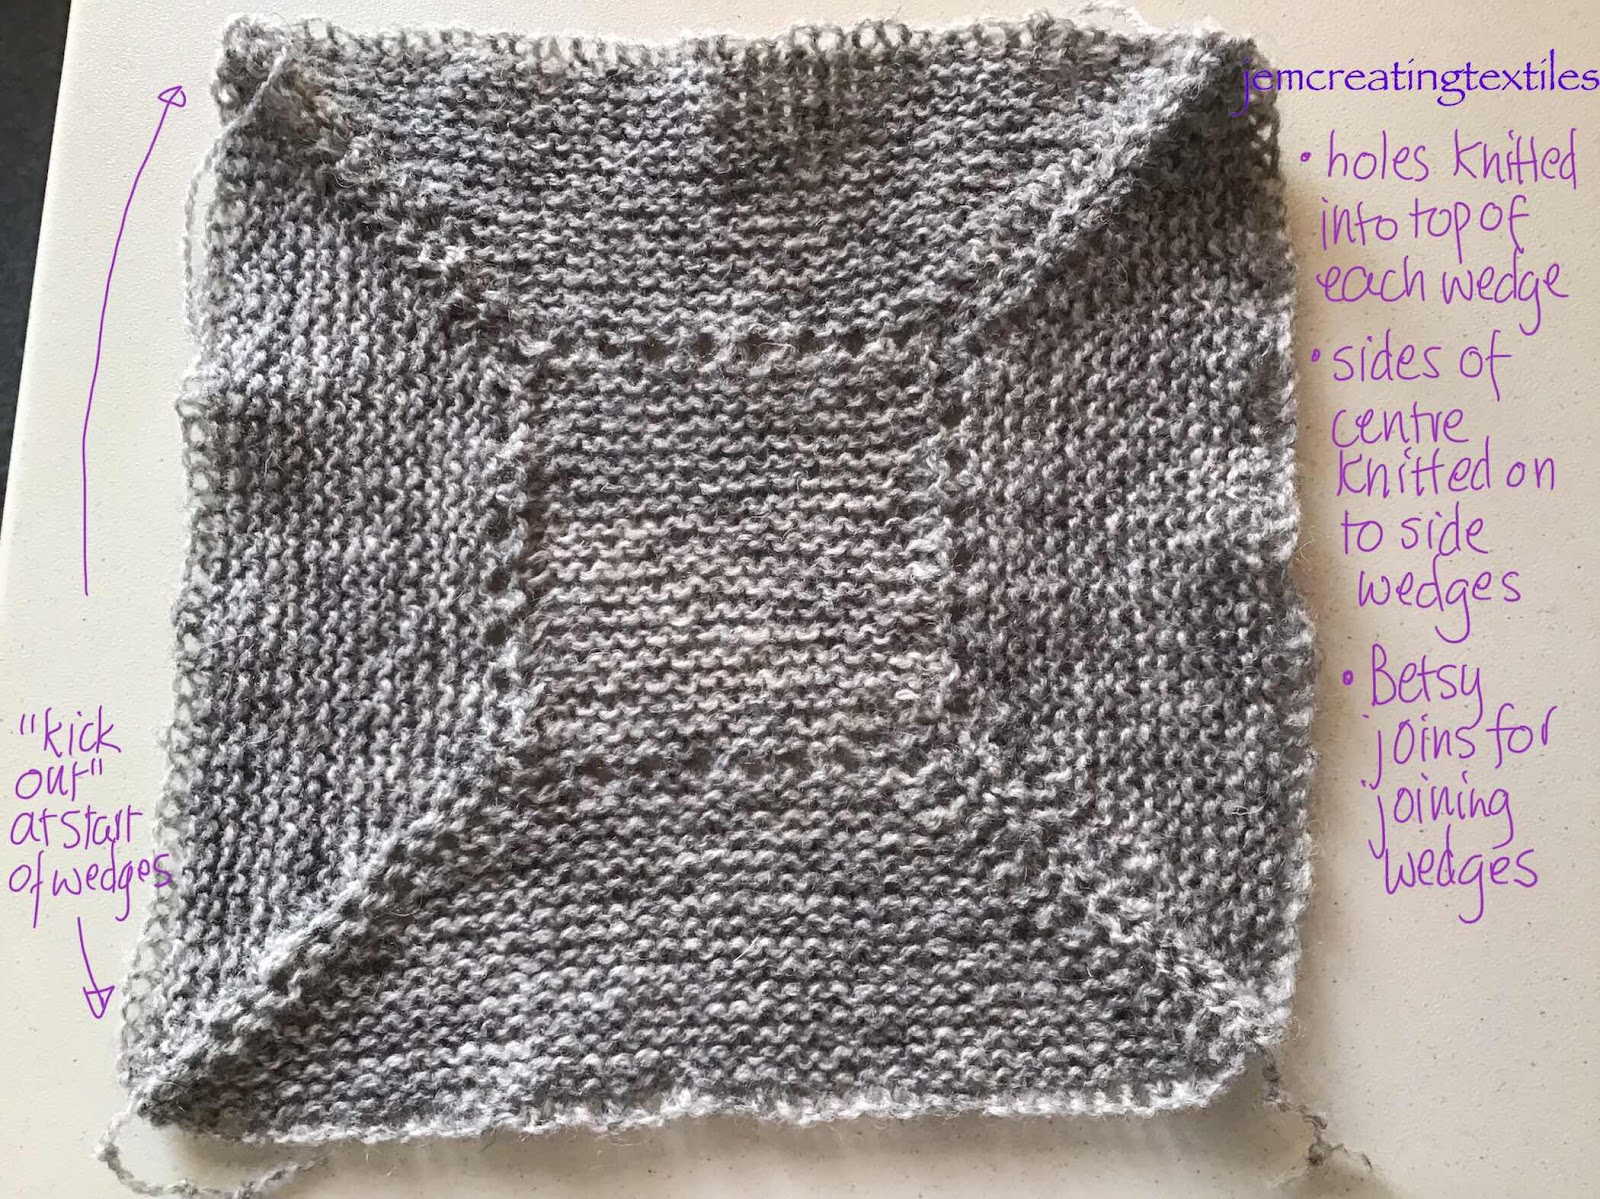


Sample three 

Bigger and with proper wedges. However, I shaped these by decreasing on every  other row from the start, outer edge, and look how they kick out at the outer edges! This must be why Shetland Hap Knitters often / usually  have some straight rows before starting the decreases to make the mitres! 

Happy with the holes and happy with how I joined on the side wedges by joining  them on as I knitted the centre 

Each wedge forming the mitres is  joined to two other wedges with versions of the Betsy join as I interpreted it in 4 different ways based on Hazel Tindall’s  demonstration in the 50 tips from Shetland Knitters  DVDs which she did with Elizabeth Johnston (3). I was waiting for my personal tuition of the Betsy  join for Elizabeth’s hap, which explained and clarified  the method. (The equivalent wedge joins after my personal tuition are shown in a previous blog post Elizabeth’s  Mini hap)


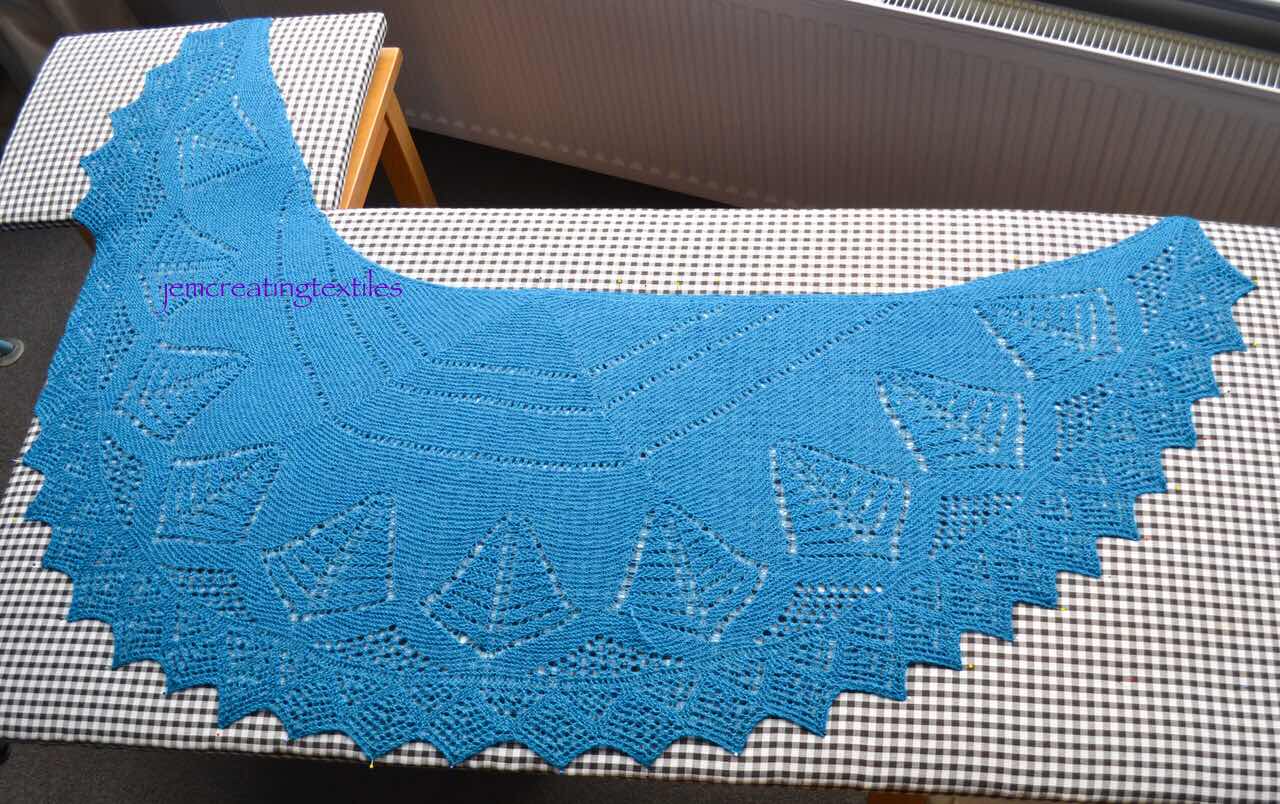
So onto a much changed version of Donna’s knitted hap from the earlier workshop. 

I used Shetland Supreme 2 ply yarn, which I naturally dyed with Alchemilla and Madder. I used size 3.25mm dpns. 

Image of the modified hap 


This has benefited from workshops and discussions with the following Shetland Lace Knitters ( I hope I have not missed anyone out, apologies if I have): 

Kathleen Anderson 

Anne Eunson 

The late Ina Irvine

Elizabeth Johnston 

Donna Smith 

Betsy Williamson

Elizabeth Williamson 


And also Tessa Lorant for the Buttercup Edging in her book  ‘Lace Edgings’ and Joni Coniglio for enabling me to graft lace invisibly


…..but basically the interpretation is mine and I now have managed to work out a variation of the 2017 Mini Hap that I am happy with. 


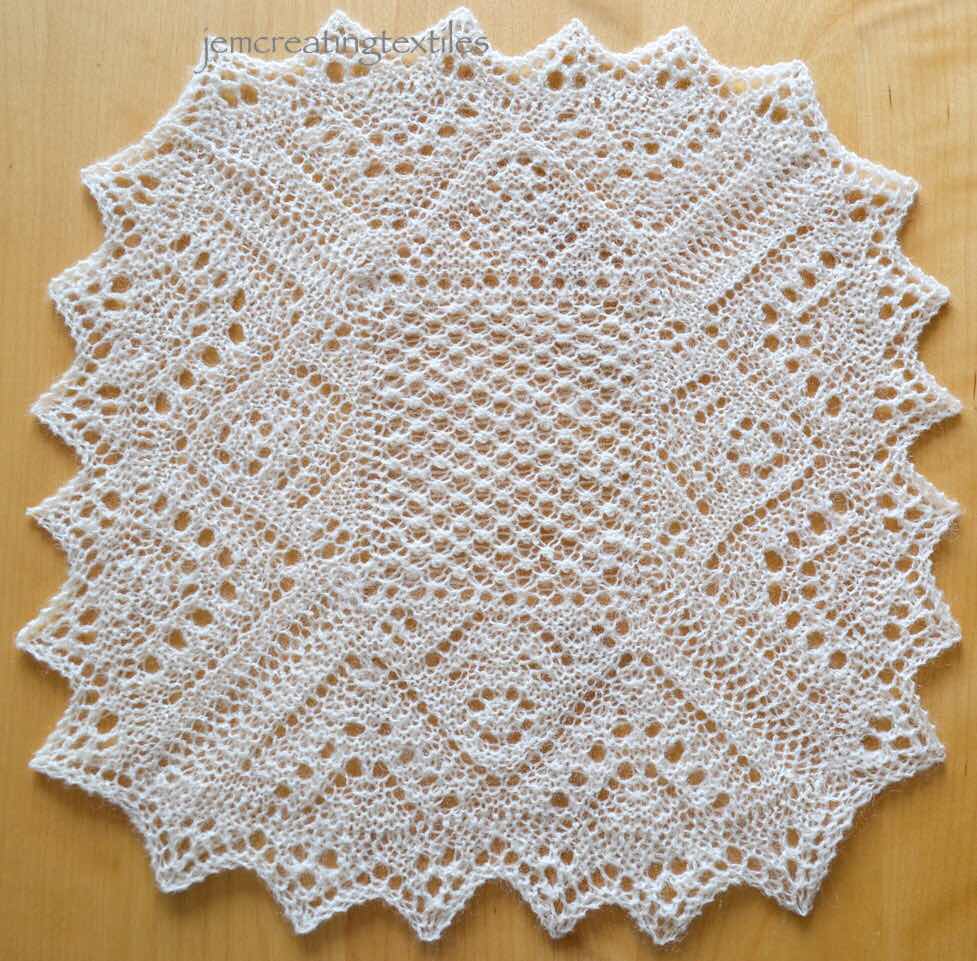
Order of construction 

Lace edging knitted first, graft completed the Joni Coniglio method

Stitches picked up along a quarter of the peaks, then board/ wedge knitted including the row of holes and return row

3 more boards  completed by picking up stitches along a quarter of the outer peaks for each one,finishing as the first one. 

Returning to the completed first board the centre is knitted picking up one stitch from boards 2 and then 3 on every other row but finishing 2 rows short. The remaining stitch left from each side board is placed on a separate yarn holder. 

The centre is then grafted to the fourth side board including picking up the remaining  st from the side boards to complete the centre section. 


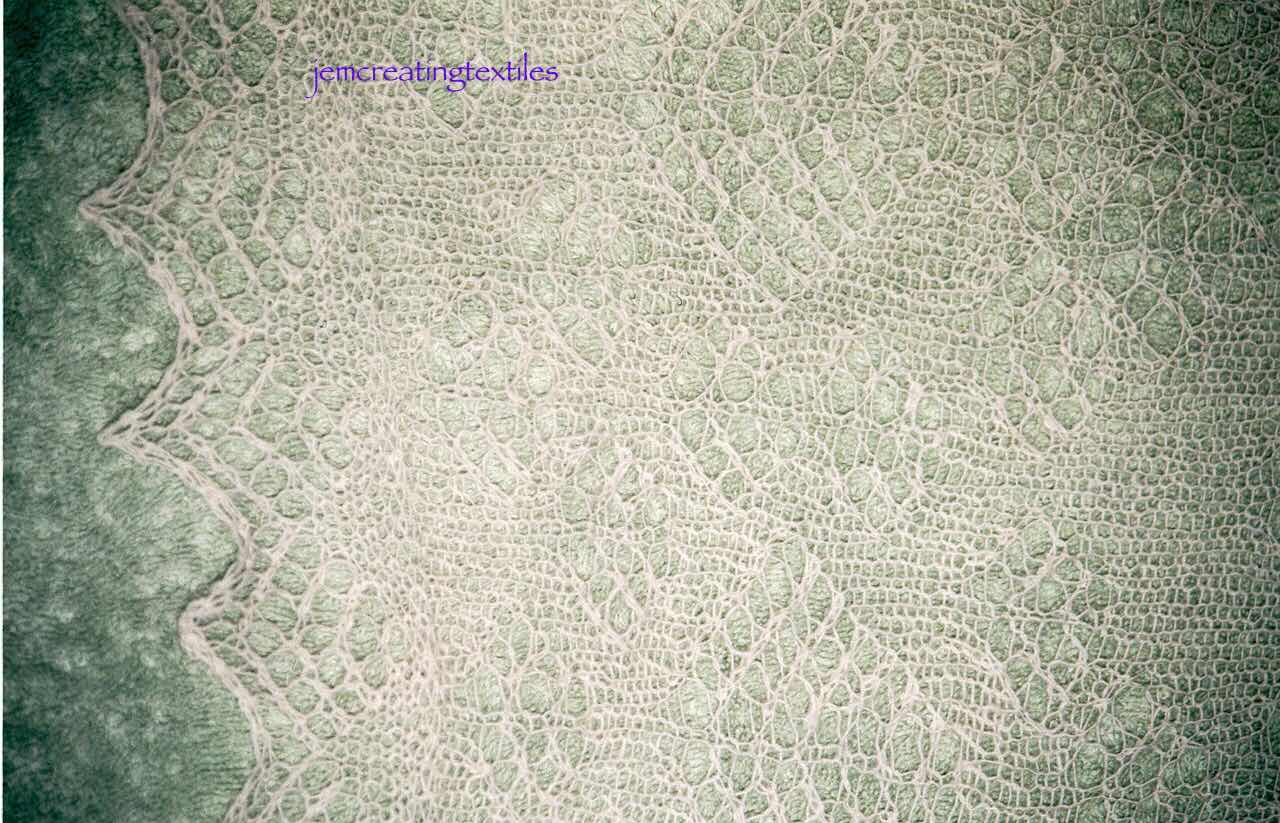
This leaves four  gaps at the mitres which are closed with herringbone stitch after dressing the hap. I felt the herringbone stitch complimented the Buttercup Edging of the lace border.


At last I feel I understand how I can knit a full sized hap, the many alternatives for knitting an outside-in hap and the effect of the different choices made. Planning and making swatches of the motifs and techniques payed off for me. I like to fully understand and be in control of all that goes on in making a knitted item. Perhaps the late Elizabeth Zimmerman should be added to my list above. She certainly encourages this approach! 


Sunday 19 June 2022

Fethaland Shawl


When I saw this pattern, by Anne Eunson in the Shetland Wool Week Annual 2021 I knew I just had to knit this.

I had been doing a series of in person ( luckily) classes with Elizabeth Williamson (1). My usual shape for Shetland lace knitting was a rectangle! I liked how the Unst (2) ones were constructed and I could by now follow the techniques and use my own motifs, proportions etc and have some items I really loved. With Elizabeth I had been exploring a variety of different shapes as we knit mini versions - the idea being we could scale up. I had cheated for the first one, ie not designed my own,  and knitted Elizabeth’s Fladda/Alchemilla and used Jamieson and Smith supreme 2 ply that I had naturally dyed. (3) 

The one Anne had designed was this same crescent shape, although the construction was different which was great for me, the more ways I know how to do a shape the better! 


What I also liked about Anne’s design was the fact that she had taken inspiration for the main motif from the Lace Assessment project she had been working on at Shetland Museum and Archives with her sister Kathleen Anderson. What to me was even better- the fact that she had ‘combined aspects of different motifs found among the collection, creating something new yet still rooted in tradition’. This I am sure is what Shetland Knitters from Shetland have been doing for generations, not just trying to copy a motif exactly but making a motif of one’s own. 


I liked the colour Anne had chosen and this sparked in me an idea. I had bought a ‘poncho’ in a similar colour from a local machine knitter. However I loved the colour but every time I put the poncho on I moved it around and ended up taking it off and wearing something else. The poncho was I guessed in Yeoman’s 50/50, not a yarn I normally use as it was 50% wool and 50% acrylic. However, I guessed it might work for this. So I pulled out the poncho, and washed the yarn. Then I set about working out the length I had (I used the weight of my blue yarn to work out the length from the manufacturer’s yarn details  and used this to cross check the length I had in my skeins. 

By looking at the information Anne gave in the pattern I would see the length she had allowed. I would have a bit of yarn spare but not as much as I would have liked. 

The next thing was to knit a tension square. I did as Anne suggested and knitted the tension swatch  using the same needle size she suggested. I stopped myself memorising  the numbers for the tension swatch and blocked this as I usually do on my sample blocking board. 

When dry and left on the blocking board and the pins removed, I was pleasantly pleased with the fact that the measurements were as near as would make no difference to the pattern tension, as it was a shawl. 


Tension sample. 


I liked how the main motif looked and decided that even though there was acrylic in the yarn besides wool it would be worth knitting using this yarn. 


So I set about casting on. I like to knit with double pointed needles and a knitting belt as I know it gives me better tension. The edging went well, but then I needed to  pick up stitches from this and had 509 sts to juggle with. Several of the dpns had to be employed with rubber bands on the ends until I got the stitch count down a bit. I was using 40 cm long needles and soon got so I could have all the stitches on 2 needles. I had done this before and the resulting shawl worked out fine (a pattern from Donna Smith.) Checking the pattern as I was going along  was tricky but as it is so important I made sure I did keep checking on progress. The only tweaking I did was at the very end where I did an invisible grafting that I have been learning from Joni Coniglio’s methods and this worked very well. 

The final graft


From the grafting, there was  not a raised area in the middle or a noticeable dip where the two joined. I hoped  for this and managed to avoid either happening. A previous shawl I knitted many years ago, before I learnt how to avoid it, still bothers me as it is not flat and forms a V at this join. 


Blocking was tricky as my door sized blocking board was not big enough! I added my sample board next to it and that worked ‘well enough’. I could not tell which end of the shawl had gone off the edge when it was finished. 

Dressing 


I started this in November and the final dressing was done in April, however, this wasn’t my sole knitting and turned into my TV knitting as I became familiar with the pattern. 


So this is the finished shawl ( see initial photo) and a far, far superior use of the yarn than as a poncho! 


Some details: 

Size 135cm x 48 cm approx, as pattern

116 g of yarn used

Yarn Yeoman’s 50/50 as mentioned above. It gave a lovely soft finish! 

Plyed  the yarn was 20 wpi ….not a good way to measure yarn as wpi means the single in the yarn usually,  but it does give an indication of the diameter. I would call this a ‘3ply’ in vintage knitting terms.

Needles used 2.75 mm dpns with a knitting belt 


Notes: 

  1. Elizabeth’s website shows her work and workshops


https://www.elizabethwilliamsonknitting.co.uk


  1. Unst lace is some of the finest, if you get to Shetland  do try and get there to see it. Some more details here http://www.unstheritage.com/web/unst-heritage-centre/unst-lace/
  2. Details and photos of Fladda can be found in this blog post of 14 Sept 21 


Wednesday 15 June 2022

A Shetland Lace Hap


At last my completed Shetland Mini Hap.


I am really pleased with how this has worked out. 

Details:

Pattern (and tuition) Elizabeth Williamson (contact for online classes for this and other lace see https://www.elizabethwilliamsonknitting.co.uk )

As followers  of my blog will know I, and 2 other Shetland and Shetland Lace Knitting Lovers have been been privileged to meet up with Elizabeth for lace knitting tuition for nearly a year now. Examples of what I have been doing are in earlier blog posts. 


Needles - 2.75 double pointed (and used a knitting belt) 

Yarn - James and Smith Shetland Supreme 2ply

Size when dressed- 32 cm x 32 cm 

Finished weight - 14.8 g 


Construction is a traditional Shetland method. Knit one lace edge, then the corresponding border, then the centre. The 3 other lace edges and corresponding border are knitted separately. These are then grafted together and make use of the ‘family’ graft, which has become known as ‘the Betsy join’. 


A big advantage of doing a hap this way particularly a full sized one, to me, is that you don’t have to carry much with you until you get to the construction. I read about people picking up hundreds of stitches and having the whole hap on their needles as they knit but this is not the case with this pattern. I think knitting a hap from the inside out, means mordanted e and more stitches as you knit but this is not the case here due to the construction. 


I love the well designed individual elements of this hap and the way they fit together. The boards (borders) being my favourite. I also learnt new ways of knitting stitches, including ‘holes’ with added definition. 


I had knitted one large scale hap previously. This was early in my Shetland Lace Knitting Career, in 2001. This  was the Brora Black Shawl, although I knit this in natural coloured 1 ply cobweb from Jamieson and Smith, pattern by Gladys Amedro. This was done from written instructions as no charted ones were available then. It was given to my son and his wife on the birth of our first  grandson in 2008. I have a ‘ post it’ on the pattern noting 95 hours! That sounds about right. It looks as if I knitted for about 1 to 2 hours at a time on it, by the crossings out on the post it! 

Unfortunately the photos are pretty poor….I’m glad my photography has improved too! 


This mini hap gives me another way of constructing a hap and I like the way the centre is not divided by ‘joins’.