Tuesday 15 December 2020

Creating Textiles - a new website

I seem to have spent the past several months writing a new website. It is now published and I think all the effort has paid off. 


Wensleydale fleece I dyed with cochineal which I have used for the background of the be website 


As I am no longer teaching workshops I thought I would redo the website to show my textile interests AND more importantly pass on basic methods for doing certain textile things, pass on hints and tips and give sources and some references. I have also taken the opportunity to write about historical aspects, which interest me greatly, for each textile  topic. I have concentrated on my local area, Norwich and Norfolk in each case. 


The main textile topics I have included in the website are: 

Spinning 

Dyeing

Weaving

Designer Knitting 

Couture Dressmaking

Colour and Style

Felt Making


Each has several separate pages accessed through the main page listed above.  I have tried to explain this in the Introduction on the website. 


I hope you find it both useful and interesting. My plan is that I use the blog for day to day textile stuff rather as I do now, but textile things of a more permanent nature, hints and tips, ‘ how I do x’ will from now be on the website. There will be some overlap but this is my general plan. 


I would like to thank Ele for organising this and leading me through it all, without her it would not have happened and to Michael for endless checking.  


The is www.creating textiles.co.uk accessed 

here

Saturday 24 October 2020

More about Norfolk 2 : Sea Palling


Last Thursday looked like a good day to go to the sea, but we began to doubt this as we drove round Norwich. There was a cloudburst but fortunately traffic is usually fairly light and we kept our nerve and continued to the East Coast. By then it was bright. First stop was at Horsey Windmill where we had coffee and cake.


We had cake and coffee with us,  but it was good to see the National Trust little coffee shop was open. This great windmill is worthy of a post of its own later. 


We drove on and aimed for Sea Palling (1)  not a beach we go to often. It is another of Norfolk’s  ‘big skies, big sandy beaches’ and just the place for a brisk walk to blow away the cobwebs and recharge the batteries. I remember stories of my father cycling there (approximately 40 miles each way)  after the 1953 North Sea Floods. Sadly 7 villagers from the area were drowned. 


The beach is characteristic as it has 9 giant reefs made of very large rocks to try and halt the erosion of the beach  and protect this small seaside community. 


Michael walked on ahead, trying to keep a good pace but as I had the camera with me I could not but stop and take photos! 


Composed by the tides, this shows a bit,of seaweed and actually a couple of colonies of animals! The lighter one of the three is Hornwrack, actually a group of Bryozoans, rather like hydra, each in their own little space. Not sure I was taught that until University! Hornwrack can be mistaken for seaweed, and strangely enough I saw that error on iG  only a few days ago. 


I’m always on the look out for textile inspiration as these two seemed to fit the bill today. 


Unfortunately I was behind one of the piles of large stones on the beach and suddenly noticed the tide coming  in much closer, I could not climb out easily on the land side, and had to put on a spurt to catch Michael up. All that watching of the tremendous  work done by the RNLI in ‘Saving Lives at Sea’ should have made me more cautious. 


Sea Palling like many of the Norfolk coastal towns and villages has a lifeboat station. This one however Is now run by volunteers and unusually funded by local people. It was set up in 1840  by private funds and the RNLI funded it until 1931 when it was closed down. It was revived, again by private finance in 1974. 


So what began as a day out to take sea air has led to far more, research into the heritage of the area, respect for those that live by it as well as textile inspiration. 


Notes

  1. The history of the village dates back to the Domesday book when it was called Pallinga. Notice no reference to ‘Sea Palling’ as it was not by the sea then! To me, the entry there is particularly interesting as it notes 71 sheep which is quite a lot. The area of the village was 3c. I understand ‘c’ to be a carucate- the area of land a plough team of 8 oxen could till in a single annual season. Further investigation looks like this area equated to about 120 acres. Ref Phillimore edition of the Domesday Book. Norfolk was lucky it belongs to the Little Domesday Book series and hence has more detail than the earlier counties surveyed and we have a copy of the 2 volumes, fortunately the original Latin and the English Translation
  2. This shows how the barriers affect the beach shape due to diffraction as the sea hits the barriers. You might need to move the photo along a bit to get the full effect. It is a bit more impressive than looking at waves in a ripple tank in school physics https://www.bing.com/maps/?v=2&cp=52.788763840321245~1.6073888540267944&lvl=16&sty=h&eo=0

Wednesday 30 September 2020

Another fine lace Unst Shawl


The Hinnywaar  is finished and I love the patterning of it. More pictures, including of my lace grafting journey if you are interested are here (blog  posts of 26 July 20, 3 Aug 20) 


So on to the next one. I have chosen the Burrafirth shawl (1) it is of similar size, it might even be a little smaller but the pattern is steeped in meaning (and memories of Unst) for us as we have not been able to go this year. With things as they are with Covid-19 all plans have to be fluid. 


For this shawl I have naturally dyed Jamieson:and Smith’s  Supreme lace yarn with Golden Rod from my garden. This shawl is a trial to see how the dyed yarn knits up. It is the finest yarn I have dyed to date, by natural dyeing. I measured the wpi after dyeing for that NM 1/16 yarn  and it came to be 60wpi. 


So the project bag is repacked (blog post of 6 Sept 20), the yarn is prepared and the pattern is chosen. Since I worked out how to graft the previous shawl I decided that I would not start another shawl without having worked out how I would do the lace graft. So I looked at the pattern and  worked out which 2 rows I would construct during the graft,  checking that this would work for each lace edging, the middle grafting would be garter stitch grafting. I wanted to check that one of these 2 central constructed rows did not involve a row of eyelets. Once  decided I then set about drawing out the 4 stages for each pair of stitches (one from the front needle and one from the back). 


Section of the graft crib sheet.


I knitted a piece of the lace edging  as it would be elsewhere on the shawl. Then I examined carefully where the graft would be so I had an example of what this looks like with knitting rather than a graft. 

The knitted lace edging - the graft will be done at the the narrowest point, marked as on the photo. 


I then knitted  a sample of lace edging for each of the front and back needles and finished 2 rows short as I would form these 2 rows during the graft. 

So then I worked through my crib sheet for the graft. 

 Trial graft


So now I feel nearly fully prepared to knit the shawl, I will do the bit marked again! 


The yarn is knitting up well, despite being naturally dyed and I am very much looking forward to being able to wear it, to coordinate with my Harris Tweed skirt! ( see blog post of 3Sept20)  

These photos show the first part. I have just stretched the knitting out a bit when dry. It has not yet been blocked and from experience I know any unevenness will look less when blocked. 


Lace edging and part of the border


The lace edging  (Norik waves pattern) is knitted first then stitches are knitted up. This  right hand corner is worked by short rows as is traditional in these Unst Heritage Lace Patterns (2)


The yellow pins show the line where I picked up the cast on row from waste yarn in working the second short row corner, apologies for using yellow pins! 


One set of the Burrafirth Trowie Caerds (3) 


  1. Like the Hinnywaar shawl, this Burrafirth is one of the series designed in Unst and sold for the Unst Heritage Museum, designed by Hazel Laurenson. The grafting method i will use is all thanks to Joni Coniglio. If you search for her name you will find more details of her brilliant instructions. 
  2. For lovers of Unst like us Norik Waves will bring  back memories of a fascinating beach  in the north of the island 
  3. Shetland dialect  for ‘ferns’


Sunday 6 September 2020

Fine Lace Knitting - essential kit


I thought it might be a good idea to show what are the essential items in my lace knitting project bag. I am sure others have different items and it would be good to see these. I seem to have 20 items in my bag! 


First of all the project bag. It is of a particular size for two reasons. I made it from a vintage chair back from a set of identical ones that I found when going through my aunt’s things after she died. She was a very good needlewoman. I also made it large enough to take my magnetic board. This was the first bag I made like this and I have since improved the zip placement. I used blackout curtain lining for the inside, to help prevent pointed needles going through the bag. This has worked very well and there have been no mishaps and given that it has near daily use that is better than I hoped for. 


The magnetic sheet. This was bought for embroidery many years ago but is perfect for all sorts of charted lace knitting. (You will note I have a bag for lace and a bag of other knitting (code for fair isle usually). I make a copy of the part of the knitting pattern  I am currently working on and have a number of magnetic strips. For example in the last lace shawl I could see the edging chart and the centre of the shawl chart on the same side. When I finish knitting for a session I leave the magnetic strip showing the last knitting row completed.


Yarn for knitting in progress. 


Knitting needles, the sleeve around the needles is my design and indicates the needle size to me


Propelling Pencil with rubber on the end. I write on my knitting sheets, so I can mark off the last row completed and and if I am doing repeats, I can keep account of those too. 


Small working notebook

This is where I record day to day things, I do write down the last row completed and the time and date, this is a back up in case the sheets move. I also keep a note of anything else relevant here, ie yarn used, amount needed, where the spare yarn is stored, date I started etc. 

I keep this notebook in a plastic bag as this one is a spiral notebook. I prefer these but don’t want any accidents with the wire spiral and the knitting or spare yarn. 


Needle ends

Essential for leaving my knitting, I love these special handmade ones from Shetland Museum. (1)


Temporary needle ends

ie. twisted up elastic bands . I keep a supply of small plastic bands in their own container and some already knotted  together for when needed. 


Tiny ( size 1.5 mm) double pointed knitting needles. These are used when I need to take back from a mistake or where the yarn falls apart on me. This rarely happens but in my last  ball of yarn I  had a few breaks! If the needles are near me I tend not to need them! You will see they have their own tiny needle holder, I inherited this from my Husband’s mother and only recently did I realise what it was! 


A container for my yarn stitch markers. I have a range of colours and find yarn stitch markers do not catch and are not heavy compared to the fine lace knitting. Made for me by a friend. 


A container for my odd lengths of yarn, again made for me by a friend. 


A set of sewing needles, some of these are quite substantial and I keep one threaded with yarn at all times. Then if a stitch runs down away from me, I can catch it with the needle and get a yarn loop in it before much harm is done. 


A latch hook, such a useful tool for working up any dropped stitch, this is one of my knitting machine tools. 


Baby powder - if my hands or the knitting needs a bit of help to move along the needles.


Knitting belt 

I always knit with a knitting belt since being taught how to use one, the advantages are tremendous. 


A fine bag to keep any completed pieces of knitting safe and clean.


Pillow case for knitting in progress also which sits on my lap when I am knitting


Pair of scissors - if I need to cut any more stitch markers for example 


A butterfly of yarn -  similar in diameter to the yarn I am knitting with. In case I need a length of the same yarn, eg waste cast on knitting or to duplicate stitch a section of yarn that I think might give way - another insurance policy. If it is in the bag it is very unlikely I will need it. 


Emery Board for the inevitable rough nails that lace knitting finds! 


What’s in your lace knitting project bag? 

Thursday 3 September 2020

More Dyeing from the Garden

More dyeing from the garden 

The Golden Rod (Solidago giganticea) has made a tremendous show in the garden this year, possibly because I completely cleared the beds in the spring and removed every scrap of ground elder and bindweed root I could. They have grown very tall but withstood the recent winds well. 


I have been intending to use them more for dyeing and this year seemed the time to do that. I also intended to try natural dyeing with Jamieson and Smith cobweb yarn and also their finer Supreme yarn.(1) I have seen the supreme dyed but this seemed to be using acid dyes. Using natural dyes is more difficult as the yarn is heated to a higher temperature for much longer than is the case with the relatively easy acid dyeing. I also wanted a rich solid colour.  I am going to use these fine yarns  for knitting fine Shetland Lace oblong shawls. To me the pattern of the motifs is what must stand out in fine lace and this must not be camouflaged by random dyed yarn. 


So as usual when trying something different a series of trials was needed. I decided initially to use the slow cooker for the mordanting and the dyeing of these fine yarns and some fleece, thinking that I would protect them from the prolonged higher temperature. After the mordanting I dyed the  fleece by my normal method with modifications and the skeins would be dyed in the slow cooker. The result of this experiment was striking, the colour of the skeins, both of cobweb and supreme, from the slow cooker was pale and insignificant. The fleece from the modified normal method using a pan on the hob gave a much stronger colour. But perhaps it was the fleece that was dyeing a better colour anyway! 


More trials were needed so I started again, fresh dye material, etc with fresh skeins and still did the mordanting in the slow cooker but this time dyed the cobweb and supreme by my modified normal method. 


All the skeins by both methods dyed very evenly. I feared the fine yarns might felt with the heating they were subjected to- in scouring, mordanting and dyeing. However, there was no hint of felting  for either the cobweb or supreme yarns. 


The conclusion from this was that I would be using my modified normal method of heating the fibres in a pan for further dyeing of cobweb or supreme fine fibres.


I wanted to dye, with Golden Rod , enough yarn for another Unst Shetland shawl in the series designed by Hazel Laurenson and available from Unst  Heritage Centre. I also wanted to get a variation of the yellow by using an additive after dyeing and decided to use iron to give a moss green. This would be used for a pattern in the Shetland Guild of Spinners, Knitters, Weavers and Dyers  book ‘A Legacy of Shetland Lace’.


I decided to dye the supreme in just Golden Rod dye and the cobweb in the Golden  Rod and iron. I would dye 50g of each yarn. 


I am pleased with both of these sets of dye and both will enable me to knit a fine lace shawl that matches my Harris Tweed skirt. 


Now for the next dye extraction. This will be Rosemary and Oregano! 


Notes

  1. The cobweb yarn is from a cone of optic white NM 1/14.5 and 33wpi (after dyeing) and the Supreme is NM 1/16 and 60wpi (after dyeing). Both are from Jamieson and Smith, Lerwick, Shetland.
  2. A Legacy of Shetland Lace, is in my mind an excellent book. The patterns in the book have been donated by members and thus it is Shetland lace designed by Shetland spinners and knitters. Each piece in the book, there are 21, are of varying (and indicated levels of difficulty)  and clearly state who is  the designer. It is also nice to read about each of the designers and to read their advice in grafting, blocking etc. 


Monday 31 August 2020

Where I live

I like to see landscape views of where others live, particularly during this ‘new normal’ time so thought I would post periodically about where I live. 

I live in a village, in the centre of a triangle of 3 Market towns in South Norfolk, in the middle of the bulge that sticks out as East Anglia on the map of England. We are quite a bit further east than Shetland. 

The village is small in population, 785 being the latest recorded figure, but large in area for here, being 4.21 square miles. The village is very spread out and we live in probably the oldest part. We live not far from what is thought to be the site of the original church. The current centre of the village is about a mile away, the population concentrating here following the Black Death. Down ‘our lane ’ is the source of a river near which Palaeolithic flint flakes were discovered. 


A view from my front drive 


Big skies - just before Storm Frances hit us, the verges have just been cut- sources of many of my dye plants.


Monday 3 August 2020

Grafting Part two


You may have read my previous post about grafting  fine Shetland Lace (26 July 2020). I have continued to work on this and am now at a stage when I fully understand what I am doing and can do it without any notes or props. This is quite a technical post! 


My first workshop on ‘more than just Kitchener stitch grafting’ was at a half day with Anne Eunson and her sister Kathleen during Shetland Wool Week in 2018 where I learnt to graft holes. I have also watched (many times) the grafting section of the video by Hazel and Elizabeth (1) and found that useful too. 


However, I have been aware that I did not know how to graft lace so that I got an invisible join in my Shetland Shawls. It is not possible to do a kitchener stitch graft across lace edging without it drawing my eye to it. There is no natural horizontal line across in fine lace edgings and to make one, to me, seems to spoil many, many hours of my fine lace knitting (and often spinning and fleece preparation too). So I set out to find a way that suited me that I could use to join across these rectangular shawls.(2)


Ideally I would have liked to have read different knitter’s methods and then chosen and adapted these to suit me. However this has not been possible. I have, luckily found a technical person  who has written extensively on the subject of lace knitting grafting. Her name is Joni Coniglio  and she has published 3 videos and an ebook with Interweave.(3) To me she is a genius as she explains so well. I started off with video 3, called Lace Knitting Grafting (check). This was a mistake as clearly I needed to study video 1 on ‘The Definitive Guide to Grafting: Fundamentals’. I even needed to study video 2 as she has made the videos increase in complexity. By the time I got onto Video 3 again it was all making sense. This has been a study of over 3 weeks. Most of the time that it was possible to think about anything other than ‘living’ I was working on this in my brain. 

I have therefore made quite a substantial commitment in terms of money and time. I have read, made many samples, given myself little tests etc etc and it has all been worth it. 

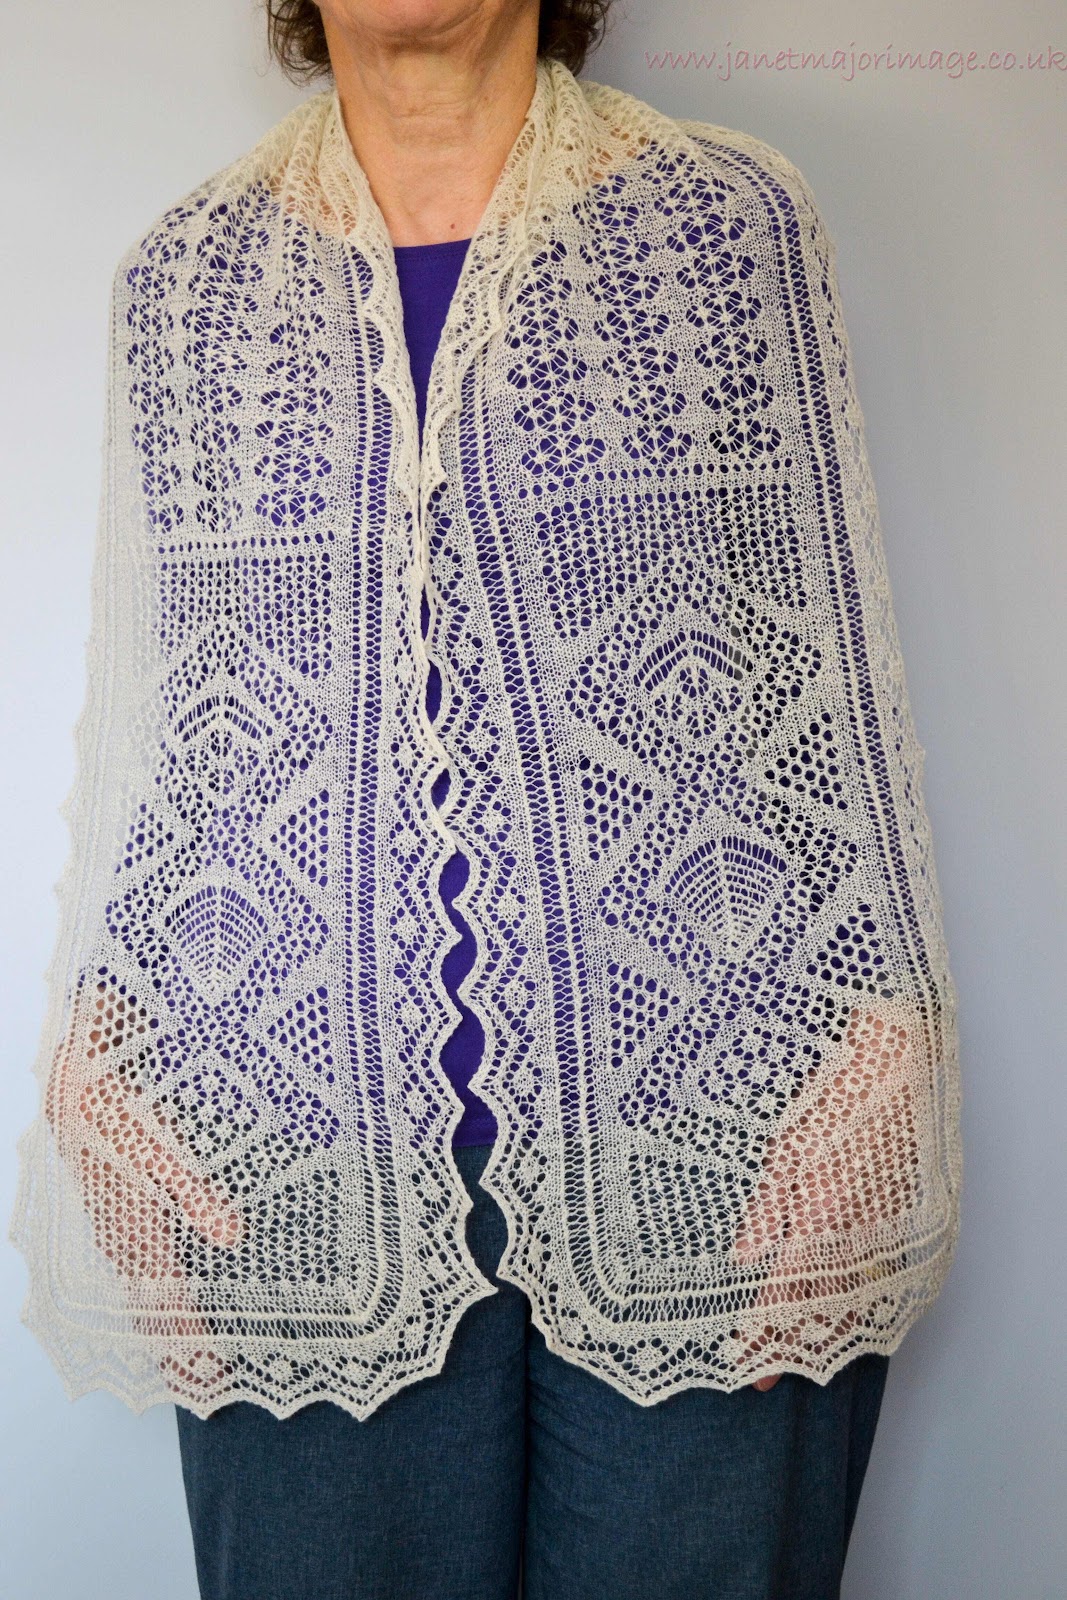
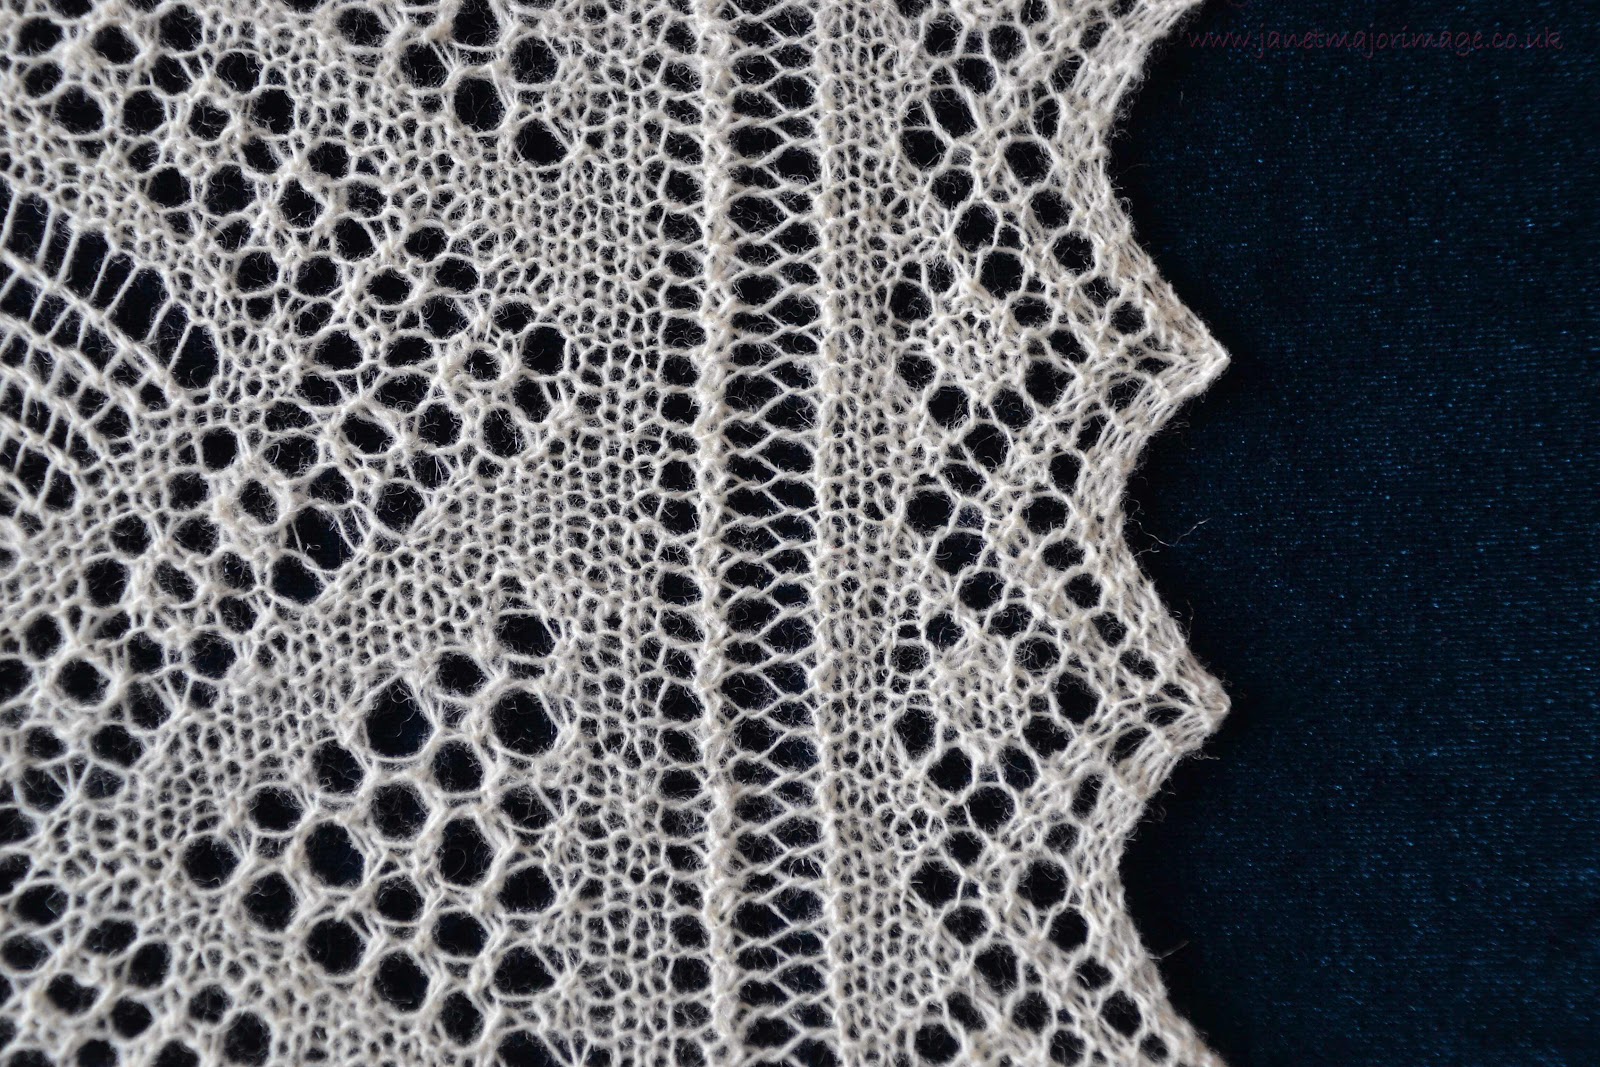
If you did look at the previous post I wrote on grafting you will see I got as far as I could before I grafted the Hinnywaar shawl.

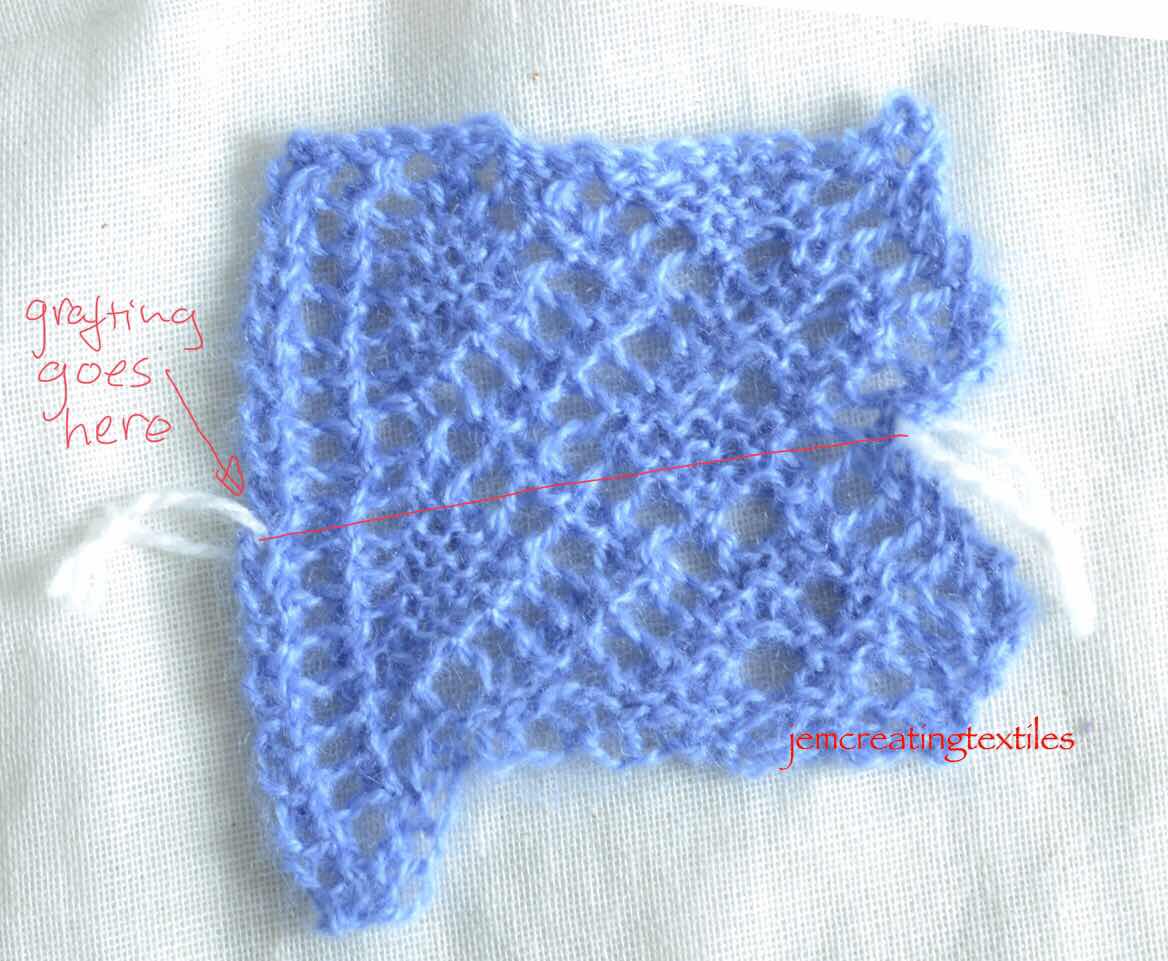
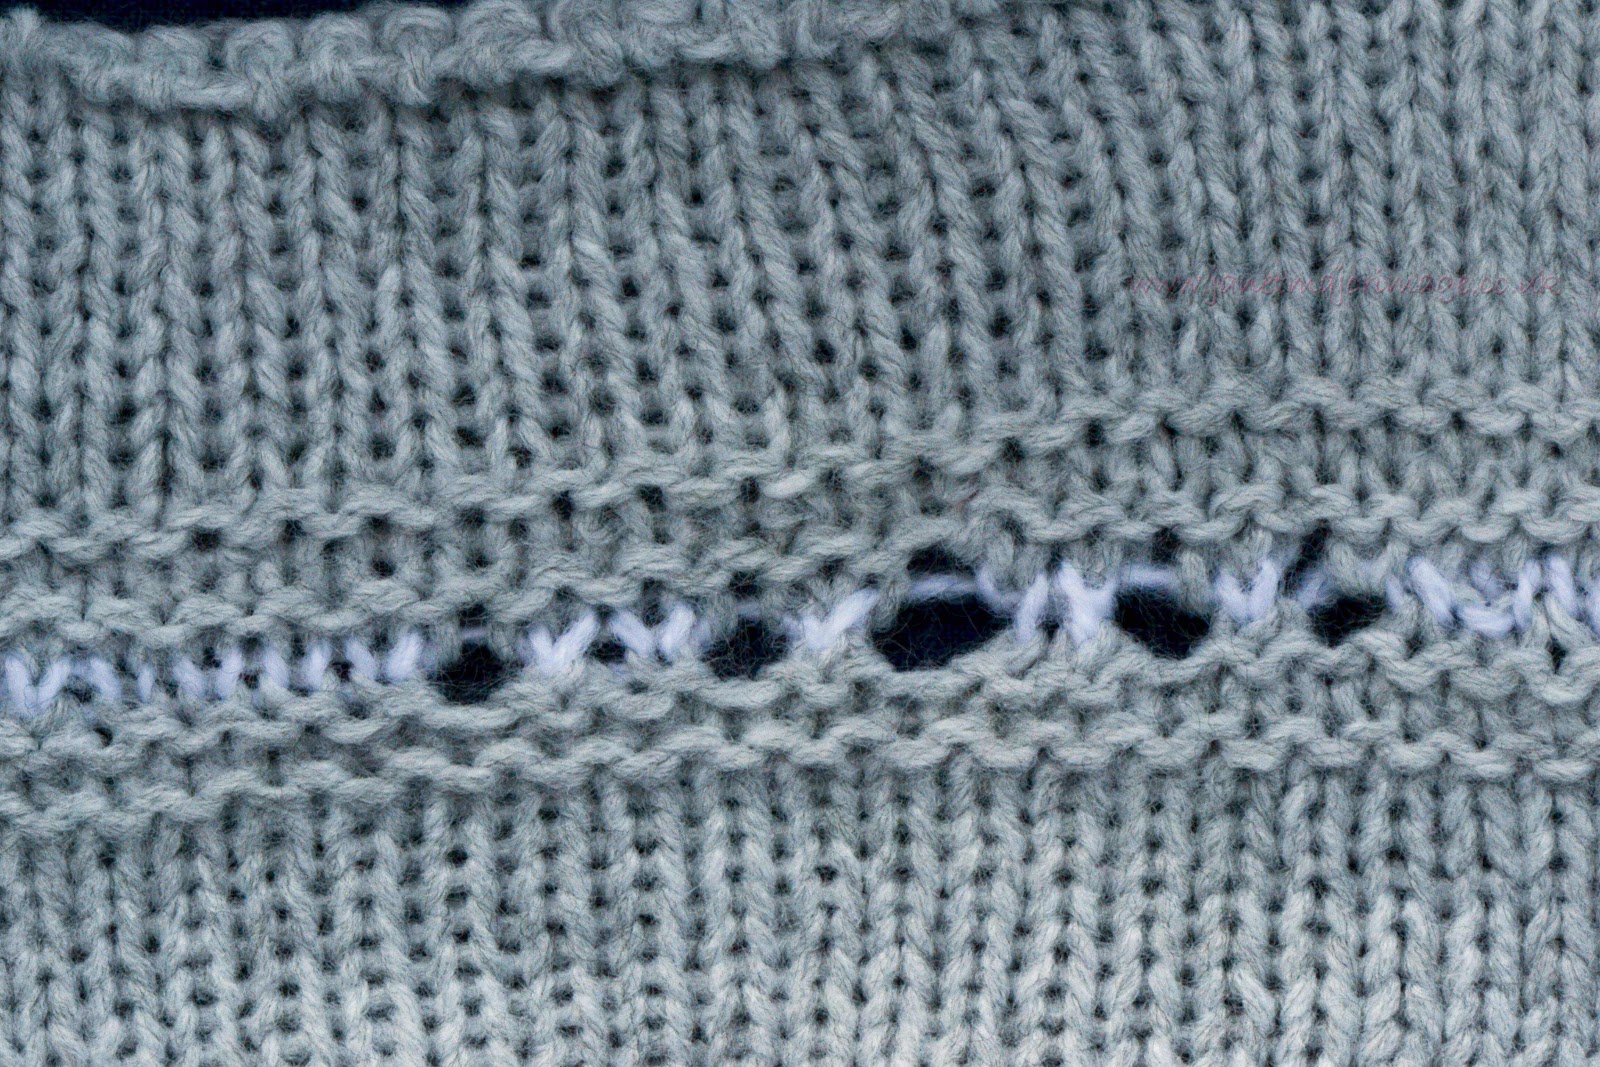
Hinnywaar graft, the narrowest section of the lace edging above the black pin and across to the left.


I was happy with what I had done but I knew I needed to have altered the pattern to give me 2 rows ‘room’ for grafting the pieces together and I could not do that once I had finished all the knitting, I only had one row. 

So I have chosen another Unst Heritage Shawl to Knit. This one is called the Burrafirth shawl and means a lot to me, given our love of the Norwick, Burrafirth and Hermaness areas of Unst. 


For grafting lace it seems to me there are 3 key things before you can think about starting: 

  • Knowing how to graft each lace stitch you will recreate on the front and  back needle
  • Finding 2 adjacent rows in the edging repeat that this will work for without too much difficulty 
  • Tweaking the pattern if necessary to ensure that these two rows are in the place where you need to do the graft. 


The lace grafting I have taught myself ‘makes’ 2 rows of lace during the grafting. 


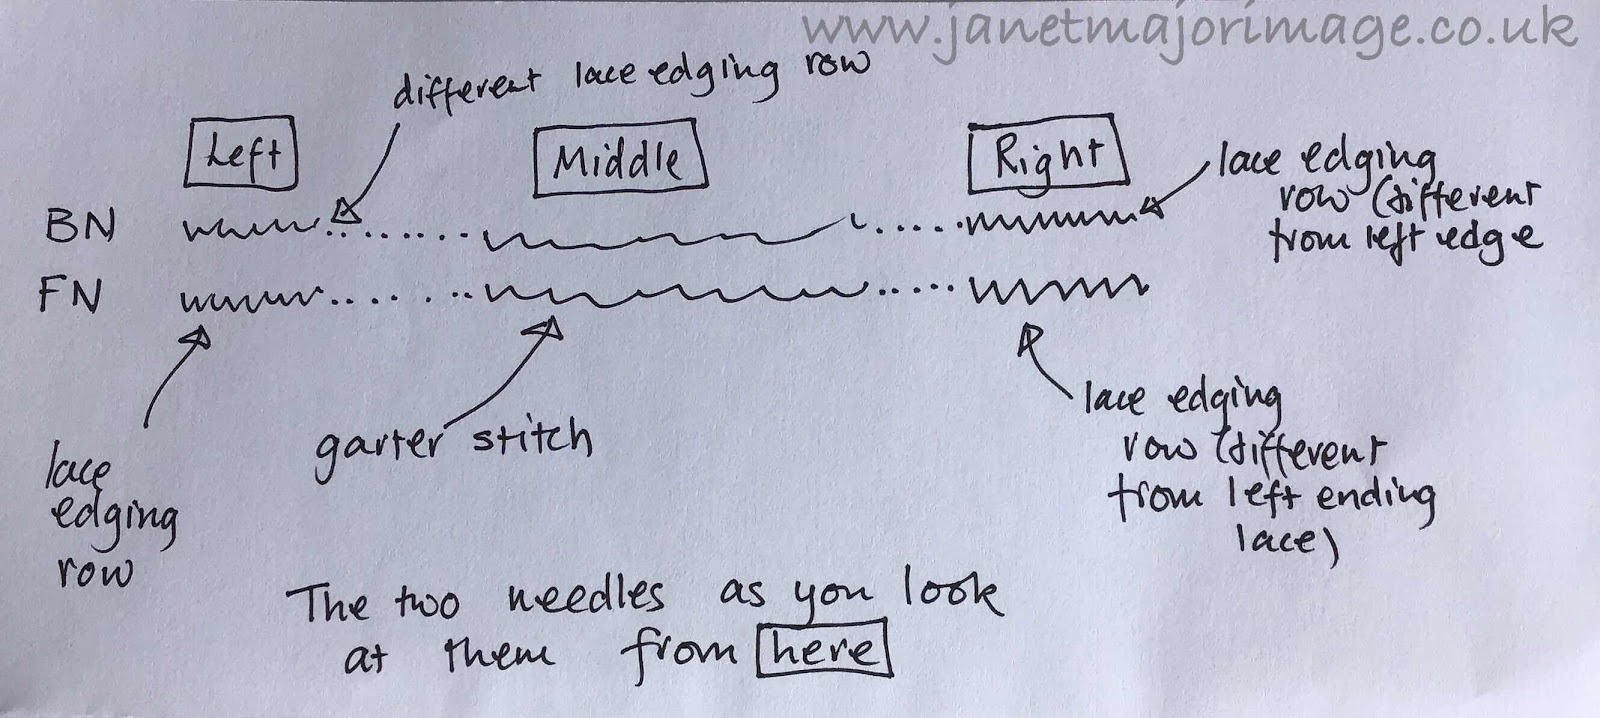
There is an added complication (or two or three) in the Shetland Lace (rectangular) Shawls I like to knit. Namely there is a centre block and usually some garter stitch rows bordering this where the grafting will occur, so straightforward! On either side of this block on  each row there will be a right lace edging row to graft which needs a matching row on the back needle and a different (from the right)  left lace edging row to graft for the front needle which also needs a matching row for the back needle. 

So counting the garter stitch graft as one sort of grafting pattern, there are 2 pairs that need to match themselves and to work in with the other two pairs of lace edging rows ! 3 different sorts of matching to get right besides the garter stitch to match garter stitch and not a row of lace holes for example! And of course this end that is grafted will need to match the end that was knitted. 

I will try and explain the above in a diagam. It is usually possible to work this out but it does need planning before you start knitting. 


Diagram of where matching needs to occur


So in the Burrafirth shawl I worked out that on the left hand side I could end the

Front needle on row 14 of the lace edging and end the corresponding section on the back needle on row 15. (Total pattern rows for one edging repeat is 16)

This looks as if I have nowhere to graft, however remember that the back needle holds the lace looking towards you as you are grafting ‘top to top’. 


Sketch of this. 


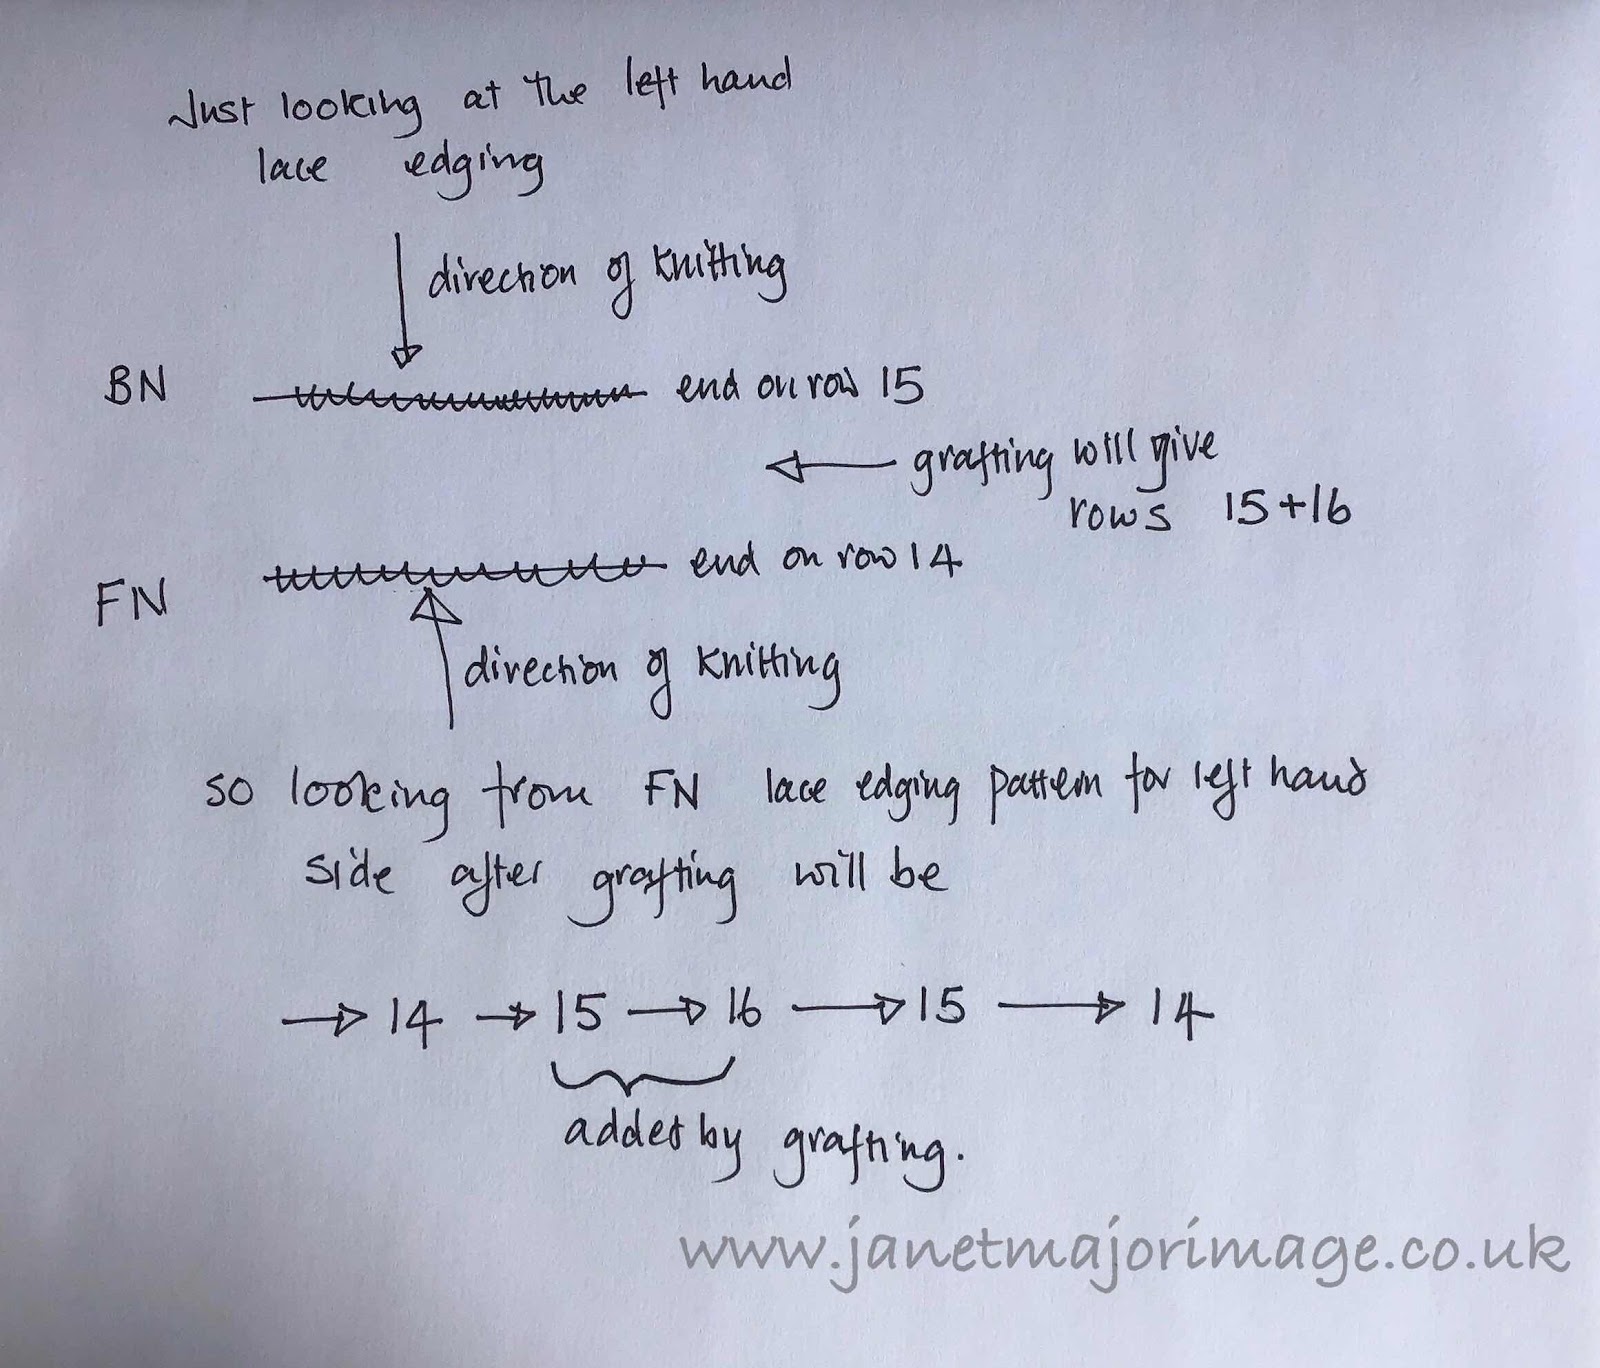
So holding the needles together I will graft row 15 coming out of the front needle and row 16 going into the back needle and the grafting should join up the lace edging seamlessly. 

Sketch


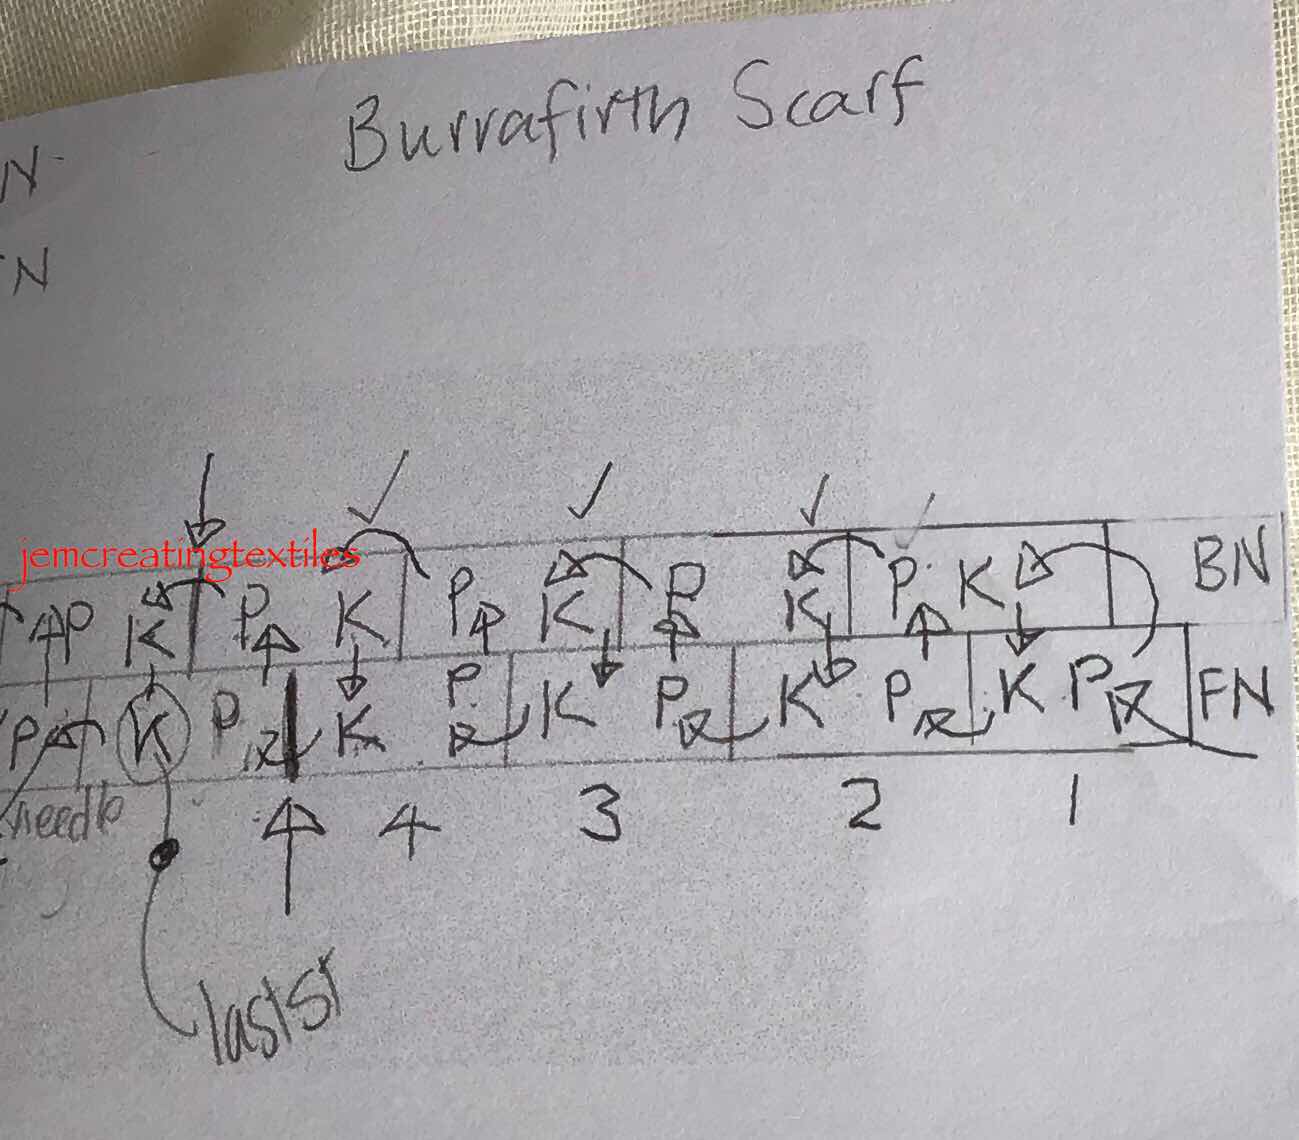
So using the system that Joni discusses I made a chart with a row for each row of knitting that I would recreate. Before you can do this you need to work out where the bumps of the garter stitch will be for each needle so you get each stitch on the front and back needle correct in the chart (4)

Each movement of my tapestry needle was added to this. 


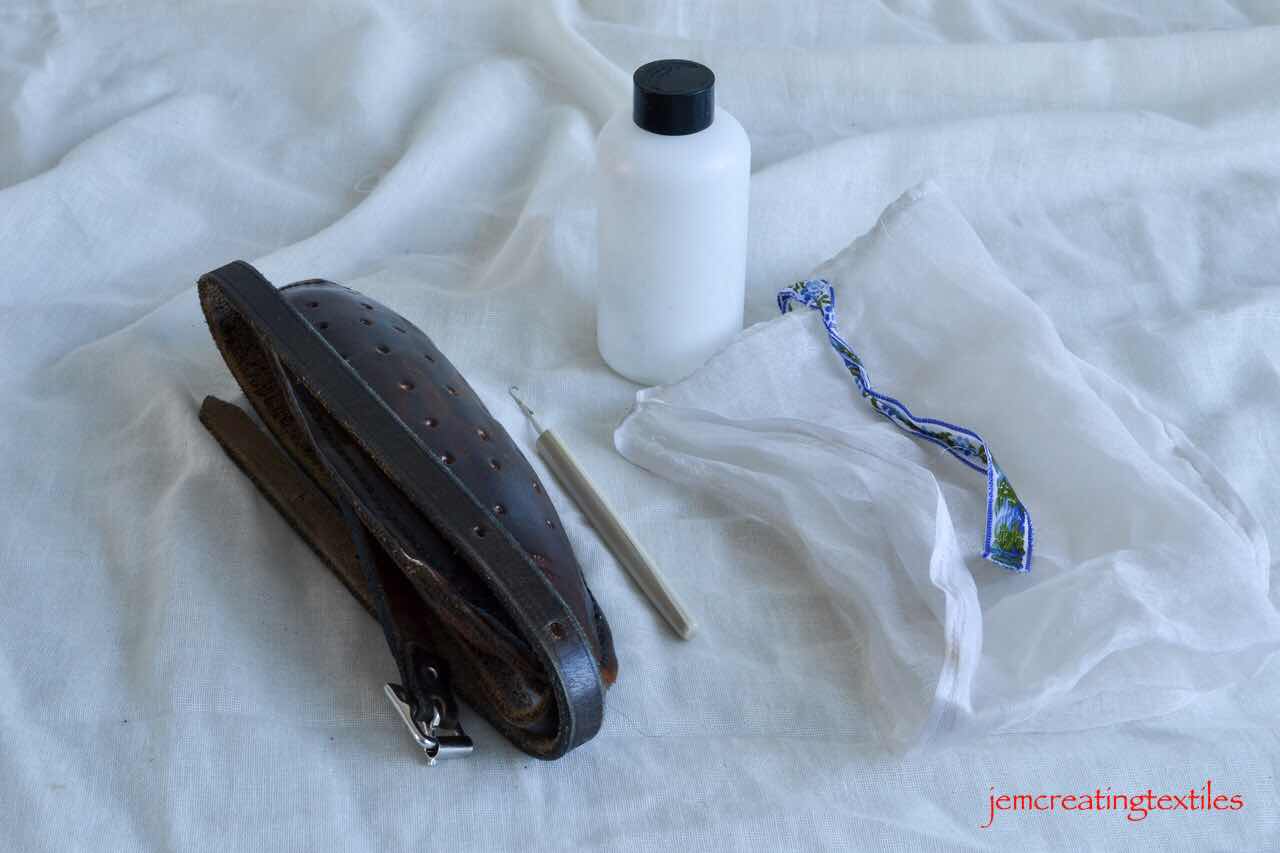
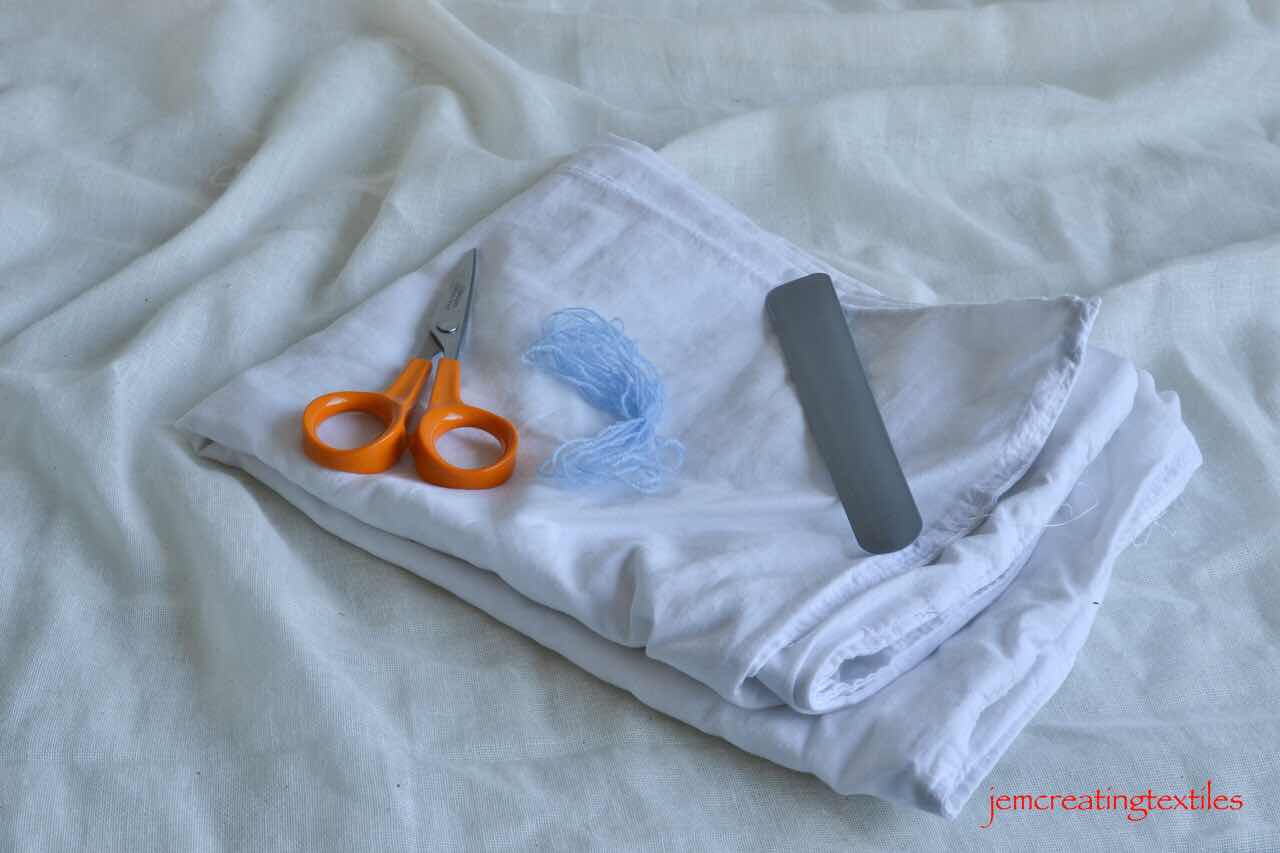
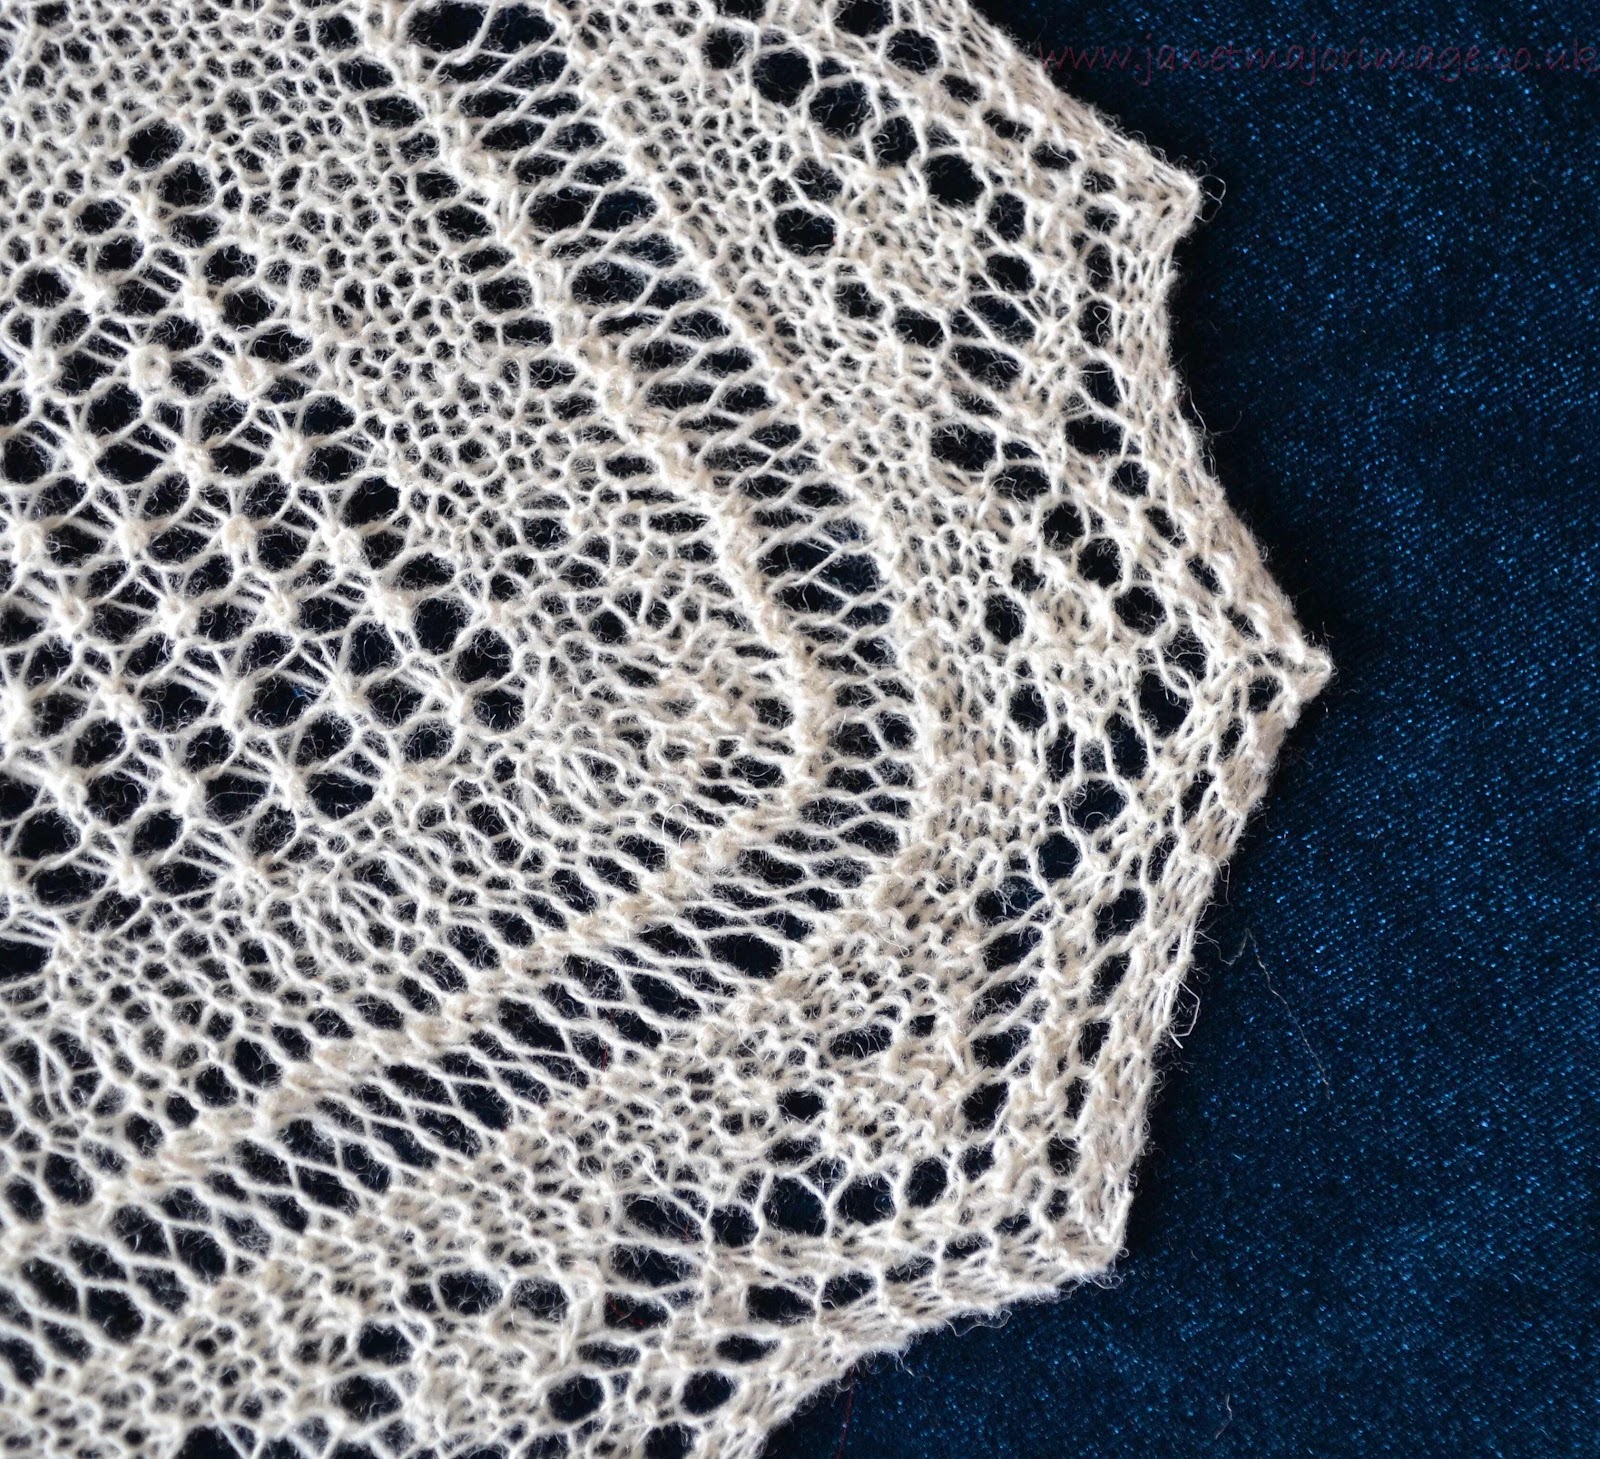
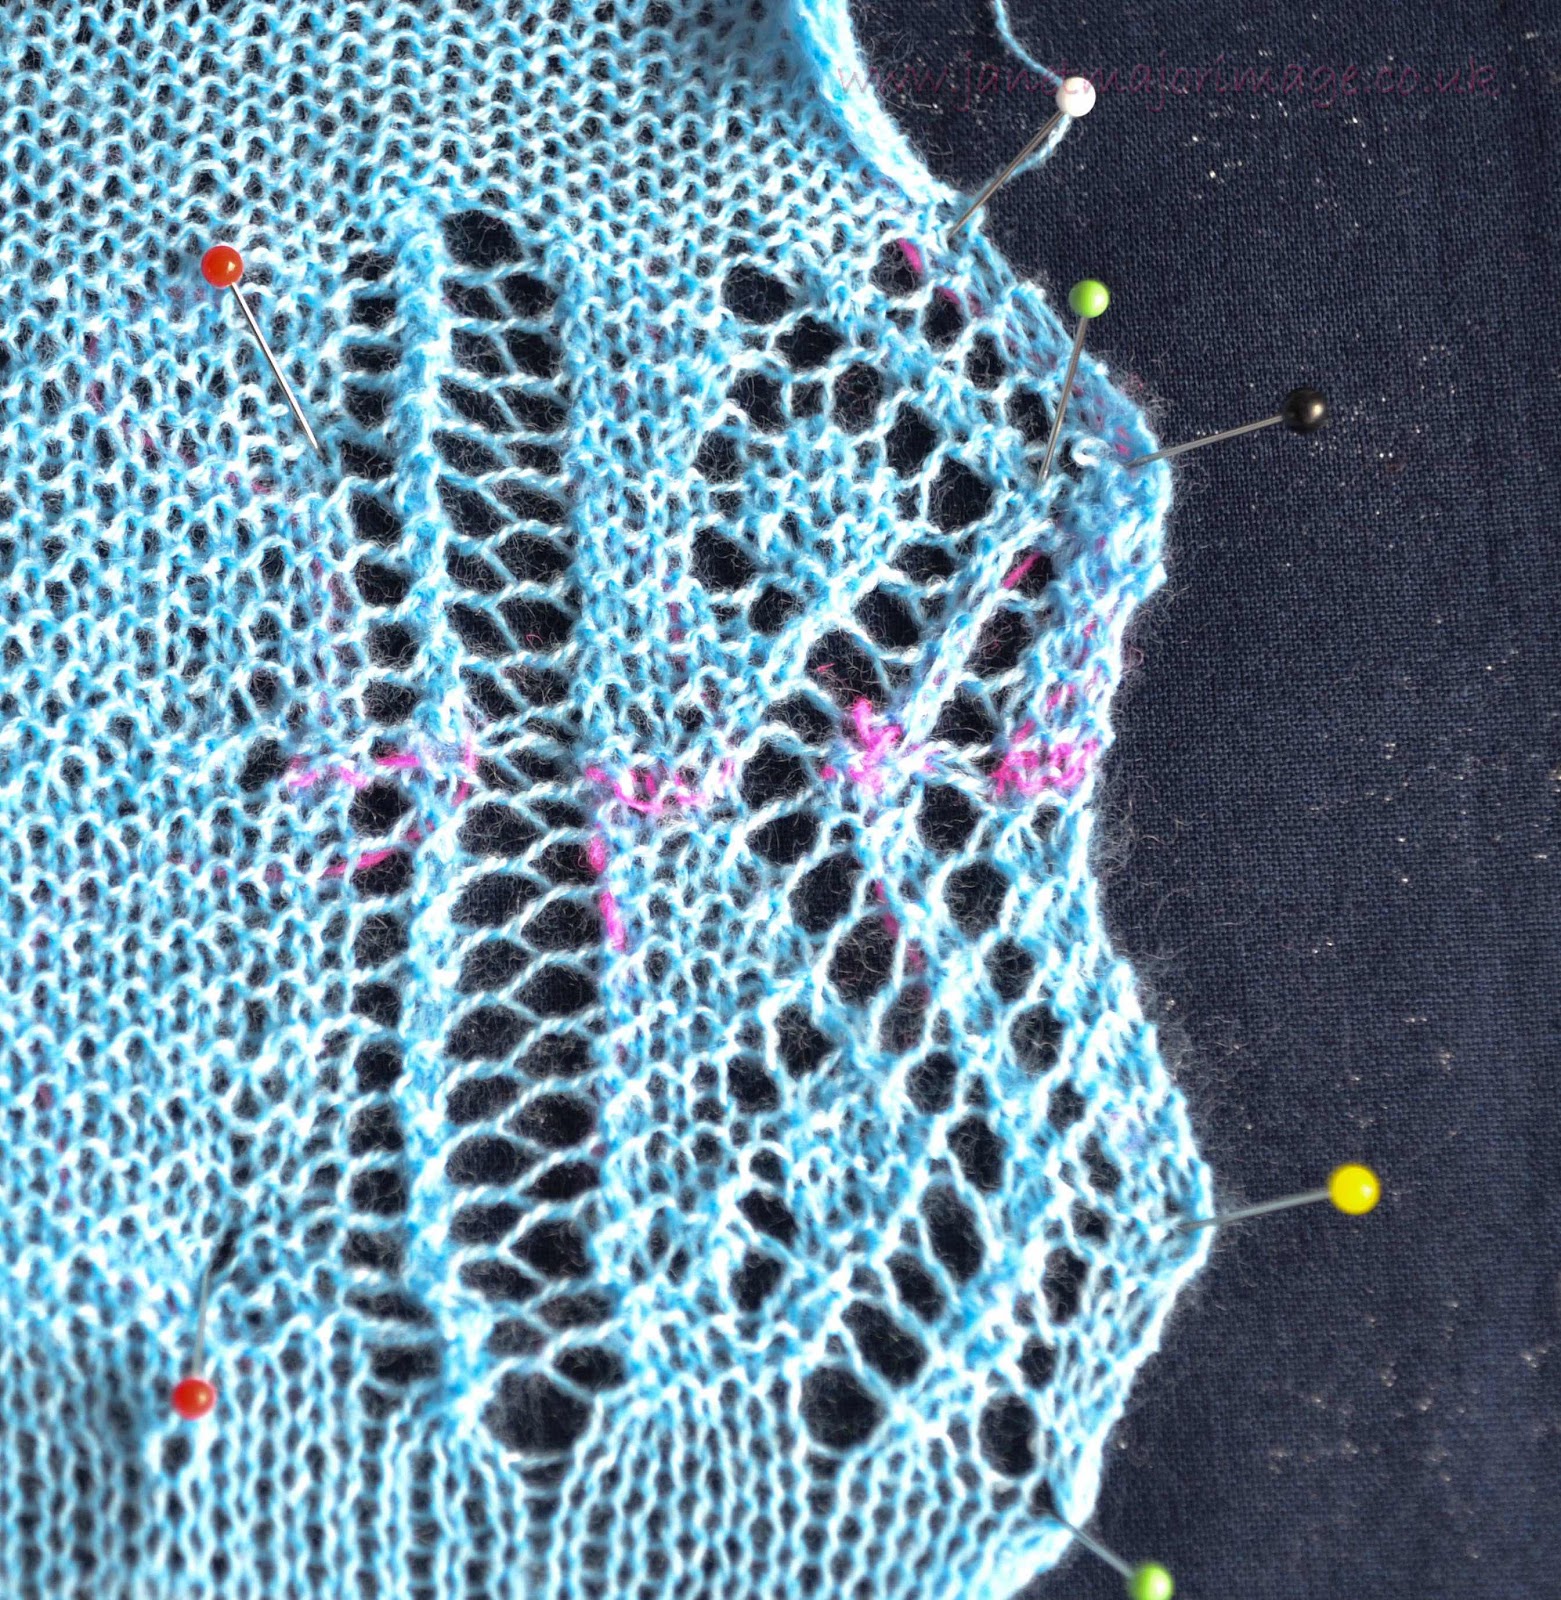
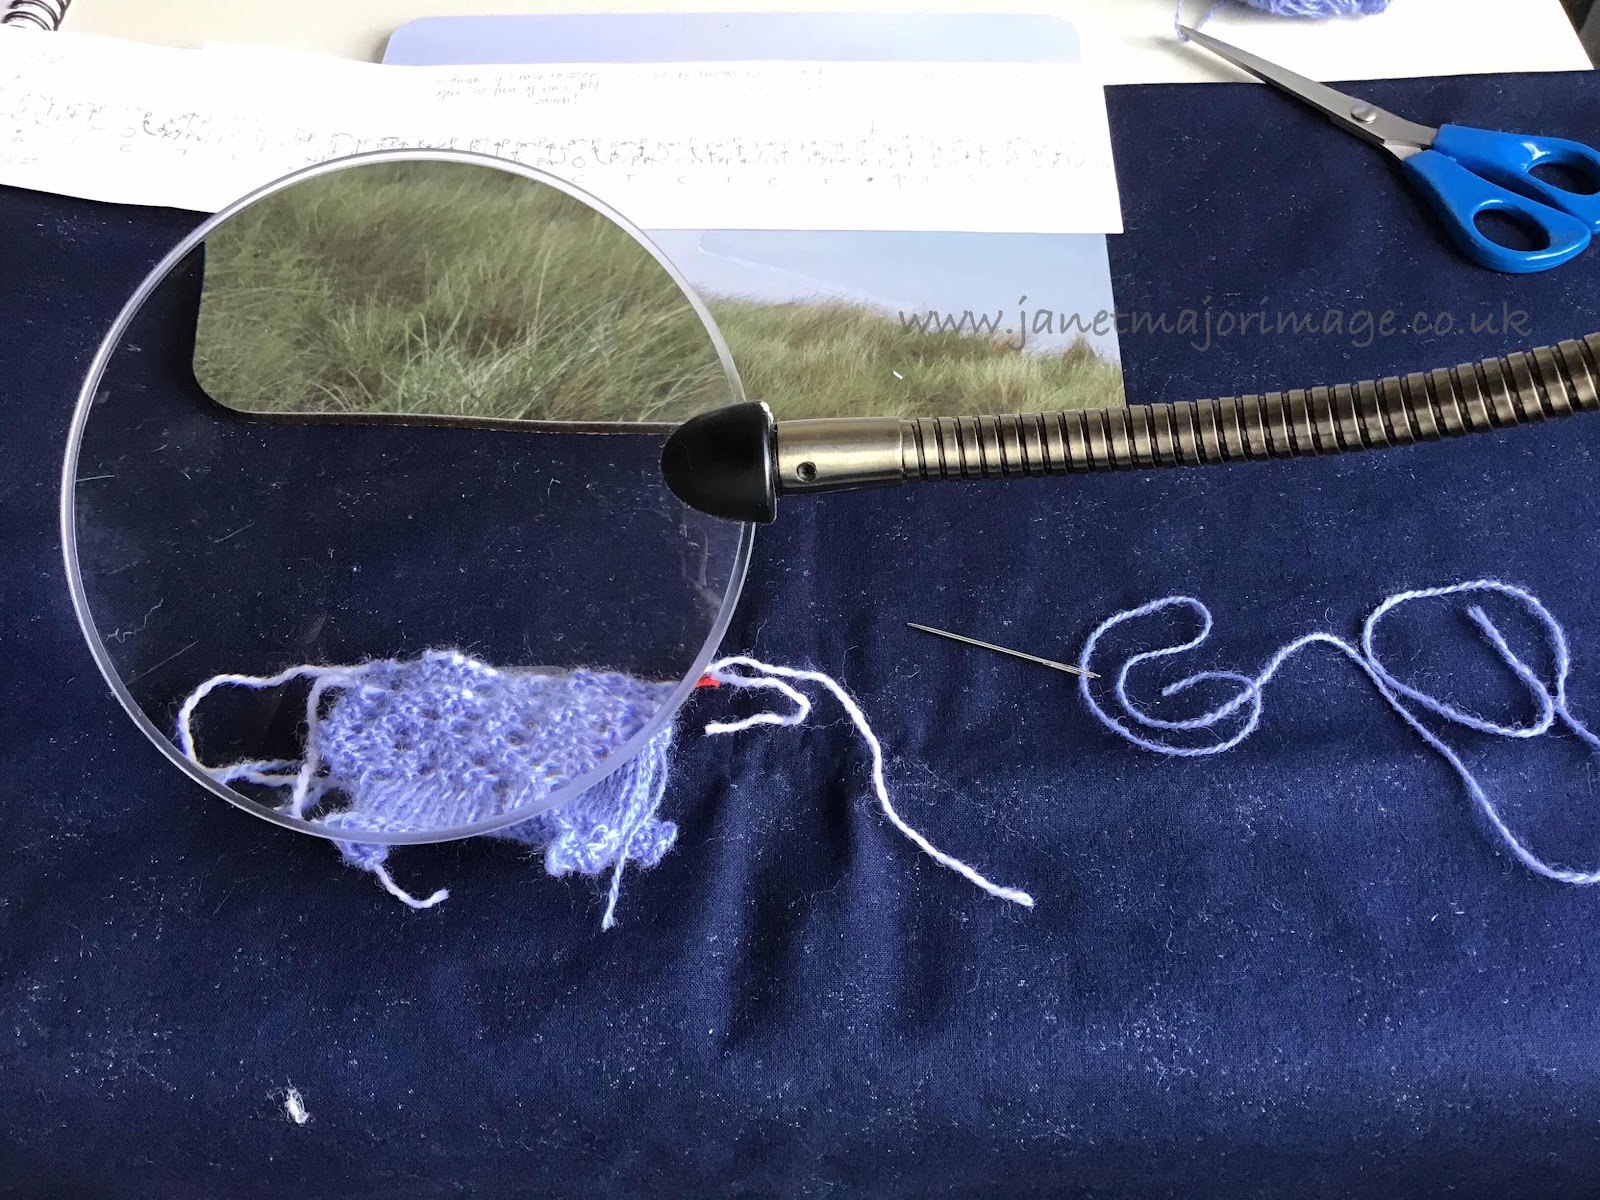
First of all I did a trial of the grafting stitches on a piece of plain knitting, to remind myself of doing yarn overs and K2tog during grafting. 


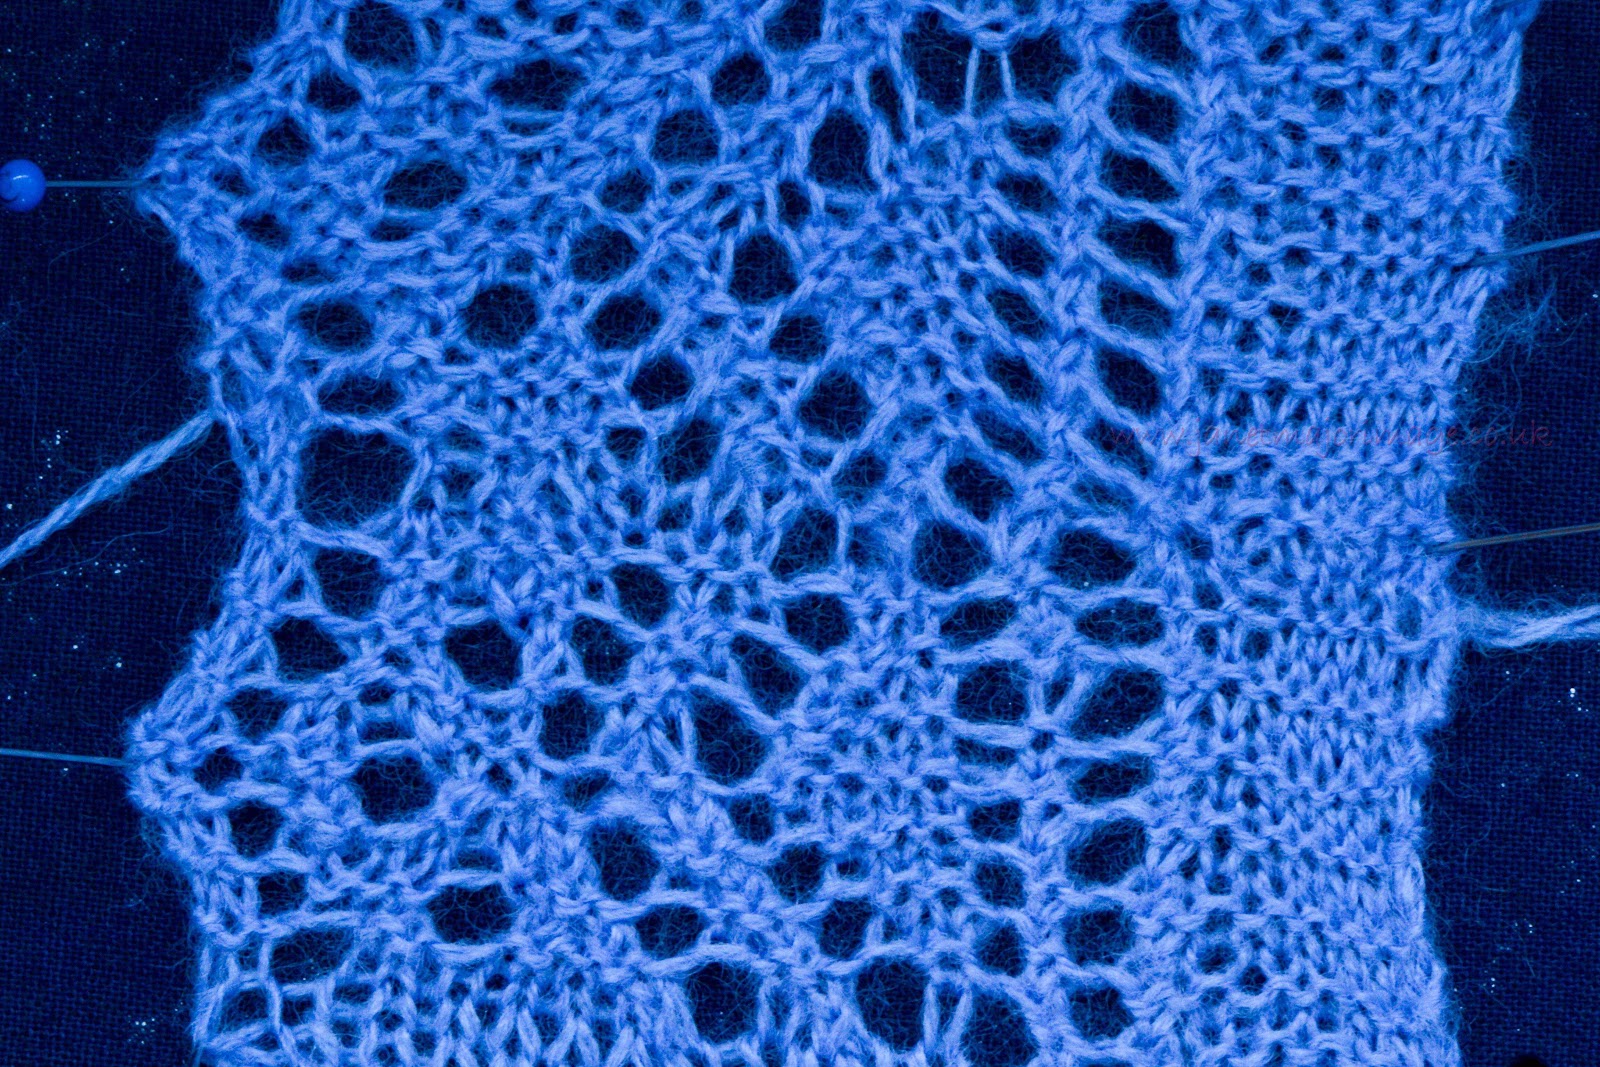
Then I moved over to 2 trial edge pieces for the left hand side. 


Preparing for grafting- you can see my custom chart at the back, this is just for this left edging graft. 

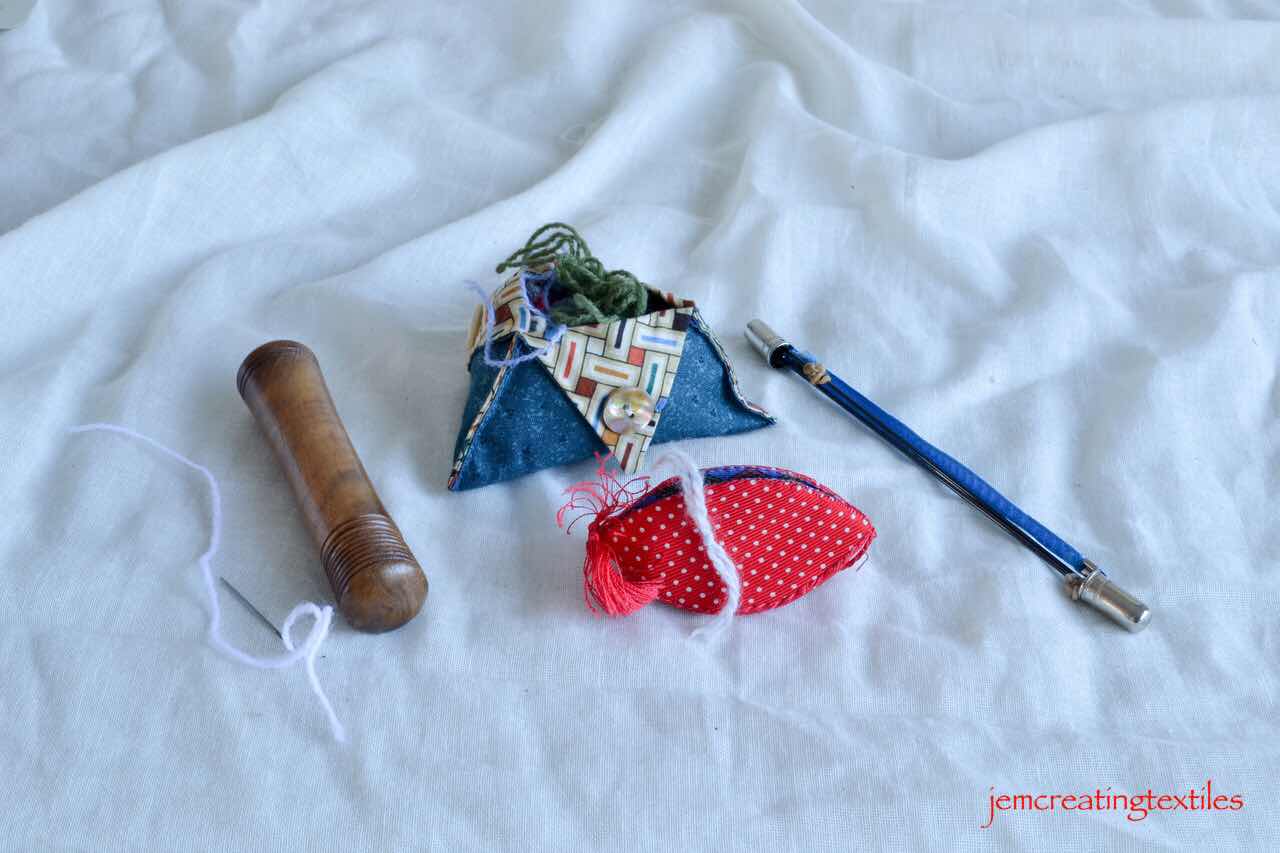
( Before I started I replaced the needles by thick yarn which I find more manageable than the needles when such concentration is needed) 


I ticked off each movement of the tapestry needle as I made it. 

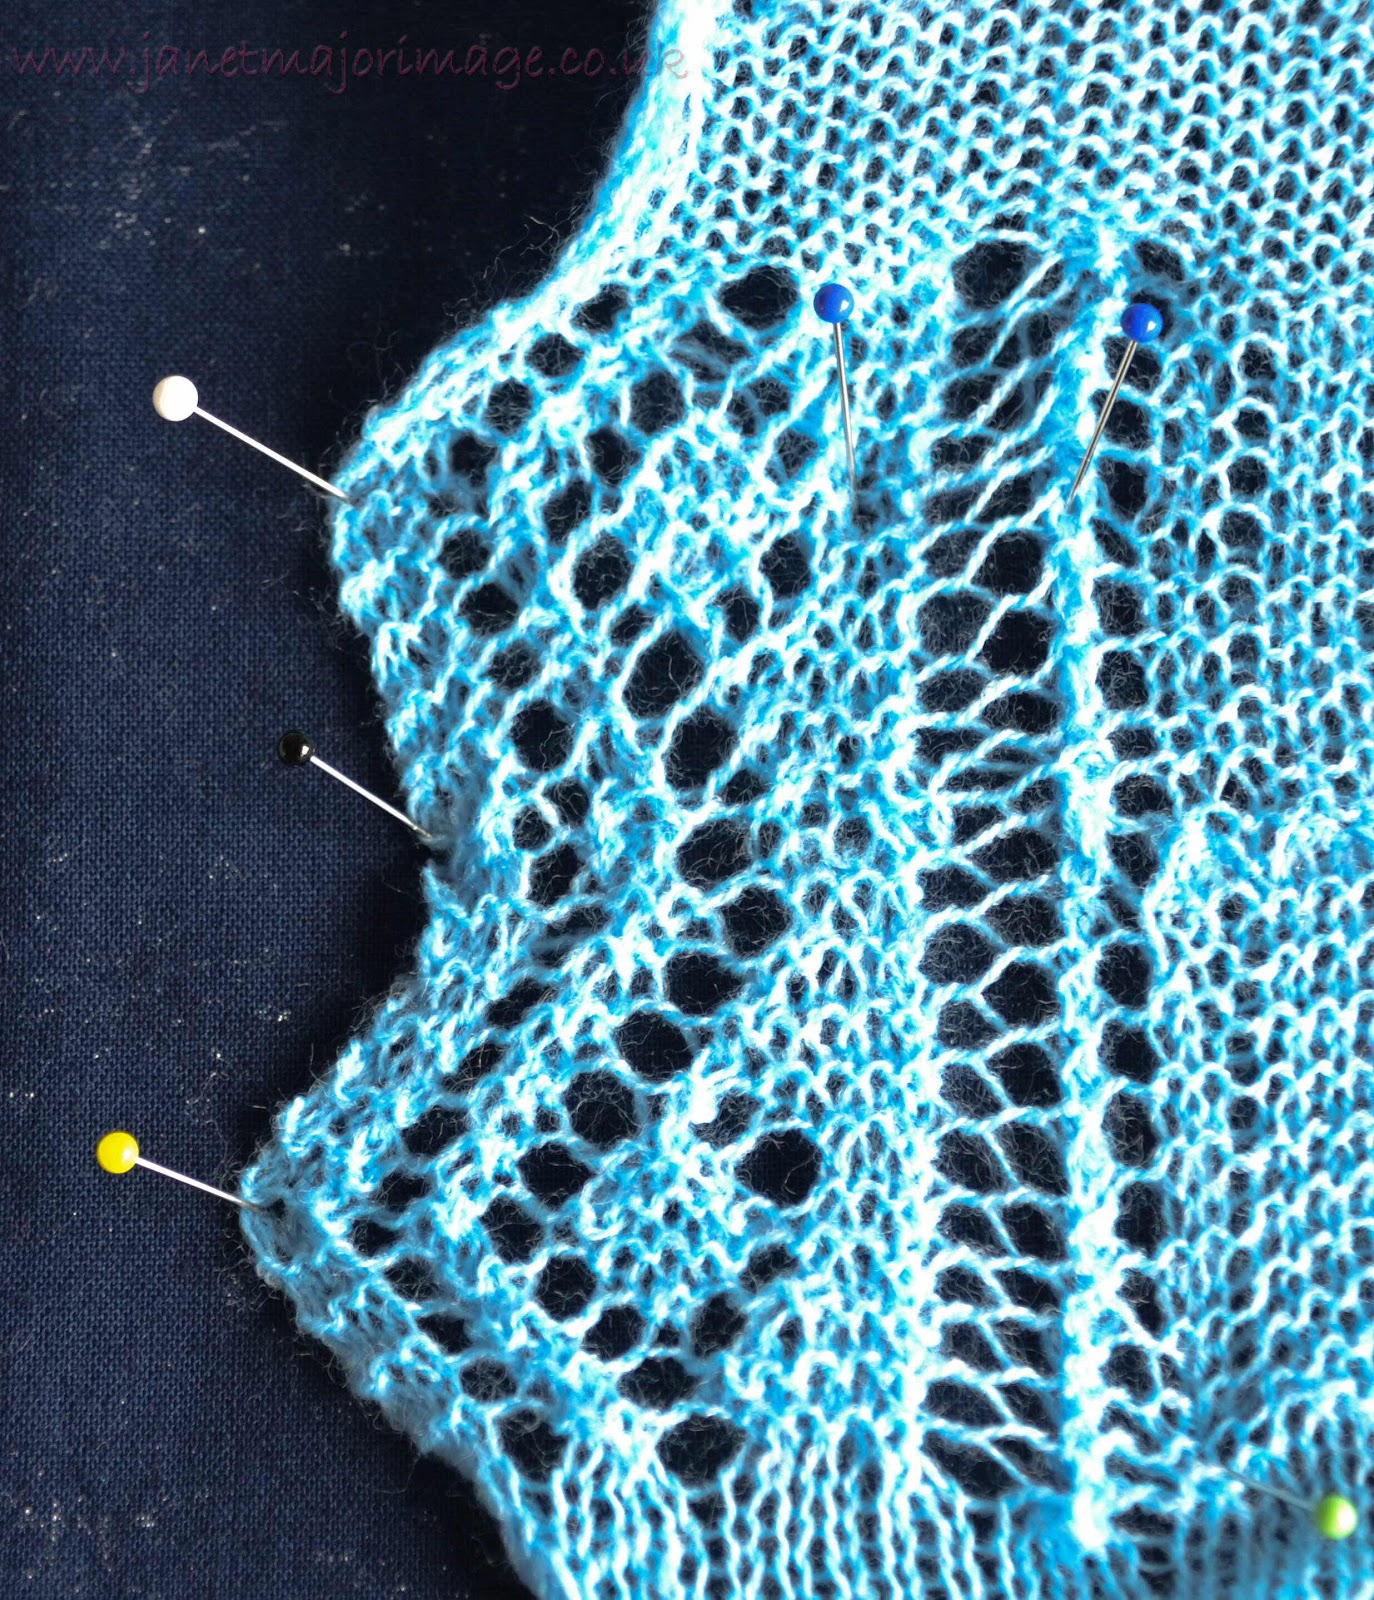
This is the result and I am pretty pleased with it. The fagoting worked fine. It is not completely error free, I split the yarn in one or two places in the garter stitch lead in on the right for example) 

I have left the yarn tails on the right start and left end so can you plot the line across. 

I hope this is helpful and all makes sense. 


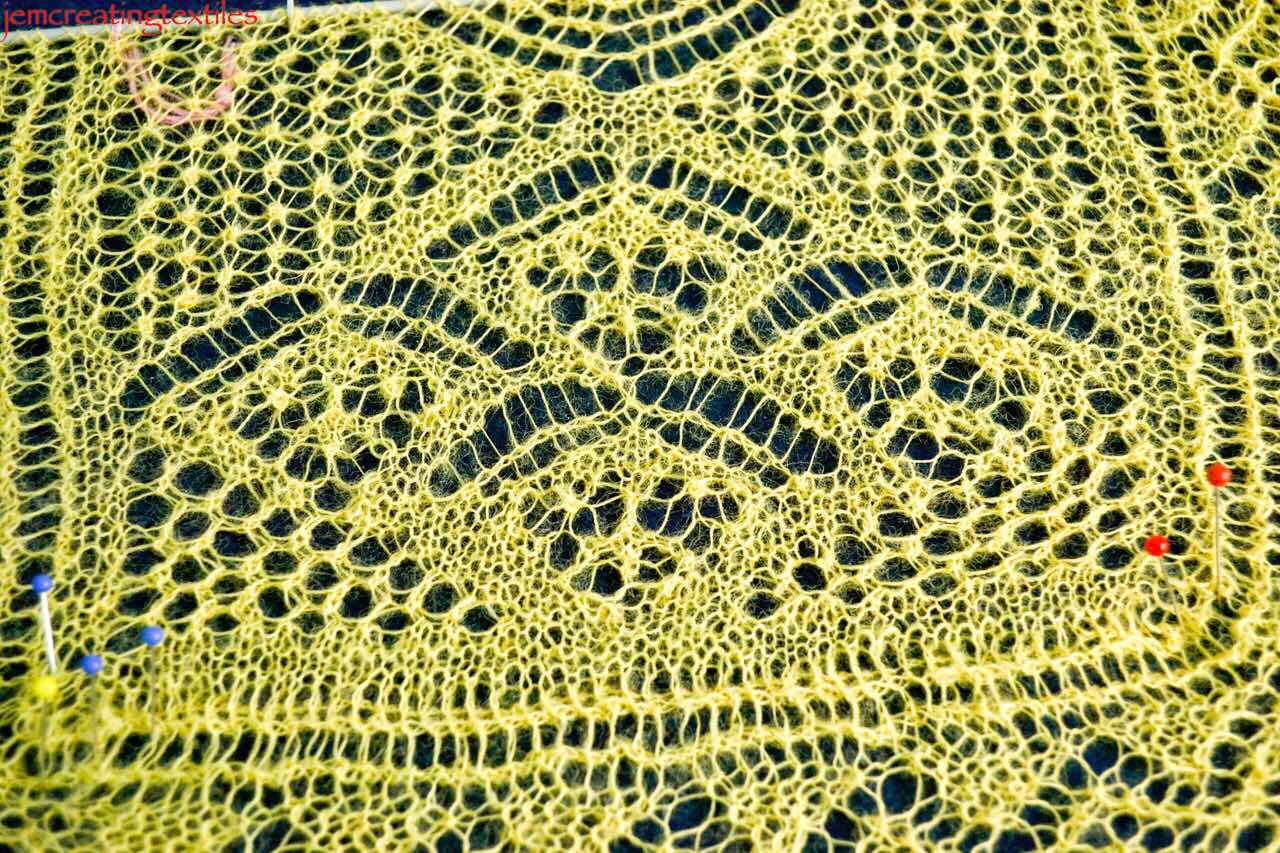
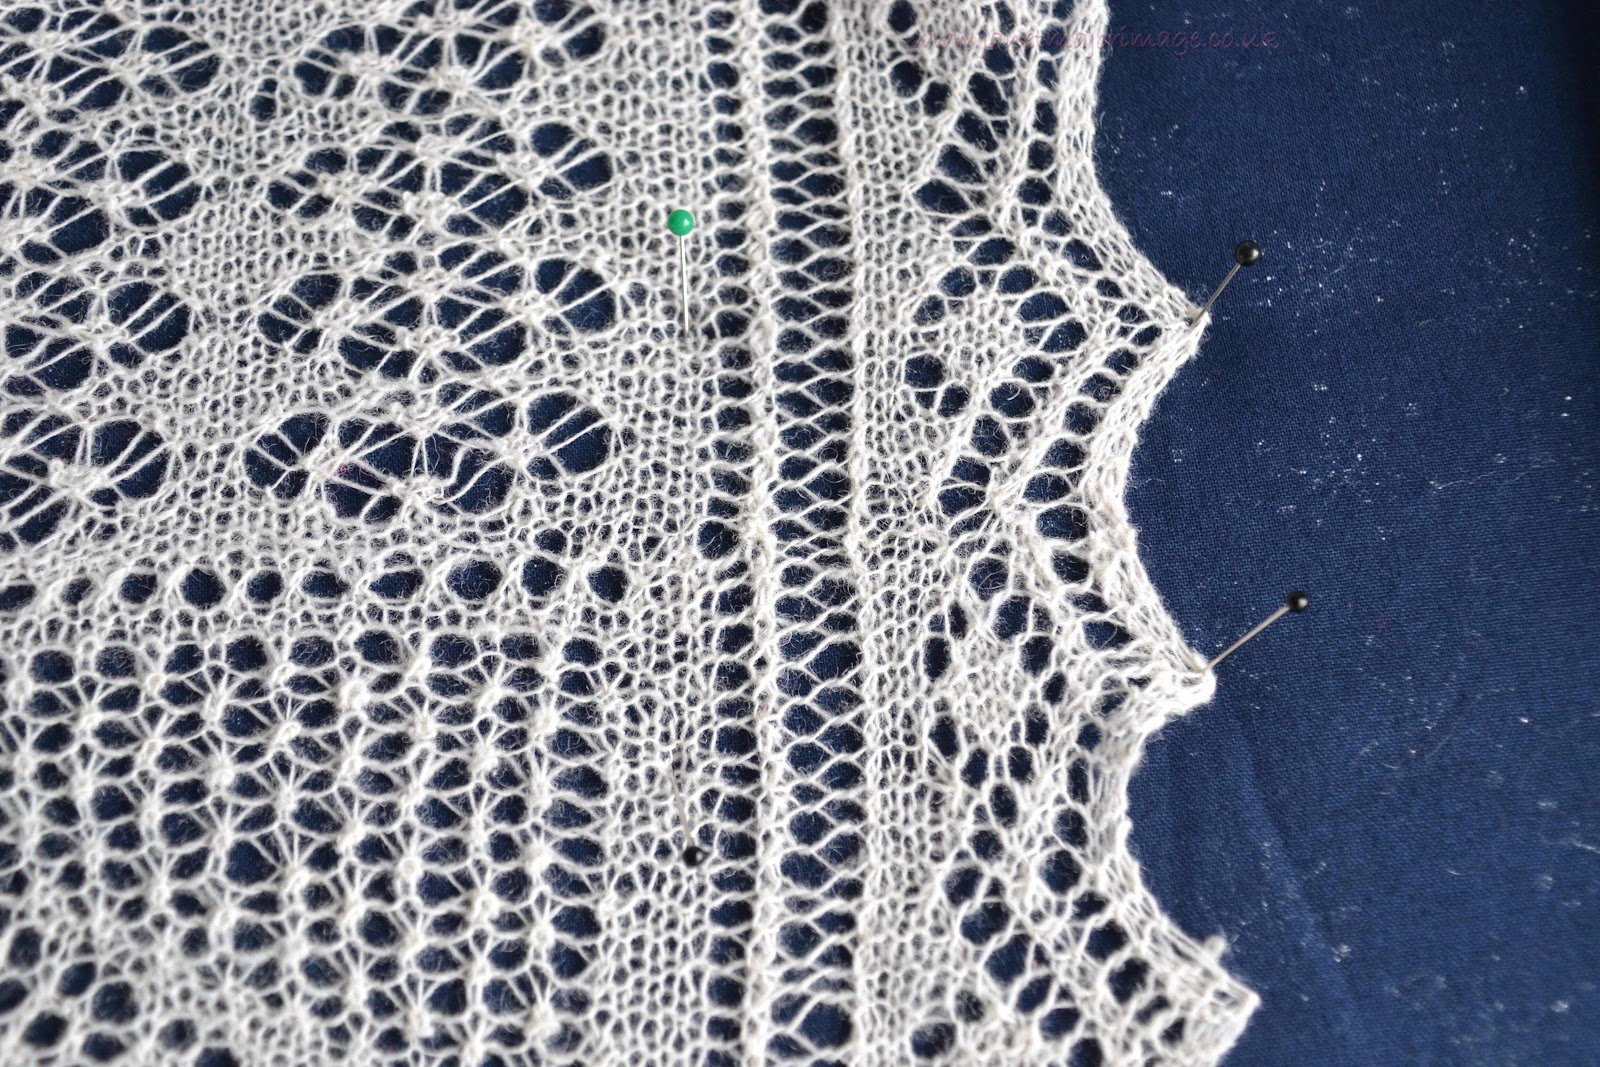
Enlarged image of the grafting 


With many thanks to Joni Coniglio for giving me the confidence to do this and take my grafting of Fine Shetland Lace to a higher level. 


The best advice to anyone is to look  at the whole pattern before you think about knitting it. As important to me as the knitting is, is there a graft, if so is this graft doable to my standards? (At this stage I might knit a sample to try the graft. )  If I am not happy with the graft, then can I tweak the pattern to enable me to enjoy knitting it, enjoy finishing it and then enjoy wearing it. 


  1. 50 tips from Shetland Knitters by Elizabeth Johnston and Hazel Tindall. 2 DVDs. Available from Hazel Tindall’s website or from Shetland Times. My go to first resource for knitting expertise on techniques. 
  2. Some rectangular Shetland Shawls can be knit straight through with no grafting.Some have an edging where the bottom edge is knitted first, then the stitches are picked up from a long edge and knitted along the length of the shawl with an edging knitted separately at the end and the only graft is across the width of the lace edging as the last stage. Some Shetland rectangular shawls have a graft across the centre and some have the graft across the width about a third of the way from one end. The Unst series of Shawls I am talking about, follow this  latter pattern. 
  3. Joni Coniglio . The complete set of Videos ‘The Definitive Guide to Grafting’ Parts 1-3 video Download and also an e book from Interweave. I highly recommend these, but they do not just give the ‘answers’ but rather teach you to work out what you need to do yourself. Time is needed to get the best out of these, in my mind, excellent resources.
  4. You need to establish where the the bumps need to be formed during grafting by looking to check you maintain the pattern as it will determine whether you form ‘knit’ or ‘purl’ stitches during your grafting. 


Thursday 30 July 2020

Woad


2 days of chemistry, that I was very much looking forward too. I hadn’t dyed with woad for some time - actually 2005 when I looked it up. This year 3 plants germinated, low germination rate but they grew well and have grown brilliantly since being put out in the garden. 

I thought it was about time to do some dyeing with them. The first day was a long day as I needed to find some suitable yarn, make up skeins etc. I knew the method I was going to follow, having read endless books about it. I worked on one of Jill Godwin’s methods, and scaled it down to something I thought realistic as a trial. It was a long day and the skeins were very pale. Initially I was only dyeing one 5g skein so overload of the Vat was not the problem. I couldn’t see anything was amiss, I got an amazing dark ‘sherry’ colour when I had squeezed the woad out as hard as I could. 

I read the books again , Cardon (1) as usual being the best for confirming the process and explaining why each stage is needed. 

Not enough dye material I thought so I increased that the second day by about seven times! The result is better, whether it is 7 times deeper  in the scale of woad depth is questionable. 


It is incredibly hard to get the tones spot on in a photo! 

I am pleased the dyeing is so even. (2)

I can imagine any of the colours in delicate Shetland shawls but to be honest I would rather dye with indigo where I feel I am in control of the colour and spend the other day and a half knitting, working on a fine lace shawl, whether it be spinning or knitting. I am  very much a natural dyer  but, and I know this will upset some, woad is my least favourite dye. I know why it is 15 years since I nurtured the plants, extracted the dye and dyed with woad. 


Notes

  1. By ‘Cardon’ I mean Natural Dyes by Dominique Cardon. Often copied by other dye books and Natural  Dyers, not all who give credit to her! 
  2. The white flecks in some of the yarn are in a yarn labelled as 70% lambswool 20% angora 10% nylon. I think the nylon must be another man made fibre as nylon should dye as wool. It reminds me of the silk, which turned out not to be silk when I got the microscope on the fibres. (post of 1June20) Is this poor labelling (the polite way to put it) common in mixed yarns? 

Sunday 26 July 2020

Hinnywaar Shawl and Grafting


I have been knitting the Hinnywaar Shawl, a pattern by Hazel Laurenson from Unst Heritage Centre. I bought this from the Heritage Centre  in 2018 I think. I knitted it in Jamieson and Smith Cobweb yarn using 2.5mm needles. I used 2 balls. I knitted it using a knitting belt. Blocked size is 155cm x 30 cm Mass is 43g (1.5oz). The pattern suggests Jamieson and Smith Shetland  Supreme but I used that for my last shawl and fancied a change. (Also I had this yarn already.) 


I have enjoyed knitting it a lot, especially as it reminds me of Unst and knitting and spinning with the ladies there, many of whom I have seen each year we have visited. 


I very much like how the corners ‘work’ 


It is constructed by knitting the bottom lace, picking up the stitches turning the two corners and then knitting up to the end of the first border. Each row has a different lace edging row ! This is left on a needle and then the above is repeated and the centre worked.  Then the two pieces are grafted. 


As I came towards the end thoughts turned to grafting. The middle section would be grated in garter stitch and other than doing a trial run to check I could still make a good job of this, that seemed fine. But grafting each edging was a different matter. There was the edging lace on each side and also lace faggoting with interlocking stitches. The  grafting I knew would not make these merge seamlessly and so would not be invisible. 

The graft is to go at the equivalent horizontal narrowest part of the lace shown in this image. 


The pattern just said join by grafting. 

Grafting was on my mind last Sept and I made a particular point of looking for grafting  wherever it was. I then studied the grafting of all the pieces of lace I saw during Shetland Wool Week. But the shawl I was knitting was at an early stage then and so I hadn’t really thought about grafting that. I was more interested then in the relative advantages and disadvantages of grafting mitred shawl edgings by knitting up or sewing and had discussions about this sort of grafting. 

I have become increasingly aware, having now completed the knitting of the Hinnywaar  Shawl of grafting across oblong shawls. It is good to see this in completed shawls in my different online lace knitting groups and also interesting to hear people say they are unhappy with their grafting or show their fine handiwork without the grafting showing. Clearly I am not the only fine lace knitter who would like to confidently graft a shawl that didn’t have the edging ‘interrupted ‘ by grafting and hence in my mind ‘draw my eye to it’. 

I have spent many hours/ days on this now trying to get my head round grafting this. (I am in the middle of a study of this and will post more about it as I continue to learn A LOT more! ) I changed where I ended the two pieces of the Hinnywaar Shawl and then realised as I adjusted the shawl to get the garter stitch correct for the grafting, the two edge pieces ended differently and hence I was on my own in unknown territory. 


So being a practical person I knitted two samples in similar yarn and set about doing my best with a different colour yarn to see what the grafting  looked like. I changed to the same colour for the garter stitch and then did the left hand edge in this yarn too. 

Right edge in contrasting yarn 


Left edge in identical yarn to knitting, improving 


I learnt a lot from this and worked out what I would do to work for me with this. As I learned more about grafting I realised I could have altered the pattern slightly before I started knitting any of it! (1)


I got the shawl ready for blocking and am really pleased with the whole shawl. Can you spot where I grafted it in the photo of me wearing it?I am pleased with  what I did but I know that this is not absolutely perfect. To me the join does not shout out however. 

Being very brave here and posting a close up of the actual graft


Still not perfect, but I know what the problem is with grafting the faggoting.


So I have achieved my aim but as this took me a whole day with a large magnifying lens in a stand and my strong reading glasses I cannot say I look forward to doing it again. I know it was my best effort but it is not perfect. It cannot be what other fine lace shawl knitters do! 

After I had done this I had another thought, and am surprised it didn’t occur to me before. I would look in ‘A Legacy of Shetland Lace’ by  Shetland Guild of Spinners, Weavers and Dyers. It is a wonderful book from real experts in the field. I hope you have the book to see the variety of grafting and  non grafting methods used in those shawls. Non of them has told me exactly what I wanted to know however. 


I am still on my grafting journey, learning more each day and will post more when my brain had processed it.  I just need to find a few hours to sit down and get  to the right stage in another knitted trial and do the grafting again. I will then do another more technical post. 


What are your thoughts and experiences of this type of grafting ? 


  1. I do a lot of knitting and sewing  and my advice to myself is: ‘know how you are going to finish an item before you start’....why did I not follow that advice here! 


Saturday 25 July 2020

Deep Coast


A couple of days ago we took ourselves to one of our (many) favourite places, a beach in Norfolk’s  Deep History coast which is a prehistory delight. 


We were there early and it wasn’t very busy! 

We were blessed with glorious weather which made the day. It is a special part of the world, ten thousand years  ago we would have been standing, not admiring the glorious blue sea and big sky but looking at land - grassland, scrub and marshland. There was no sea, but a land link with the rest of Europe. There would have been mammoth, rhino, hippos and our earliest ancestors would have used local flint, still common  today, to make tools for hunting. 


Nowadays the coast is subject to much erosion and it is this that has made the area so fascinating and so important.  


Previous sea defences I guess, such wonderful colours in the rust.


An eroding cliff, , with thousands of years of history sliced through.


In 2014  850,000 year old footprints of early man  were found, the oldest in the world out of Africa. As if that were not enough the most complete mammoth’s skeleton ever discovered was retrieved from the cliffs after a particularly bad storm. 


The footprints were found in something like this! 


These are just two of the reasons why, to me, it feels such a special place to be. I am pleased that it is now beginning to get the recognition nationally that it deserves. This is on top of having great beaches. I hope these photos give you a feel for this fascinating area.